D-Link DNS-1250-04 Acronis Backup Software User Manual for DNS-1250-04 - Page 106
Disk management, Where to recover
 |
View all D-Link DNS-1250-04 manuals
Add to My Manuals
Save this manual to your list of manuals |
Page 106 highlights
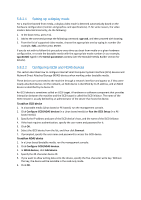
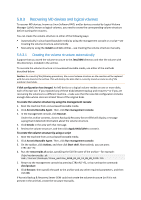
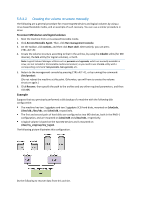
Step 1: Creating the volume structure 1. Boot the machine from a Linux-based bootable media. 2. In the management console, press CTRL+ALT+F2. 3. Run the following commands to create the MD devices: mdadm --create /dev/md0 --level=1 --raid-devices=2 /dev/sd[ab] mdadm --create /dev/md1 --level=1 --raid-devices=2 /dev/sd[cd] 4. Run the following commands to create the logical volume group: Caution: The pvcreate command destroys all data on the /dev/md0 and /dev/md1 devices. lvm pvcreate /dev/md0 /dev/md1 lvm vgcreate my_volgroup /dev/md0 /dev/md1 lvm vgdisplay The output of the lvm vgdisplay command will contain lines similar to the following: --- Volume group --- VG Name my_volgroup ... VG Access read/write VG Status resizable ... VG Size 1.99 GB ... VG UUID 0qoQ4l-Vk7W-yDG3-uF1l-Q2AL-C0z0-vMeACu 5. Run the following command to create the logical volume; in the -L parameter, specify the size given by VG Size: lvm lvcreate -L1.99G --name my_logvol my_volgroup 6. Activate the volume group by running the following command: lvm vgchange -a y my_volgroup 7. Press CTRL+ALT+F1 to return to the management console. Step 2: Starting the recovery 1. In the management console, click Recover. 2. In Archive, click Change and then specify the name of the archive. 3. In Backup, click Change and then select the backup from which you want to recover data. 4. In Data type, select Volumes. 5. In Items to recover, select the check box next to my_volgroup-my_logvol. 6. Under Where to recover, click Change, and then select the logical volume that you created in Step 1. Click the chevron buttons to expand the list of disks. 7. Click OK to start the recovery. 5.9 Disk management Acronis Disk Director Lite is a tool for preparing a machine disk/volume configuration for recovering the volume images saved by the Acronis Backup & Recovery Server OEM software. Sometimes after the volume has been backed up and its image placed into a safe storage, the machine disk configuration might change due to a HDD replacement or hardware loss. In such case with the help of Acronis Disk Director Lite, the user has the possibility to recreate the necessary disk configuration so that the volume image can be recovered exactly "as it was" or with any alteration of the disk or volume structure the user might consider necessary.
-
 1
1 -
2
-
3
-
4
-
5
-
6
-
7
-
8
-
9
-
10
-
11
-
12
-
13
-
14
-
15
-
16
-
17
-
18
-
19
-
20
-
21
-
22
-
23
-
24
-
25
-
26
-
27
-
28
-
29
-
30
-
31
-
32
-
33
-
34
-
35
-
36
-
37
-
38
-
39
-
40
-
41
-
42
-
43
-
44
-
45
-
46
-
47
-
48
-
49
-
50
-
51
-
52
-
53
-
54
-
55
-
56
-
57
-
58
-
59
-
60
-
61
-
62
-
63
-
64
-
65
-
66
-
67
-
68
-
69
-
70
-
71
-
72
-
73
-
74
-
75
-
76
-
77
-
78
-
79
-
80
-
81
-
82
-
83
-
84
-
85
-
86
-
87
-
88
-
89
-
90
-
91
-
92
-
93
-
94
-
95
-
96
-
97
-
98
-
99
-
100
-
 101
101 -
 102
102 -
 103
103 -
 104
104 -
 105
105 -
 106
106 -
 107
107 -
 108
108 -
 109
109 -
 110
110 -
 111
111 -
112
-
113
-
114
-
115
-
116
-
117
-
118
-
119
-
120
-
121
-
122
-
123
-
124
-
125
-
126
-
127
-
128
-
129
-
130
-
131
-
132
-
133
-
134
-
135
-
136
-
137
-
138
-
139
-
140
-
141
-
142
-
143
-
144
-
145
-
146
-
147
-
148
-
149
-
150
-
151
-
152
-
153
 |
 |
