Dell 2335dn Dell™ 2335dn MFP User's Guide - Page 111
Scanning, Scanning Overview, Dell ScanCenter - scan to network
 |
UPC - 884116001898
View all Dell 2335dn manuals
Add to My Manuals
Save this manual to your list of manuals |
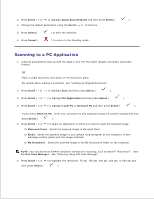
Page 111 highlights
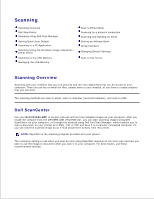
Scanning Scanning Overview Dell ScanCenter Scanning Using Dell Scan Manager Setting Quick Scan Default Scanning to a PC Application Scanning Using the Windows Image Acquisition (WIA) Driver Scanning to the USB Memory Managing the USB Memory Scan to Email Setup Scanning by a network connection Scanning and Sending an Email Setting up Address Book Group Numbers Changing Default Settings Scan to Fax Server Scanning Overview Scanning with your machine lets you turn pictures and text into digital files that can be stored on your computer. Then you can fax or email the files, upload them to your website, or use them to create projects that you can print. The scanning methods are scan to email, scan to computer (local and network), and scan to USB. Dell ScanCenter Use your Dell 2335dn MFP to convert pictures and text into editable images on your computer. After you install the software from the DRIVERS AND UTILITIES CD , you can start scanning images using Dell ScanCenter on your computer, or through the network using Dell Dell Scan Manager, which enables you to scan a document on your printer as a JPEG, TIFF or PDF and save it to a network-connected computer. Or, you can send the scanned image as an e-mail attachment directly from the printer. NOTE: PaperPort is the scanning program provided with your printer. The resolution setting to use when you scan an item using PaperPort depends on the item type and how you plan to use the image or document after you scan it to your computer. For best results, use these recommended settings.
-
 1
1 -
2
-
3
-
4
-
5
-
6
-
7
-
8
-
9
-
10
-
11
-
12
-
13
-
14
-
15
-
16
-
17
-
18
-
19
-
20
-
21
-
22
-
23
-
24
-
25
-
26
-
27
-
28
-
29
-
30
-
31
-
32
-
33
-
34
-
35
-
36
-
37
-
38
-
39
-
40
-
41
-
42
-
43
-
44
-
45
-
46
-
47
-
48
-
49
-
50
-
51
-
52
-
53
-
54
-
55
-
56
-
57
-
58
-
59
-
60
-
61
-
62
-
63
-
64
-
65
-
66
-
67
-
68
-
69
-
70
-
71
-
72
-
73
-
74
-
75
-
76
-
77
-
78
-
79
-
80
-
81
-
82
-
83
-
84
-
85
-
86
-
87
-
88
-
89
-
90
-
91
-
92
-
93
-
94
-
95
-
96
-
97
-
98
-
99
-
100
-
101
-
102
-
103
-
104
-
105
-
 106
106 -
 107
107 -
 108
108 -
 109
109 -
 110
110 -
 111
111 -
 112
112 -
 113
113 -
 114
114 -
 115
115 -
 116
116 -
117
-
118
-
119
-
120
-
121
-
122
-
123
-
124
-
125
-
126
-
127
-
128
-
129
-
130
-
131
-
132
-
133
-
134
-
135
-
136
-
137
-
138
-
139
-
140
-
141
-
142
-
143
-
144
-
145
-
146
-
147
-
148
-
149
-
150
-
151
-
152
-
153
-
154
-
155
-
156
-
157
-
158
-
159
-
160
-
161
-
162
-
163
-
164
-
165
-
166
-
167
-
168
-
169
-
170
-
171
-
172
-
173
-
174
-
175
-
176
-
177
-
178
-
179
-
180
-
181
-
182
-
183
-
184
-
185
-
186
-
187
-
188
-
189
-
190
-
191
-
192
-
193
-
194
-
195
-
196
-
197
-
198
-
199
-
200
-
201
-
202
-
203
-
204
-
205
-
206
-
207
-
208
-
209
-
210
-
211
-
212
-
213
-
214
-
215
-
216
-
217
-
218
-
219
-
220
-
221
-
222
-
223
-
224
-
225
-
226
-
227
-
228
-
229
-
230
-
231
-
232
-
233
-
234
-
235
-
236
-
237
-
238
-
239
-
240
-
241
-
242
-
243
-
244
-
245
-
246
-
247
-
248
-
249
-
250
-
251
-
252
-
253
-
254
-
255
-
256
-
257
-
258
-
259
-
260
-
261
-
262
-
263
-
264
-
265
-
266
-
267
-
268
-
269
-
270
-
271
-
272
-
273
-
274
-
275
-
276
-
277
-
278
-
279
-
280
-
281
-
282
-
283
-
284
 |
 |