Dell 2335dn Dell™ 2335dn MFP User's Guide - Page 117
Sending an Email via Quick Email, Global Address Book - scan driver
 |
UPC - 884116001898
View all Dell 2335dn manuals
Add to My Manuals
Save this manual to your list of manuals |
Page 117 highlights
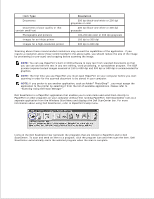
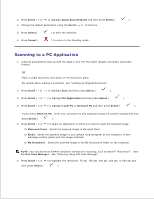
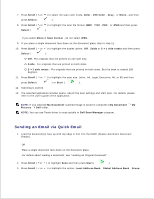
6. 7. Press Scroll ( or ) to select the scan color mode, Color , 256 Color , Gray , or Mono , and then press Select ( ). 8. Press Scroll ( or ) to highlight the scan file format, BMP , TIFF , PDF , or JPEG and then press Select ( ). If you select Mono in Scan Format , do not select JPEG . 9. If you place a single document face down on the document glass, skip to step 11 . 10. Press Scroll ( or ) to highlight the duplex option, Off , 2side or 2->1 side rotate and then press Select ( ). Off : For originals that are printed on one side only. 2side : For originals that are printed on both sides. 2->1 side rotate : For originals that are printed on both sides. But the back is rotated 180 degrees. 11. Press Scroll ( or ) to highlight the scan size, Letter, A4, Legal, Executive, A5, or B5 and then press Select ( ) or Start ( ). 12. Scanning is started. 13. The selected application window opens. Adjust the scan settings and start scan. For details, please refer to the user's guide of the application. NOTE: If you selected My Document scanned image is saved in computer's My Document My Pictures Dell folder. NOTE: You can use Twain driver to scan quickly in Dell Scan Manager program. Sending an Email via Quick Email 1. Load the document(s) face up with top edge in first into the DADF (Duplex Automatic Document Feeder). OR Place a single document face down on the document glass. For details about loading a document, see "Loading an Original Document" . 2. Press Scroll ( or ) to highlight Scan and then press Start ( ). 3. Press Scroll ( or ) to highlight the option, Local Address Book , Global Address Book , Group
-
 1
1 -
2
-
3
-
4
-
5
-
6
-
7
-
8
-
9
-
10
-
11
-
12
-
13
-
14
-
15
-
16
-
17
-
18
-
19
-
20
-
21
-
22
-
23
-
24
-
25
-
26
-
27
-
28
-
29
-
30
-
31
-
32
-
33
-
34
-
35
-
36
-
37
-
38
-
39
-
40
-
41
-
42
-
43
-
44
-
45
-
46
-
47
-
48
-
49
-
50
-
51
-
52
-
53
-
54
-
55
-
56
-
57
-
58
-
59
-
60
-
61
-
62
-
63
-
64
-
65
-
66
-
67
-
68
-
69
-
70
-
71
-
72
-
73
-
74
-
75
-
76
-
77
-
78
-
79
-
80
-
81
-
82
-
83
-
84
-
85
-
86
-
87
-
88
-
89
-
90
-
91
-
92
-
93
-
94
-
95
-
96
-
97
-
98
-
99
-
100
-
101
-
102
-
103
-
104
-
105
-
106
-
107
-
108
-
109
-
110
-
111
-
 112
112 -
 113
113 -
 114
114 -
 115
115 -
 116
116 -
 117
117 -
 118
118 -
 119
119 -
 120
120 -
 121
121 -
 122
122 -
123
-
124
-
125
-
126
-
127
-
128
-
129
-
130
-
131
-
132
-
133
-
134
-
135
-
136
-
137
-
138
-
139
-
140
-
141
-
142
-
143
-
144
-
145
-
146
-
147
-
148
-
149
-
150
-
151
-
152
-
153
-
154
-
155
-
156
-
157
-
158
-
159
-
160
-
161
-
162
-
163
-
164
-
165
-
166
-
167
-
168
-
169
-
170
-
171
-
172
-
173
-
174
-
175
-
176
-
177
-
178
-
179
-
180
-
181
-
182
-
183
-
184
-
185
-
186
-
187
-
188
-
189
-
190
-
191
-
192
-
193
-
194
-
195
-
196
-
197
-
198
-
199
-
200
-
201
-
202
-
203
-
204
-
205
-
206
-
207
-
208
-
209
-
210
-
211
-
212
-
213
-
214
-
215
-
216
-
217
-
218
-
219
-
220
-
221
-
222
-
223
-
224
-
225
-
226
-
227
-
228
-
229
-
230
-
231
-
232
-
233
-
234
-
235
-
236
-
237
-
238
-
239
-
240
-
241
-
242
-
243
-
244
-
245
-
246
-
247
-
248
-
249
-
250
-
251
-
252
-
253
-
254
-
255
-
256
-
257
-
258
-
259
-
260
-
261
-
262
-
263
-
264
-
265
-
266
-
267
-
268
-
269
-
270
-
271
-
272
-
273
-
274
-
275
-
276
-
277
-
278
-
279
-
280
-
281
-
282
-
283
-
284
 |
 |
