Dell 2335dn Dell™ 2335dn MFP User's Guide - Page 123
Managing the USB Memory, Deleting an Image File
 |
UPC - 884116001898
View all Dell 2335dn manuals
Add to My Manuals
Save this manual to your list of manuals |
Page 123 highlights
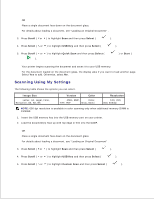
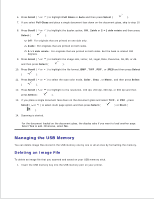
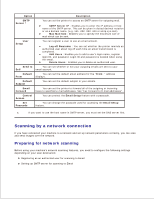
5. 6. Press Scroll ( or ) to highlight Full Glass or Auto and then press Select ( ). 7. If you select Full Glass and place a single document face down on the document glass, skip to step 10 . 8. Press Scroll ( or ) to highlight the duplex option, Off , 2side or 2->1 side rotate and then press Select ( ). Off : For originals that are printed on one side only. 2side : For originals that are printed on both sides. 2->1 side rotate : For originals that are printed on both sides. But the back is rotated 180 degrees. 9. Press Scroll ( or ) to highlight the image size, Letter, A4, Legal, Folio, Executive, A5, B5, or A6 and then press Select ( ). 10. Press Scroll ( or ) to highlight the file format, BMP , TIFF , PDF , or JPEG and then press Select ( ). 11. Press Scroll ( or ) to select the scan color mode, Color , Gray , or Mono , and then press Select ( ). 12. Press Scroll ( or ) to highlight to the resolution, 100 dpi, 200 dpi, 300 dpi, or 600 dpi and then press Select ( ). 13. If you place a single document face down on the document glass and select TIFF , or PDF , press Scroll ( or ) to select multi page option and then press Select ( ) or Start ( ). 14. Scanning is started. For the document loaded on the document glass, the display asks if you want to load another page. Select Yes to add. Otherwise, select No . Managing the USB Memory You can delete image files stored in the USB memory one by one or all at once by formatting the memory. Deleting an Image File To delete an image file that you scanned and saved on your USB memory stick. 1. Insert the USB memory key into the USB memory port on your printer. 2. 3.
-
 1
1 -
2
-
3
-
4
-
5
-
6
-
7
-
8
-
9
-
10
-
11
-
12
-
13
-
14
-
15
-
16
-
17
-
18
-
19
-
20
-
21
-
22
-
23
-
24
-
25
-
26
-
27
-
28
-
29
-
30
-
31
-
32
-
33
-
34
-
35
-
36
-
37
-
38
-
39
-
40
-
41
-
42
-
43
-
44
-
45
-
46
-
47
-
48
-
49
-
50
-
51
-
52
-
53
-
54
-
55
-
56
-
57
-
58
-
59
-
60
-
61
-
62
-
63
-
64
-
65
-
66
-
67
-
68
-
69
-
70
-
71
-
72
-
73
-
74
-
75
-
76
-
77
-
78
-
79
-
80
-
81
-
82
-
83
-
84
-
85
-
86
-
87
-
88
-
89
-
90
-
91
-
92
-
93
-
94
-
95
-
96
-
97
-
98
-
99
-
100
-
101
-
102
-
103
-
104
-
105
-
106
-
107
-
108
-
109
-
110
-
111
-
112
-
113
-
114
-
115
-
116
-
117
-
 118
118 -
 119
119 -
 120
120 -
 121
121 -
 122
122 -
 123
123 -
 124
124 -
 125
125 -
 126
126 -
 127
127 -
 128
128 -
129
-
130
-
131
-
132
-
133
-
134
-
135
-
136
-
137
-
138
-
139
-
140
-
141
-
142
-
143
-
144
-
145
-
146
-
147
-
148
-
149
-
150
-
151
-
152
-
153
-
154
-
155
-
156
-
157
-
158
-
159
-
160
-
161
-
162
-
163
-
164
-
165
-
166
-
167
-
168
-
169
-
170
-
171
-
172
-
173
-
174
-
175
-
176
-
177
-
178
-
179
-
180
-
181
-
182
-
183
-
184
-
185
-
186
-
187
-
188
-
189
-
190
-
191
-
192
-
193
-
194
-
195
-
196
-
197
-
198
-
199
-
200
-
201
-
202
-
203
-
204
-
205
-
206
-
207
-
208
-
209
-
210
-
211
-
212
-
213
-
214
-
215
-
216
-
217
-
218
-
219
-
220
-
221
-
222
-
223
-
224
-
225
-
226
-
227
-
228
-
229
-
230
-
231
-
232
-
233
-
234
-
235
-
236
-
237
-
238
-
239
-
240
-
241
-
242
-
243
-
244
-
245
-
246
-
247
-
248
-
249
-
250
-
251
-
252
-
253
-
254
-
255
-
256
-
257
-
258
-
259
-
260
-
261
-
262
-
263
-
264
-
265
-
266
-
267
-
268
-
269
-
270
-
271
-
272
-
273
-
274
-
275
-
276
-
277
-
278
-
279
-
280
-
281
-
282
-
283
-
284
 |
 |