Dell 2335dn Dell™ 2335dn MFP User's Guide - Page 144
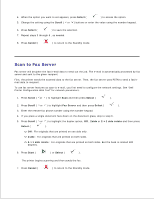
Scan to Fax Server, Select, Scroll, Cancel, Fax Server, 2side, >1 side rotate, Start
 |
UPC - 884116001898
View all Dell 2335dn manuals
Add to My Manuals
Save this manual to your list of manuals |
Page 144 highlights
2. 3. 4. When the option you want to set appears, press Select ( ) to access the option. 5. Change the setting using the Scroll ( or ) buttons or enter the value using the number keypad. 6. Press Select ( ) to save the selection. 7. Repeat steps 3 through 6 , as needed. 8. Press Cancel ( ) to return to the Standby mode. Scan to Fax Server Fax server will decipher the fax/e-mail data to send out the job. The e-mail is automatically processed by fax server and sent to the given recipient. First, the printer sends the scanned data to the fax server. Then, the fax server uses PSTN to send a fax/email data to recipient. To use fax server features as scan to e-mail, you first need to configure the network settings. See "Dell Printer Configuration Web Tool" for network parameters. 1. Press Scroll ( or ) to highlight Scan and then press Select ( ). 2. Press Scroll ( or ) to highlight Fax Server and then press Select ( ). 3. Enter the remote fax phone number using the number keypad. 4. If you place a single document face down on the document glass, skip to step 6 . 5. Press Scroll ( or ) to highlight the duplex option, Off , 2side or 2->1 side rotate and then press Select ( ). Off : For originals that are printed on one side only. 2side : For originals that are printed on both sides. 2->1 side rotate : For originals that are printed on both sides. But the back is rotated 180 degrees. 6. Press Start ( ) or Select ( ). The printer begins scanning and then sends the fax. 7. Press Cancel ( ) to return to the Standby mode.
-
 1
1 -
2
-
3
-
4
-
5
-
6
-
7
-
8
-
9
-
10
-
11
-
12
-
13
-
14
-
15
-
16
-
17
-
18
-
19
-
20
-
21
-
22
-
23
-
24
-
25
-
26
-
27
-
28
-
29
-
30
-
31
-
32
-
33
-
34
-
35
-
36
-
37
-
38
-
39
-
40
-
41
-
42
-
43
-
44
-
45
-
46
-
47
-
48
-
49
-
50
-
51
-
52
-
53
-
54
-
55
-
56
-
57
-
58
-
59
-
60
-
61
-
62
-
63
-
64
-
65
-
66
-
67
-
68
-
69
-
70
-
71
-
72
-
73
-
74
-
75
-
76
-
77
-
78
-
79
-
80
-
81
-
82
-
83
-
84
-
85
-
86
-
87
-
88
-
89
-
90
-
91
-
92
-
93
-
94
-
95
-
96
-
97
-
98
-
99
-
100
-
101
-
102
-
103
-
104
-
105
-
106
-
107
-
108
-
109
-
110
-
111
-
112
-
113
-
114
-
115
-
116
-
117
-
118
-
119
-
120
-
121
-
122
-
123
-
124
-
125
-
126
-
127
-
128
-
129
-
130
-
131
-
132
-
133
-
134
-
135
-
136
-
137
-
138
-
 139
139 -
 140
140 -
 141
141 -
 142
142 -
 143
143 -
 144
144 -
 145
145 -
 146
146 -
 147
147 -
 148
148 -
 149
149 -
150
-
151
-
152
-
153
-
154
-
155
-
156
-
157
-
158
-
159
-
160
-
161
-
162
-
163
-
164
-
165
-
166
-
167
-
168
-
169
-
170
-
171
-
172
-
173
-
174
-
175
-
176
-
177
-
178
-
179
-
180
-
181
-
182
-
183
-
184
-
185
-
186
-
187
-
188
-
189
-
190
-
191
-
192
-
193
-
194
-
195
-
196
-
197
-
198
-
199
-
200
-
201
-
202
-
203
-
204
-
205
-
206
-
207
-
208
-
209
-
210
-
211
-
212
-
213
-
214
-
215
-
216
-
217
-
218
-
219
-
220
-
221
-
222
-
223
-
224
-
225
-
226
-
227
-
228
-
229
-
230
-
231
-
232
-
233
-
234
-
235
-
236
-
237
-
238
-
239
-
240
-
241
-
242
-
243
-
244
-
245
-
246
-
247
-
248
-
249
-
250
-
251
-
252
-
253
-
254
-
255
-
256
-
257
-
258
-
259
-
260
-
261
-
262
-
263
-
264
-
265
-
266
-
267
-
268
-
269
-
270
-
271
-
272
-
273
-
274
-
275
-
276
-
277
-
278
-
279
-
280
-
281
-
282
-
283
-
284
 |
 |
