Dell 2335dn Dell™ 2335dn MFP User's Guide - Page 26
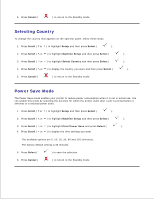
Setting Daylight Savings Time, Scroll, Setup, Select, Machine Setup, Date & Time
 |
UPC - 884116001898
View all Dell 2335dn manuals
Add to My Manuals
Save this manual to your list of manuals |
Page 26 highlights
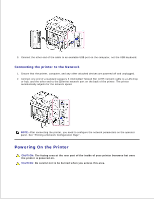
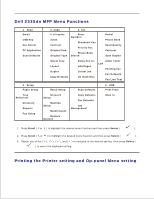
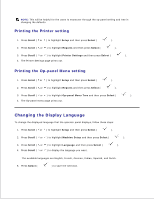
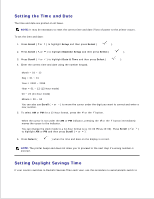
Setting the Time and Date The time and date are printed on all faxes. NOTE: It may be necessary to reset the correct time and date if loss of power to the printer occurs . To set the time and date: 1. Press Scroll ( or ) to highlight Setup and then press Select ( ). 2. Press Scroll ( or ) to highlight Machine Setup and then press Select ( ). 3. Press Scroll ( or ) to highlight Date & Time and then press Select ( ). 4. Enter the correct time and date using the number keypad. Month = 01 ~ 12 Day = 01 ~ 31 Year = 2000 ~ 2099 Hour = 01 ~ 12 (12-hour mode) 00 ~ 23 (24-hour mode) Minute = 00 ~ 59 You can also use Scroll ( or ) to move the cursor under the digit you want to correct and enter a new number. 5. To select AM or PM for a 12-hour format, press the or the button. When the cursor is not under the AM or PM indicator, pressing the or the button immediately moves the cursor to the indicator. You can change the clock mode to a 24-hour format (e.g. 01:00 PM as 13:00). Press Scroll ( or ) to highlight AM or PM and then press Scroll ( or ). 6. Press Select ( ) when the time and date on the display is correct. NOTE: The printer beeps and does not allow you to proceed to the next step if a wrong number is entered . Setting Daylight Savings Time If your country switches to Daylight Savings Time each year, use this procedure to automatically switch to 1.
-
 1
1 -
2
-
3
-
4
-
5
-
6
-
7
-
8
-
9
-
10
-
11
-
12
-
13
-
14
-
15
-
16
-
17
-
18
-
19
-
20
-
 21
21 -
 22
22 -
 23
23 -
 24
24 -
 25
25 -
 26
26 -
 27
27 -
 28
28 -
 29
29 -
 30
30 -
 31
31 -
32
-
33
-
34
-
35
-
36
-
37
-
38
-
39
-
40
-
41
-
42
-
43
-
44
-
45
-
46
-
47
-
48
-
49
-
50
-
51
-
52
-
53
-
54
-
55
-
56
-
57
-
58
-
59
-
60
-
61
-
62
-
63
-
64
-
65
-
66
-
67
-
68
-
69
-
70
-
71
-
72
-
73
-
74
-
75
-
76
-
77
-
78
-
79
-
80
-
81
-
82
-
83
-
84
-
85
-
86
-
87
-
88
-
89
-
90
-
91
-
92
-
93
-
94
-
95
-
96
-
97
-
98
-
99
-
100
-
101
-
102
-
103
-
104
-
105
-
106
-
107
-
108
-
109
-
110
-
111
-
112
-
113
-
114
-
115
-
116
-
117
-
118
-
119
-
120
-
121
-
122
-
123
-
124
-
125
-
126
-
127
-
128
-
129
-
130
-
131
-
132
-
133
-
134
-
135
-
136
-
137
-
138
-
139
-
140
-
141
-
142
-
143
-
144
-
145
-
146
-
147
-
148
-
149
-
150
-
151
-
152
-
153
-
154
-
155
-
156
-
157
-
158
-
159
-
160
-
161
-
162
-
163
-
164
-
165
-
166
-
167
-
168
-
169
-
170
-
171
-
172
-
173
-
174
-
175
-
176
-
177
-
178
-
179
-
180
-
181
-
182
-
183
-
184
-
185
-
186
-
187
-
188
-
189
-
190
-
191
-
192
-
193
-
194
-
195
-
196
-
197
-
198
-
199
-
200
-
201
-
202
-
203
-
204
-
205
-
206
-
207
-
208
-
209
-
210
-
211
-
212
-
213
-
214
-
215
-
216
-
217
-
218
-
219
-
220
-
221
-
222
-
223
-
224
-
225
-
226
-
227
-
228
-
229
-
230
-
231
-
232
-
233
-
234
-
235
-
236
-
237
-
238
-
239
-
240
-
241
-
242
-
243
-
244
-
245
-
246
-
247
-
248
-
249
-
250
-
251
-
252
-
253
-
254
-
255
-
256
-
257
-
258
-
259
-
260
-
261
-
262
-
263
-
264
-
265
-
266
-
267
-
268
-
269
-
270
-
271
-
272
-
273
-
274
-
275
-
276
-
277
-
278
-
279
-
280
-
281
-
282
-
283
-
284
 |
 |