Dell PowerConnect W-IAP92 Dell Instant 6.1.3.4-3.1.0.0 User Guide - Page 108
Configuring the DHCP Server,
 |
View all Dell PowerConnect W-IAP92 manuals
Add to My Manuals
Save this manual to your list of manuals |
Page 108 highlights
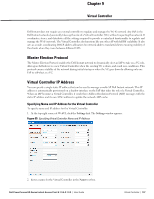
3. Enter the appropriate IP address in the Virtual Controller IP text box. Configuring the DHCP Server The DHCP Server is the built-in server, used for networks which have Client IP Assignment set to Virtual Controller Assigned. The default size of the IP address pool has been increased to 512. You can customize the DHCP pool's subnet and address range if you need to provide simultaneous access to more number of clients. The largest address pool supported is 2048. To configure the domain name, DNS server, and lease time for the DHCP server, perform the following steps: 1. At the top right corner of the Instant UI, click the Settings link. 2. In the Settings window, select the General tab. 3. Enter the domain name of the client in the Domain name text box. 4. Enter the IP addresses of the DNS servers seperated by comma(,). in the DNS server text box. 5. Enter the duration of the DHCP lease in the Lease time text box. 6. Select Minutes, Hours, or Days for the lease time from the drop-down list next to Lease time. 7. Enter the network in the Network text box. 8. Enter the mask in the Mask text box. NOTE: To provide simultaneous access to more than 512 clients, use the Network and Mask fields to specify a larger range. While the network (or prefix) is the common part of the address range, the mask (suffix) specifies how long the variable part of the address range is. Figure 96 Configuring the DHCP Server 9. Click Ok to apply the changes. 108 | Virtual Controller Dell PowerConnect W-Series Instant Access Point 6.1.3.4-3.1.0.0 | User Guide
-
 1
1 -
2
-
3
-
4
-
5
-
6
-
7
-
8
-
9
-
10
-
11
-
12
-
13
-
14
-
15
-
16
-
17
-
18
-
19
-
20
-
21
-
22
-
23
-
24
-
25
-
26
-
27
-
28
-
29
-
30
-
31
-
32
-
33
-
34
-
35
-
36
-
37
-
38
-
39
-
40
-
41
-
42
-
43
-
44
-
45
-
46
-
47
-
48
-
49
-
50
-
51
-
52
-
53
-
54
-
55
-
56
-
57
-
58
-
59
-
60
-
61
-
62
-
63
-
64
-
65
-
66
-
67
-
68
-
69
-
70
-
71
-
72
-
73
-
74
-
75
-
76
-
77
-
78
-
79
-
80
-
81
-
82
-
83
-
84
-
85
-
86
-
87
-
88
-
89
-
90
-
91
-
92
-
93
-
94
-
95
-
96
-
97
-
98
-
99
-
100
-
101
-
102
-
 103
103 -
 104
104 -
 105
105 -
 106
106 -
 107
107 -
 108
108 -
 109
109 -
 110
110 -
 111
111 -
 112
112 -
 113
113 -
114
-
115
-
116
-
117
-
118
-
119
-
120
-
121
-
122
-
123
-
124
-
125
-
126
-
127
-
128
-
129
-
130
-
131
-
132
-
133
-
134
-
135
-
136
-
137
-
138
-
139
-
140
-
141
-
142
-
143
-
144
-
145
-
146
-
147
-
148
-
149
-
150
-
151
-
152
-
153
-
154
-
155
-
156
-
157
-
158
-
159
-
160
-
161
-
162
-
163
-
164
-
165
-
166
-
167
-
168
-
169
-
170
-
171
-
172
-
173
-
174
-
175
-
176
-
177
-
178
-
179
-
180
-
181
-
182
-
183
-
184
-
185
-
186
-
187
-
188
-
189
-
190
-
191
-
192
-
193
-
194
-
195
-
196
-
197
-
198
-
199
-
200
-
201
-
202
-
203
-
204
-
205
-
206
-
207
-
208
-
209
-
210
-
211
-
212
-
213
-
214
-
215
-
216
-
217
-
218
-
219
-
220
-
221
-
222
-
223
-
224
-
225
-
226
-
227
-
228
-
229
-
230
-
231
-
232
-
233
-
234
-
235
-
236
-
237
-
238
-
239
-
240
-
241
-
242
-
243
-
244
-
245
-
246
 |
 |
