Dell PowerConnect W-IAP92 Dell Instant 6.1.3.4-3.1.0.0 User Guide - Page 79
Adding an IAP to the Network, Logging Level, Description
 |
View all Dell PowerConnect W-IAP92 manuals
Add to My Manuals
Save this manual to your list of manuals |
Page 79 highlights
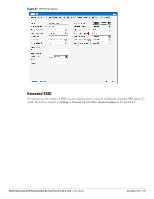
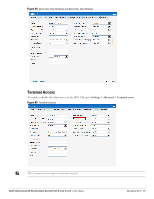
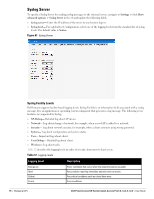
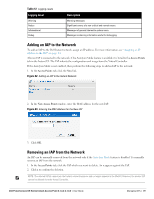
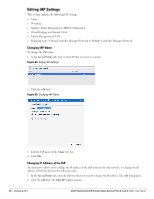
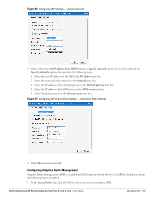
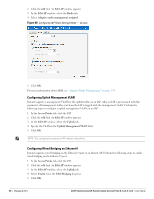
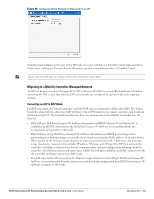
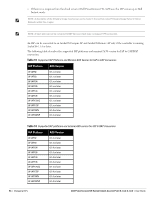
Table 12 Logging Levels Logging Level Warning Notice Informational Debug Description Warning messages. Significant events of a non-critical and normal nature. Messages of general interest to system users. Messages containing information useful for debugging. Adding an IAP to the Network To add an IAP to the Dell Instant network, assign an IP address. For more information, see "Assigning an IP Address to the IAP" on page 14. After an IAP is connected to the network, if the Auto Join Mode feature is enabled, it is listed in the Access Points tab in the Instant UI. The IAP inherits the configuration and image from the Virtual Controller. If the Auto Join Mode is not enabled, then perform the following steps to add an IAP to the network: 1. In the Access Points tab, click the New link. Figure 62 Adding an IAP to the Instant Network 2. In the New Access Point window, enter the MAC address for the new IAP. Figure 63 Entering the MAC Address for the New IAP 3. Click OK. Removing an IAP from the Network An IAP can be manually removed from the network only if the Auto Join Mode feature is disabled. To manually remove an IAP from the network: 1. In the Access Points tab, click the IAP which you want to delete. An x appears against the IAP. 2. Click x to confirm the deletion. NOTE: The deleted IAP(s) cannot join the Instant network anymore and no longer appears in the WebUI. However, the master IAP cannot be deleted from the Virtual Controller. Dell PowerConnect W-Series Instant Access Point 6.1.3.4-3.1.0.0 | User Guide Managing IAPs | 79
-
 1
1 -
2
-
3
-
4
-
5
-
6
-
7
-
8
-
9
-
10
-
11
-
12
-
13
-
14
-
15
-
16
-
17
-
18
-
19
-
20
-
21
-
22
-
23
-
24
-
25
-
26
-
27
-
28
-
29
-
30
-
31
-
32
-
33
-
34
-
35
-
36
-
37
-
38
-
39
-
40
-
41
-
42
-
43
-
44
-
45
-
46
-
47
-
48
-
49
-
50
-
51
-
52
-
53
-
54
-
55
-
56
-
57
-
58
-
59
-
60
-
61
-
62
-
63
-
64
-
65
-
66
-
67
-
68
-
69
-
70
-
71
-
72
-
73
-
 74
74 -
 75
75 -
 76
76 -
 77
77 -
 78
78 -
 79
79 -
 80
80 -
 81
81 -
 82
82 -
 83
83 -
 84
84 -
85
-
86
-
87
-
88
-
89
-
90
-
91
-
92
-
93
-
94
-
95
-
96
-
97
-
98
-
99
-
100
-
101
-
102
-
103
-
104
-
105
-
106
-
107
-
108
-
109
-
110
-
111
-
112
-
113
-
114
-
115
-
116
-
117
-
118
-
119
-
120
-
121
-
122
-
123
-
124
-
125
-
126
-
127
-
128
-
129
-
130
-
131
-
132
-
133
-
134
-
135
-
136
-
137
-
138
-
139
-
140
-
141
-
142
-
143
-
144
-
145
-
146
-
147
-
148
-
149
-
150
-
151
-
152
-
153
-
154
-
155
-
156
-
157
-
158
-
159
-
160
-
161
-
162
-
163
-
164
-
165
-
166
-
167
-
168
-
169
-
170
-
171
-
172
-
173
-
174
-
175
-
176
-
177
-
178
-
179
-
180
-
181
-
182
-
183
-
184
-
185
-
186
-
187
-
188
-
189
-
190
-
191
-
192
-
193
-
194
-
195
-
196
-
197
-
198
-
199
-
200
-
201
-
202
-
203
-
204
-
205
-
206
-
207
-
208
-
209
-
210
-
211
-
212
-
213
-
214
-
215
-
216
-
217
-
218
-
219
-
220
-
221
-
222
-
223
-
224
-
225
-
226
-
227
-
228
-
229
-
230
-
231
-
232
-
233
-
234
-
235
-
236
-
237
-
238
-
239
-
240
-
241
-
242
-
243
-
244
-
245
-
246
 |
 |
