Dell PowerConnect W-IAP92 Dell Instant 6.1.3.4-3.1.0.0 User Guide - Page 23
Settings, General, Admin, Wired, Dell RTLS, Update, Aeroscout
 |
View all Dell PowerConnect W-IAP92 manuals
Add to My Manuals
Save this manual to your list of manuals |
Page 23 highlights
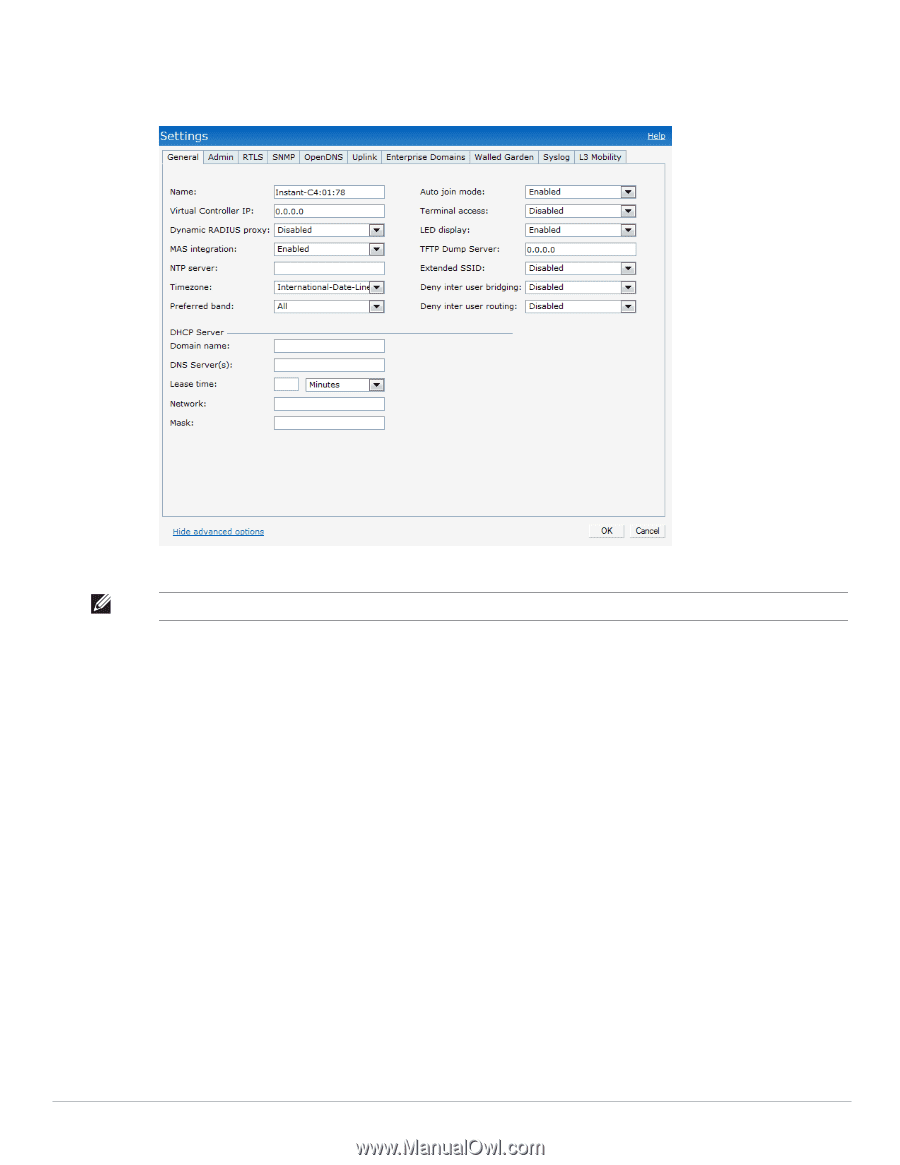
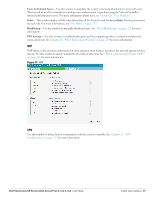
Settings This link displays the Settings window. The Settings consists of the following tabs: Figure 9 Settings Link NOTE: Use the Show/Hide Advanced option on the bottom-left of the Settings window to view or hide the advanced options. General- View or edit the Name, IP address, NTP Server, and DHCP server settings of the Virtual Controller. For information about Virtual Controller settings and NTP Server, see Chapter 9, "Virtual Controller" and Chapter 8, "NTP Server" . For information about Auto join mode, Terminal Access, LED display, TFTP Dump Server, and Deny inter user bridging see Chapter 5, "Managing IAPs" . Admin- View or edit the admin credentials for access to the Virtual Controller Management User Interface. See "Management Authentication Settings" on page 116 for more information. You can also configure Dell PowerConnect W-AirWave in this tab. See "Configuring Dell PowerConnect W-AirWave" on page 191 for more information. Wired- Specify the desired profile for each port of the IAP. See Chapter 21, "Ethernet Downlink" for more information. RTLS- View or edit the RTLS server settings. Dell RTLS- Enable this to integrate with Dell PowerConnect W-AirWave Management platform, Ekahau Real Time Location Server and Nearbuy Real Time Location Server. Specify the IP address and port number of the server to which location reports are sent, a shared secret key, and the frequency at which packets are sent to the server. Update indicates how frequently the Virtual Controller updates the RTLS server. Aeroscout- Enables the AP to send RFID tag information to an AeroScout real-time asset location (RTLS) server. Specify the IP address and port number of the AeroScout server to which location reports should be sent. Dell PowerConnect W-Series Instant Access Point 6.1.3.4-3.1.0.0 | User Guide Instant User Interface | 23
-
 1
1 -
2
-
3
-
4
-
5
-
6
-
7
-
8
-
9
-
10
-
11
-
12
-
13
-
14
-
15
-
16
-
17
-
 18
18 -
 19
19 -
 20
20 -
 21
21 -
 22
22 -
 23
23 -
 24
24 -
 25
25 -
 26
26 -
 27
27 -
 28
28 -
29
-
30
-
31
-
32
-
33
-
34
-
35
-
36
-
37
-
38
-
39
-
40
-
41
-
42
-
43
-
44
-
45
-
46
-
47
-
48
-
49
-
50
-
51
-
52
-
53
-
54
-
55
-
56
-
57
-
58
-
59
-
60
-
61
-
62
-
63
-
64
-
65
-
66
-
67
-
68
-
69
-
70
-
71
-
72
-
73
-
74
-
75
-
76
-
77
-
78
-
79
-
80
-
81
-
82
-
83
-
84
-
85
-
86
-
87
-
88
-
89
-
90
-
91
-
92
-
93
-
94
-
95
-
96
-
97
-
98
-
99
-
100
-
101
-
102
-
103
-
104
-
105
-
106
-
107
-
108
-
109
-
110
-
111
-
112
-
113
-
114
-
115
-
116
-
117
-
118
-
119
-
120
-
121
-
122
-
123
-
124
-
125
-
126
-
127
-
128
-
129
-
130
-
131
-
132
-
133
-
134
-
135
-
136
-
137
-
138
-
139
-
140
-
141
-
142
-
143
-
144
-
145
-
146
-
147
-
148
-
149
-
150
-
151
-
152
-
153
-
154
-
155
-
156
-
157
-
158
-
159
-
160
-
161
-
162
-
163
-
164
-
165
-
166
-
167
-
168
-
169
-
170
-
171
-
172
-
173
-
174
-
175
-
176
-
177
-
178
-
179
-
180
-
181
-
182
-
183
-
184
-
185
-
186
-
187
-
188
-
189
-
190
-
191
-
192
-
193
-
194
-
195
-
196
-
197
-
198
-
199
-
200
-
201
-
202
-
203
-
204
-
205
-
206
-
207
-
208
-
209
-
210
-
211
-
212
-
213
-
214
-
215
-
216
-
217
-
218
-
219
-
220
-
221
-
222
-
223
-
224
-
225
-
226
-
227
-
228
-
229
-
230
-
231
-
232
-
233
-
234
-
235
-
236
-
237
-
238
-
239
-
240
-
241
-
242
-
243
-
244
-
245
-
246
 |
 |