Dell PowerConnect W-IAP92 Dell Instant 6.1.3.4-3.1.0.0 User Guide - Page 44
Adding an Employee Network, WLAN Settings
 |
View all Dell PowerConnect W-IAP92 manuals
Add to My Manuals
Save this manual to your list of manuals |
Page 44 highlights
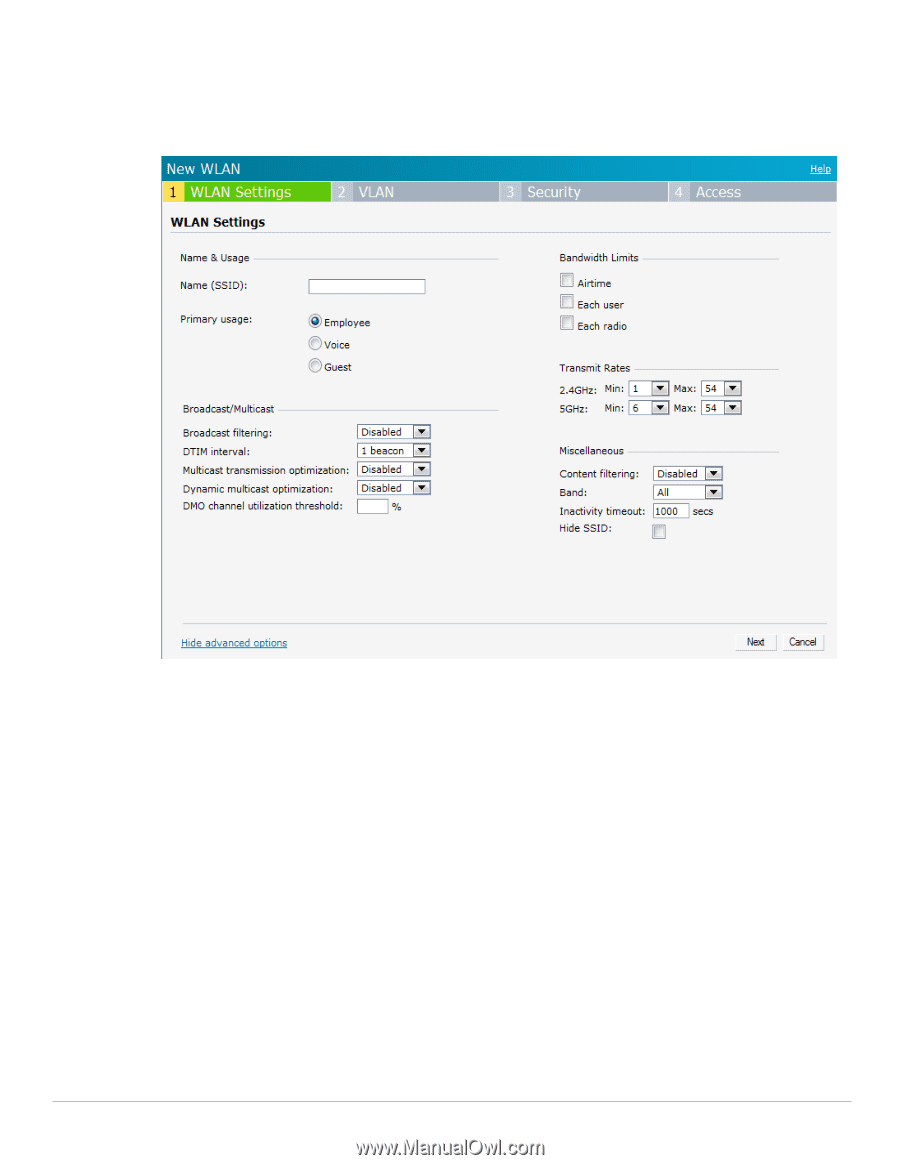
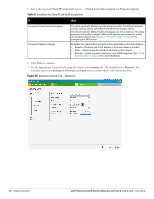
Adding an Employee Network This section provides the procedure to add an employee network. 1. In the Networks tab, click the New link. The New WLAN window appears. Figure 36 Adding an Employee Network - WLAN Settings Tab 2. In the WLAN Settings tab, perform the following steps: a. Name (SSID)- Enter a name that uniquely identifies a wireless network. b. Primary usage- Select Employee (this is selected by default) from the Primary usage options. This selection determines whether the network is primarily intended to be used for employee data, guest data, or voice traffic. 3. Click the Show advanced options link and perform the following steps. a. Broadcast/Multicast Broadcast filtering- When set to All, the IAP will drop all broadcast and multicast frames except for DHCP and ARP. When set to ARP, in addition to the above, the IAP will convert ARP requests to unicast and send frames directly to the associated client. When Disabled, all broadcast and multicast traffic is forwarded. DTIM interval- Indicates the DTIM (delivery traffic indication message) period in beacons. You can configure this option for every WLAN SSID profile. The default value is 1, which means the client will check for buffered data on the IAP at every beacon. You may choose to configure a larger DTIM value for power saving. Multicast transmission optimization- When Enabled, the IAP will choose the optimal rate for sending broadcast and multicast frames based on the lowest of unicast rates across all associated clients. The default values are 1 mbps for 2.4GHz and 6 mbps for 5.0GHz bands. Multicast traffic can be sent at up to 24 mbps when this option is enabled. This option is disabled by default. 44 | Wireless Network Dell PowerConnect W-Series Instant Access Point 6.1.3.4-3.1.0.0 | User Guide
-
 1
1 -
2
-
3
-
4
-
5
-
6
-
7
-
8
-
9
-
10
-
11
-
12
-
13
-
14
-
15
-
16
-
17
-
18
-
19
-
20
-
21
-
22
-
23
-
24
-
25
-
26
-
27
-
28
-
29
-
30
-
31
-
32
-
33
-
34
-
35
-
36
-
37
-
38
-
 39
39 -
 40
40 -
 41
41 -
 42
42 -
 43
43 -
 44
44 -
 45
45 -
 46
46 -
 47
47 -
 48
48 -
 49
49 -
50
-
51
-
52
-
53
-
54
-
55
-
56
-
57
-
58
-
59
-
60
-
61
-
62
-
63
-
64
-
65
-
66
-
67
-
68
-
69
-
70
-
71
-
72
-
73
-
74
-
75
-
76
-
77
-
78
-
79
-
80
-
81
-
82
-
83
-
84
-
85
-
86
-
87
-
88
-
89
-
90
-
91
-
92
-
93
-
94
-
95
-
96
-
97
-
98
-
99
-
100
-
101
-
102
-
103
-
104
-
105
-
106
-
107
-
108
-
109
-
110
-
111
-
112
-
113
-
114
-
115
-
116
-
117
-
118
-
119
-
120
-
121
-
122
-
123
-
124
-
125
-
126
-
127
-
128
-
129
-
130
-
131
-
132
-
133
-
134
-
135
-
136
-
137
-
138
-
139
-
140
-
141
-
142
-
143
-
144
-
145
-
146
-
147
-
148
-
149
-
150
-
151
-
152
-
153
-
154
-
155
-
156
-
157
-
158
-
159
-
160
-
161
-
162
-
163
-
164
-
165
-
166
-
167
-
168
-
169
-
170
-
171
-
172
-
173
-
174
-
175
-
176
-
177
-
178
-
179
-
180
-
181
-
182
-
183
-
184
-
185
-
186
-
187
-
188
-
189
-
190
-
191
-
192
-
193
-
194
-
195
-
196
-
197
-
198
-
199
-
200
-
201
-
202
-
203
-
204
-
205
-
206
-
207
-
208
-
209
-
210
-
211
-
212
-
213
-
214
-
215
-
216
-
217
-
218
-
219
-
220
-
221
-
222
-
223
-
224
-
225
-
226
-
227
-
228
-
229
-
230
-
231
-
232
-
233
-
234
-
235
-
236
-
237
-
238
-
239
-
240
-
241
-
242
-
243
-
244
-
245
-
246
 |
 |