Dell PowerEdge T100 Hardware Owner's Manual - Page 73
SAS Controller Expansion Card, attached peripherals.
 |
View all Dell PowerEdge T100 manuals
Add to My Manuals
Save this manual to your list of manuals |
Page 73 highlights
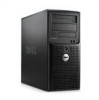
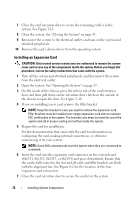
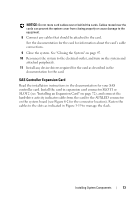
NOTICE: Do not route card cables over or behind the cards. Cables routed over the cards can prevent the system cover from closing properly or cause damage to the equipment. 8 Connect any cables that should be attached to the card. See the documentation for the card for information about the card's cable connections. 9 Close the system. See "Closing the System" on page 47. 10 Reconnect the system to the electrical outlet, and turn on the system and attached peripherals. 11 Install any device drivers required for the card as described in the documentation for the card. SAS Controller Expansion Card Read the installation instructions in the documentation for your SAS controller card. Install the card in expansion card connector SLOT1 or SLOT2 (see "Installing an Expansion Card" on page 72), and connect the hard-drive activity indicator cable from the card to the AUXLED connector on the system board (see Figure 6-2 for the connector location). Fasten the cables to the slots as indicated in Figure 3-19 to manage the slack. Installing System Components 73
-
 1
1 -
2
-
3
-
4
-
5
-
6
-
7
-
8
-
9
-
10
-
11
-
12
-
13
-
14
-
15
-
16
-
17
-
18
-
19
-
20
-
21
-
22
-
23
-
24
-
25
-
26
-
27
-
28
-
29
-
30
-
31
-
32
-
33
-
34
-
35
-
36
-
37
-
38
-
39
-
40
-
41
-
42
-
43
-
44
-
45
-
46
-
47
-
48
-
49
-
50
-
51
-
52
-
53
-
54
-
55
-
56
-
57
-
58
-
59
-
60
-
61
-
62
-
63
-
64
-
65
-
66
-
67
-
 68
68 -
 69
69 -
 70
70 -
 71
71 -
 72
72 -
 73
73 -
 74
74 -
 75
75 -
 76
76 -
 77
77 -
 78
78 -
79
-
80
-
81
-
82
-
83
-
84
-
85
-
86
-
87
-
88
-
89
-
90
-
91
-
92
-
93
-
94
-
95
-
96
-
97
-
98
-
99
-
100
-
101
-
102
-
103
-
104
-
105
-
106
-
107
-
108
-
109
-
110
-
111
-
112
-
113
-
114
-
115
-
116
-
117
-
118
-
119
-
120
-
121
-
122
-
123
-
124
-
125
-
126
-
127
-
128
-
129
-
130
-
131
-
132
-
133
-
134
-
135
-
136
-
137
-
138
-
139
-
140
-
141
-
142
-
143
-
144
-
145
-
146
-
147
-
148
-
149
-
150
-
151
-
152
-
153
-
154
-
155
-
156
-
157
-
158
 |
 |
