Dell PowerEdge T100 Hardware Owner's Manual - Page 86
Replacing the Cooling Fans, If you are replacing the hard drive cooling fan
 |
View all Dell PowerEdge T100 manuals
Add to My Manuals
Save this manual to your list of manuals |
Page 86 highlights
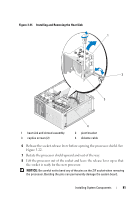
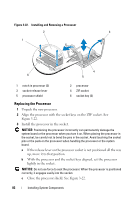
Figure 3-24. Removing and Installing the Heat Sink Cooling Fan 1 2 3 4 1 bottom release tab 3 bottom mounting tabs 2 side release tab 4 bottom mounting holes Replacing the Cooling Fans CAUTION: Only trained service technicians are authorized to remove the system cover and access any of the components inside the system. Before you begin this procedure, review the safety instructions that came with the system. If you are replacing the hard drive cooling fan: 1 Align the bottom mounting tabs on the replacement fan with the mounting holes in the system chassis. 2 Squeeze the top two release tabs and guide the assembly forward so that it locks into place. 86 Installing System Components
-
 1
1 -
2
-
3
-
4
-
5
-
6
-
7
-
8
-
9
-
10
-
11
-
12
-
13
-
14
-
15
-
16
-
17
-
18
-
19
-
20
-
21
-
22
-
23
-
24
-
25
-
26
-
27
-
28
-
29
-
30
-
31
-
32
-
33
-
34
-
35
-
36
-
37
-
38
-
39
-
40
-
41
-
42
-
43
-
44
-
45
-
46
-
47
-
48
-
49
-
50
-
51
-
52
-
53
-
54
-
55
-
56
-
57
-
58
-
59
-
60
-
61
-
62
-
63
-
64
-
65
-
66
-
67
-
68
-
69
-
70
-
71
-
72
-
73
-
74
-
75
-
76
-
77
-
78
-
79
-
80
-
 81
81 -
 82
82 -
 83
83 -
 84
84 -
 85
85 -
 86
86 -
 87
87 -
 88
88 -
 89
89 -
 90
90 -
 91
91 -
92
-
93
-
94
-
95
-
96
-
97
-
98
-
99
-
100
-
101
-
102
-
103
-
104
-
105
-
106
-
107
-
108
-
109
-
110
-
111
-
112
-
113
-
114
-
115
-
116
-
117
-
118
-
119
-
120
-
121
-
122
-
123
-
124
-
125
-
126
-
127
-
128
-
129
-
130
-
131
-
132
-
133
-
134
-
135
-
136
-
137
-
138
-
139
-
140
-
141
-
142
-
143
-
144
-
145
-
146
-
147
-
148
-
149
-
150
-
151
-
152
-
153
-
154
-
155
-
156
-
157
-
158
 |
 |

86
Installing System Components
Figure 3-24.
Removing and Installing the Heat Sink Cooling Fan
Replacing the Cooling Fans
CAUTION:
Only trained service technicians are authorized to remove the system
cover and access any of the components inside the system. Before you begin this
procedure, review the safety instructions that came with the system.
If you are replacing the hard drive cooling fan:
1
Align the bottom mounting tabs on the replacement fan with the
mounting holes in the system chassis.
2
Squeeze the top two release tabs and guide the assembly forward so that it
locks into place.
1
bottom release tab
2
side release tab
3
bottom mounting tabs
4
bottom mounting holes
2
3
1
4