HP 6125XLG R2306-HP 6125XLG Blade Switch Layer 3 - IP Services Configuration G - Page 50
Applying an address pool on an interface, Configuring IP address conflict detection
 |
View all HP 6125XLG manuals
Add to My Manuals
Save this manual to your list of manuals |
Page 50 highlights
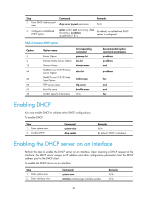
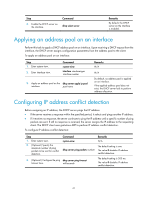
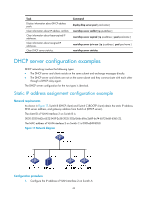
Step 3. Enable the DHCP server on the interface. Command dhcp select server Remarks By default, the DHCP server on the interface is enabled. Applying an address pool on an interface Perform this task to apply a DHCP address pool on an interface. Upon receiving a DHCP request from the interface, the DHCP server assigns configuration parameters from the address pool to the client. To apply an address pool on an interface: Step 1. Enter system view. 2. Enter interface view. Command system-view interface interface-type interface-number 3. Apply an address pool on the dhcp server apply ip-pool interface. pool-name Remarks N/A N/A By default, no address pool is applied on an interface. If the applied address pool does not exist, the DHCP server fails to perform address allocation. Configuring IP address conflict detection Before assigning an IP address, the DHCP server pings that IP address. • If the server receives a response within the specified period, it selects and pings another IP address. • If it receives no response, the server continues to ping the IP address until a specific number of ping packets are sent. If still no response is received, the server assigns the IP address to the requesting client. The DHCP client uses gratuitous ARP to perform IP address conflict detection. To configure IP address conflict detection: Step 1. Enter system view. 2. (Optional.) Specify the maximum number of ping packets to be sent for conflict detection. Command system-view dhcp server ping packets number 3. (Optional.) Configure the ping dhcp server ping timeout timeout time. milliseconds Remarks N/A The default setting is one. The value 0 disables IP address conflict detection. The default setting is 500 ms. The value 0 disables IP address conflict detection. 41
-
 1
1 -
2
-
3
-
4
-
5
-
6
-
7
-
8
-
9
-
10
-
11
-
12
-
13
-
14
-
15
-
16
-
17
-
18
-
19
-
20
-
21
-
22
-
23
-
24
-
25
-
26
-
27
-
28
-
29
-
30
-
31
-
32
-
33
-
34
-
35
-
36
-
37
-
38
-
39
-
40
-
41
-
42
-
43
-
44
-
 45
45 -
 46
46 -
 47
47 -
 48
48 -
 49
49 -
 50
50 -
 51
51 -
 52
52 -
 53
53 -
 54
54 -
 55
55 -
56
-
57
-
58
-
59
-
60
-
61
-
62
-
63
-
64
-
65
-
66
-
67
-
68
-
69
-
70
-
71
-
72
-
73
-
74
-
75
-
76
-
77
-
78
-
79
-
80
-
81
-
82
-
83
-
84
-
85
-
86
-
87
-
88
-
89
-
90
-
91
-
92
-
93
-
94
-
95
-
96
-
97
-
98
-
99
-
100
-
101
-
102
-
103
-
104
-
105
-
106
-
107
-
108
-
109
-
110
-
111
-
112
-
113
-
114
-
115
-
116
-
117
-
118
-
119
-
120
-
121
-
122
-
123
-
124
-
125
-
126
-
127
-
128
-
129
-
130
-
131
-
132
-
133
-
134
-
135
-
136
-
137
-
138
-
139
-
140
-
141
-
142
-
143
-
144
-
145
-
146
-
147
-
148
-
149
-
150
-
151
-
152
-
153
-
154
-
155
-
156
-
157
-
158
-
159
-
160
-
161
-
162
-
163
-
164
-
165
-
166
-
167
-
168
-
169
-
170
-
171
-
172
-
173
-
174
-
175
-
176
-
177
-
178
-
179
-
180
-
181
-
182
-
183
-
184
-
185
-
186
-
187
-
188
-
189
-
190
-
191
-
192
-
193
-
194
-
195
-
196
-
197
-
198
-
199
-
200
-
201
-
202
-
203
-
204
-
205
-
206
-
207
-
208
-
209
-
210
-
211
-
212
-
213
-
214
-
215
-
216
-
217
-
218
-
219
-
220
-
221
-
222
-
223
-
224
-
225
-
226
-
227
-
228
-
229
-
230
 |
 |