HP 9085mfp HP 9085mfp - (English) System Administrator Guide - Page 111
Checking Feature Selections and Proof Copying continued, To change the settings
 |
View all HP 9085mfp manuals
Add to My Manuals
Save this manual to your list of manuals |
Page 111 highlights
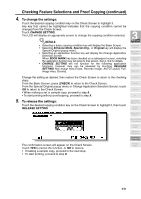
Checking Feature Selections and Proof Copying (continued) 4. To change the settings: Touch the desired copying condition key on the Check Screen to highlight it. Any key that cannot be highlighted indicates that the copying condition cannot be changed from the Check Screen. Touch CHANGE SETTING. The LCD will display an appropriate screen to change the copying condition selected. DETAILS • Selecting a basic copying condition key will display the Basic Screen. • Selecting Enhance Mode, Special Orig., or Original key will display the Special Original popup menu. • Selecting an application function key will display the Change Application Selection Screen. When BOOK MARK has been checked on a subsequent screen, selecting the application function key will jump to that screen. See p. 9-2 for details. • CHANGE SETTING will not function for the following application functions, however they can be released by touching RELEASE SETTING: Non-Image Area Erase, Reverse Image, AUTO Layout, FullImage Area, Overlay. 3 Copying Operations Positioning Originals Setting Print Quantity Set Job During Warmup Stop Scan/Print Paper Size Change the setting as desired, then restore the Check Screen to return to the checking steps. From the Basic Screen, press [CHECK] to return to the Check Screen. From the Special Original popup menu or Change Application Selection Screen, touch OK to return to the Check Screen. • When making a set or sample copy, proceed to step 6. • To start printing without proofcopying, proceed to step 8. 5. To release the settings: Touch the desired copying condition key on the Check Screen to highlight it, then touch RELEASE SETTING. The confirmation screen will appear on the Check Screen. Touch YES to cancel the function, or NO to restore. • If making a sample copy, proceed to the next step. • To start printing, proceed to step 8. Lens Mode Density 1-2, 2-2 2-1 Multi-Sheet Bypass Tray Using Memory Output without Finisher Q3219A/Q3220A Output Modes Binding Mode Recalling Previous Job Check Mode & Proof Copy Interrupt Mode 3-51
-
 1
1 -
2
-
3
-
4
-
5
-
6
-
7
-
8
-
9
-
10
-
11
-
12
-
13
-
14
-
15
-
16
-
17
-
18
-
19
-
20
-
21
-
22
-
23
-
24
-
25
-
26
-
27
-
28
-
29
-
30
-
31
-
32
-
33
-
34
-
35
-
36
-
37
-
38
-
39
-
40
-
41
-
42
-
43
-
44
-
45
-
46
-
47
-
48
-
49
-
50
-
51
-
52
-
53
-
54
-
55
-
56
-
57
-
58
-
59
-
60
-
61
-
62
-
63
-
64
-
65
-
66
-
67
-
68
-
69
-
70
-
71
-
72
-
73
-
74
-
75
-
76
-
77
-
78
-
79
-
80
-
81
-
82
-
83
-
84
-
85
-
86
-
87
-
88
-
89
-
90
-
91
-
92
-
93
-
94
-
95
-
96
-
97
-
98
-
99
-
100
-
101
-
102
-
103
-
104
-
105
-
 106
106 -
 107
107 -
 108
108 -
 109
109 -
 110
110 -
 111
111 -
 112
112 -
 113
113 -
 114
114 -
 115
115 -
 116
116 -
117
-
118
-
119
-
120
-
121
-
122
-
123
-
124
-
125
-
126
-
127
-
128
-
129
-
130
-
131
-
132
-
133
-
134
-
135
-
136
-
137
-
138
-
139
-
140
-
141
-
142
-
143
-
144
-
145
-
146
-
147
-
148
-
149
-
150
-
151
-
152
-
153
-
154
-
155
-
156
-
157
-
158
-
159
-
160
-
161
-
162
-
163
-
164
-
165
-
166
-
167
-
168
-
169
-
170
-
171
-
172
-
173
-
174
-
175
-
176
-
177
-
178
-
179
-
180
-
181
-
182
-
183
-
184
-
185
-
186
-
187
-
188
-
189
-
190
-
191
-
192
-
193
-
194
-
195
-
196
-
197
-
198
-
199
-
200
-
201
-
202
-
203
-
204
-
205
-
206
-
207
-
208
-
209
-
210
-
211
-
212
-
213
-
214
-
215
-
216
-
217
-
218
-
219
-
220
-
221
-
222
-
223
-
224
-
225
-
226
-
227
-
228
-
229
-
230
-
231
-
232
-
233
-
234
-
235
-
236
-
237
-
238
-
239
-
240
-
241
-
242
-
243
-
244
-
245
-
246
-
247
-
248
-
249
-
250
-
251
-
252
-
253
-
254
-
255
-
256
-
257
-
258
-
259
-
260
-
261
-
262
-
263
-
264
-
265
-
266
-
267
-
268
-
269
-
270
-
271
-
272
-
273
-
274
-
275
-
276
-
277
-
278
-
279
-
280
-
281
-
282
-
283
-
284
-
285
-
286
-
287
-
288
-
289
-
290
-
291
-
292
-
293
-
294
-
295
-
296
-
297
-
298
-
299
-
300
-
301
-
302
-
303
-
304
-
305
-
306
-
307
-
308
-
309
-
310
-
311
-
312
-
313
-
314
-
315
-
316
-
317
-
318
-
319
-
320
-
321
-
322
-
323
-
324
-
325
-
326
-
327
-
328
-
329
-
330
-
331
-
332
-
333
-
334
-
335
-
336
-
337
-
338
-
339
-
340
-
341
-
342
-
343
-
344
-
345
-
346
-
347
-
348
-
349
-
350
-
351
-
352
-
353
-
354
-
355
-
356
-
357
-
358
-
359
-
360
 |
 |
