HP 9085mfp HP 9085mfp - (English) System Administrator Guide - Page 231
Copying Image in the Centre of Copy Paper AUTO Layout continued
 |
View all HP 9085mfp manuals
Add to My Manuals
Save this manual to your list of manuals |
Page 231 highlights
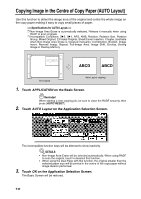
Copying Image in the Centre of Copy Paper (AUTO Layout) (continued) 4. Select the desired magnification and paper size on the Basic Screen. DETAILS • APS and AMS are automatically released, and 1.00 (100%) is selected as a magnification ratio. • Copy mode is automatically set to 1u1. When selecting 1u2 mode, Platen store mode will function automatically. 5. Enter the desired print quantity from the control panel keypad. HINT See p. 3-7 for details on setting print quantity. 6. Position original(s) FACE UP in the document feeder or FACE DOWN on the platen glass. HINT For details on positioning originals, see p. 3-2 to p. 3-6. Reminder! DO NOT close the RADF when Non-Image Area Erase is selected. Placing original obliquely on the platen glass may cause black copy marks. 7. Press [START]. Application Selection Screen Sheet/Cover Insertion Chapter Combination Booklet OHP Interleave Image Insert Dual Page Program Job CAUTION When the finisher / trimmer unit / paper exit tray capacity is exceeded due to the print quantity selected, remove the copied sets as they exit; otherwise, mishandled paper will occur. Non-Image Area Erase Reverse Image Repeat Having Any Problem? The AUTO layout function may not operate properly if the lighting in the work place is directly over the platen glass. In this case, consult your service representative about an appropriate place for installation. 9 Applications Frame/Fold Erasure AUTO Layout Full-Image Area Image Shift Reduce & Shift Stamp Overlay Overlay Memory 9-41
-
 1
1 -
2
-
3
-
4
-
5
-
6
-
7
-
8
-
9
-
10
-
11
-
12
-
13
-
14
-
15
-
16
-
17
-
18
-
19
-
20
-
21
-
22
-
23
-
24
-
25
-
26
-
27
-
28
-
29
-
30
-
31
-
32
-
33
-
34
-
35
-
36
-
37
-
38
-
39
-
40
-
41
-
42
-
43
-
44
-
45
-
46
-
47
-
48
-
49
-
50
-
51
-
52
-
53
-
54
-
55
-
56
-
57
-
58
-
59
-
60
-
61
-
62
-
63
-
64
-
65
-
66
-
67
-
68
-
69
-
70
-
71
-
72
-
73
-
74
-
75
-
76
-
77
-
78
-
79
-
80
-
81
-
82
-
83
-
84
-
85
-
86
-
87
-
88
-
89
-
90
-
91
-
92
-
93
-
94
-
95
-
96
-
97
-
98
-
99
-
100
-
101
-
102
-
103
-
104
-
105
-
106
-
107
-
108
-
109
-
110
-
111
-
112
-
113
-
114
-
115
-
116
-
117
-
118
-
119
-
120
-
121
-
122
-
123
-
124
-
125
-
126
-
127
-
128
-
129
-
130
-
131
-
132
-
133
-
134
-
135
-
136
-
137
-
138
-
139
-
140
-
141
-
142
-
143
-
144
-
145
-
146
-
147
-
148
-
149
-
150
-
151
-
152
-
153
-
154
-
155
-
156
-
157
-
158
-
159
-
160
-
161
-
162
-
163
-
164
-
165
-
166
-
167
-
168
-
169
-
170
-
171
-
172
-
173
-
174
-
175
-
176
-
177
-
178
-
179
-
180
-
181
-
182
-
183
-
184
-
185
-
186
-
187
-
188
-
189
-
190
-
191
-
192
-
193
-
194
-
195
-
196
-
197
-
198
-
199
-
200
-
201
-
202
-
203
-
204
-
205
-
206
-
207
-
208
-
209
-
210
-
211
-
212
-
213
-
214
-
215
-
216
-
217
-
218
-
219
-
220
-
221
-
222
-
223
-
224
-
225
-
 226
226 -
 227
227 -
 228
228 -
 229
229 -
 230
230 -
 231
231 -
 232
232 -
 233
233 -
 234
234 -
 235
235 -
 236
236 -
237
-
238
-
239
-
240
-
241
-
242
-
243
-
244
-
245
-
246
-
247
-
248
-
249
-
250
-
251
-
252
-
253
-
254
-
255
-
256
-
257
-
258
-
259
-
260
-
261
-
262
-
263
-
264
-
265
-
266
-
267
-
268
-
269
-
270
-
271
-
272
-
273
-
274
-
275
-
276
-
277
-
278
-
279
-
280
-
281
-
282
-
283
-
284
-
285
-
286
-
287
-
288
-
289
-
290
-
291
-
292
-
293
-
294
-
295
-
296
-
297
-
298
-
299
-
300
-
301
-
302
-
303
-
304
-
305
-
306
-
307
-
308
-
309
-
310
-
311
-
312
-
313
-
314
-
315
-
316
-
317
-
318
-
319
-
320
-
321
-
322
-
323
-
324
-
325
-
326
-
327
-
328
-
329
-
330
-
331
-
332
-
333
-
334
-
335
-
336
-
337
-
338
-
339
-
340
-
341
-
342
-
343
-
344
-
345
-
346
-
347
-
348
-
349
-
350
-
351
-
352
-
353
-
354
-
355
-
356
-
357
-
358
-
359
-
360
 |
 |
