HP 9085mfp HP 9085mfp - (English) System Administrator Guide - Page 317
[3] E.K.C. Function Setting
 |
View all HP 9085mfp manuals
Add to My Manuals
Save this manual to your list of manuals |
Page 317 highlights
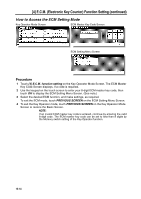
[4] E.C.M. (Electronic Key Counter) Function Setting (continued) [3] E.C.M. Function Setting Use this function to turn ECM On or Off, or to select whether the machine will stop when the count limit is reached, or if the mfp will complete the copy job before stopping when reaching maximum copy count. ECM Setting Menu Screen ECM Function Setting Screen Key Operator Mode System Initial Setting mfp Initial Setting User Setting Mode E.C.M. Procedure 1 Touch [4] E.C.M. function setting on the Key Operator Mode Screen. Enter an 8-digit ECM master key code, then touch OK to display the ECM Setting Menu Screen. NOTE: If an invalid ECM master key code is entered, continue by entering the valid 8-digit code. 2 Touch [3] E.C.M. function setting. The ECM Function Setting Screen will be displayed. 3 Touch ECM On to activate ECM or touch ECM Off to de-activate ECM. The selected key will be highlighted. 4 Touch Immediately to stop the machine at once when the copy limit is reached. In this case, copy conditions selected for the current job will be cleared. To continue the job using the same user password, change the copy limit of the password or clear the copy count. Touch After job to stop the machine after the current job is completed, when copy limit is reached. Touch Warning to only display a warning message when copy limit is reached. The selected key will be highlighted. 5 Touch OK to complete the setting and return to the ECM Setting Menu Screen. 6 If other ECM setting changes are required, touch desired key, from [1]~[3]. 7 Touch PREVIOUS SCREEN to restore the Key Operator Mode Screen. 8 If no further changes are required, touch PREVIOUS SCREEN to restore the Basic Screen to perform copying operations. Lock/Delete Job Memory Paper Type/ Special Size Panel Contrast/ Key Sound Key Operator Data Setting Weekly Timer Control Panel Adjustment Tray Auto Select Setting Power Save Setting Memory Switch Machine Management List Print Call Remote Centre Side 2 Lens Adjustment Finisher Adjustment HDD Management Scan Transmission Non-Image Area Erase Timing Adjustment Centering Adjustment 13 Key Operator Mode 13-19
-
 1
1 -
2
-
3
-
4
-
5
-
6
-
7
-
8
-
9
-
10
-
11
-
12
-
13
-
14
-
15
-
16
-
17
-
18
-
19
-
20
-
21
-
22
-
23
-
24
-
25
-
26
-
27
-
28
-
29
-
30
-
31
-
32
-
33
-
34
-
35
-
36
-
37
-
38
-
39
-
40
-
41
-
42
-
43
-
44
-
45
-
46
-
47
-
48
-
49
-
50
-
51
-
52
-
53
-
54
-
55
-
56
-
57
-
58
-
59
-
60
-
61
-
62
-
63
-
64
-
65
-
66
-
67
-
68
-
69
-
70
-
71
-
72
-
73
-
74
-
75
-
76
-
77
-
78
-
79
-
80
-
81
-
82
-
83
-
84
-
85
-
86
-
87
-
88
-
89
-
90
-
91
-
92
-
93
-
94
-
95
-
96
-
97
-
98
-
99
-
100
-
101
-
102
-
103
-
104
-
105
-
106
-
107
-
108
-
109
-
110
-
111
-
112
-
113
-
114
-
115
-
116
-
117
-
118
-
119
-
120
-
121
-
122
-
123
-
124
-
125
-
126
-
127
-
128
-
129
-
130
-
131
-
132
-
133
-
134
-
135
-
136
-
137
-
138
-
139
-
140
-
141
-
142
-
143
-
144
-
145
-
146
-
147
-
148
-
149
-
150
-
151
-
152
-
153
-
154
-
155
-
156
-
157
-
158
-
159
-
160
-
161
-
162
-
163
-
164
-
165
-
166
-
167
-
168
-
169
-
170
-
171
-
172
-
173
-
174
-
175
-
176
-
177
-
178
-
179
-
180
-
181
-
182
-
183
-
184
-
185
-
186
-
187
-
188
-
189
-
190
-
191
-
192
-
193
-
194
-
195
-
196
-
197
-
198
-
199
-
200
-
201
-
202
-
203
-
204
-
205
-
206
-
207
-
208
-
209
-
210
-
211
-
212
-
213
-
214
-
215
-
216
-
217
-
218
-
219
-
220
-
221
-
222
-
223
-
224
-
225
-
226
-
227
-
228
-
229
-
230
-
231
-
232
-
233
-
234
-
235
-
236
-
237
-
238
-
239
-
240
-
241
-
242
-
243
-
244
-
245
-
246
-
247
-
248
-
249
-
250
-
251
-
252
-
253
-
254
-
255
-
256
-
257
-
258
-
259
-
260
-
261
-
262
-
263
-
264
-
265
-
266
-
267
-
268
-
269
-
270
-
271
-
272
-
273
-
274
-
275
-
276
-
277
-
278
-
279
-
280
-
281
-
282
-
283
-
284
-
285
-
286
-
287
-
288
-
289
-
290
-
291
-
292
-
293
-
294
-
295
-
296
-
297
-
298
-
299
-
300
-
301
-
302
-
303
-
304
-
305
-
306
-
307
-
308
-
309
-
310
-
311
-
 312
312 -
 313
313 -
 314
314 -
 315
315 -
 316
316 -
 317
317 -
 318
318 -
 319
319 -
 320
320 -
 321
321 -
 322
322 -
323
-
324
-
325
-
326
-
327
-
328
-
329
-
330
-
331
-
332
-
333
-
334
-
335
-
336
-
337
-
338
-
339
-
340
-
341
-
342
-
343
-
344
-
345
-
346
-
347
-
348
-
349
-
350
-
351
-
352
-
353
-
354
-
355
-
356
-
357
-
358
-
359
-
360
 |
 |
