HP 9120 HP Officejet 9100 - User Guide - Page 190
Tips for avoiding jams, Close the ADF.
 |
UPC - 829160117782
View all HP 9120 manuals
Add to My Manuals
Save this manual to your list of manuals |
Page 190 highlights
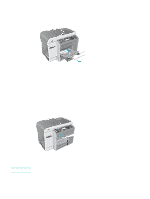
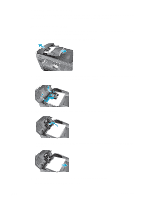
8 Close the ADF. 9 Lower the green lever. 10 Reinstall the jam cleanout part by inserting it as shown. Push down on the two tabs until the part snaps into place. Install the cleanout part correctly, because future jamming might occur if the cleanout part is not replaced correctly. 11 Close the ADF and replace the ADF input tray. Tips for avoiding jams If media repeatedly jams in the all-in-one, follow these tips to avoid the jams. z Make sure that the printhead latch is correctly engaged. z Make sure that nothing is blocking the paper path. z Do not overload the trays. Tray 1 holds up to 150 sheets of paper and tray 2 holds up to 250 sheets. Make sure that the media does not exceed the maximum stack height that is indicated inside the tray. z Load media correctly. See Loading the print media for more information. z Make sure that the media width and length adjusters fit snugly but gently against the stack of media, but do not wrinkle or bend the media. z Do not combine different media types and sizes in the same tray. z Always use media that meets specifications. See Choosing the print media for more information. z Do not use media that is damaged, curled, crumpled, or wrinkled. Do not use media with cutouts or perforations or media that is heavily textured or embossed. z Avoid media that is too thin, has a slick texture, or "stretches" easily. Such media does not feed correctly through the all-in-one. z Do not add media to a tray while the all-in-one is printing or scanning. 188 10 - Maintaining and troubleshooting ENWW
-
 1
1 -
2
-
3
-
4
-
5
-
6
-
7
-
8
-
9
-
10
-
11
-
12
-
13
-
14
-
15
-
16
-
17
-
18
-
19
-
20
-
21
-
22
-
23
-
24
-
25
-
26
-
27
-
28
-
29
-
30
-
31
-
32
-
33
-
34
-
35
-
36
-
37
-
38
-
39
-
40
-
41
-
42
-
43
-
44
-
45
-
46
-
47
-
48
-
49
-
50
-
51
-
52
-
53
-
54
-
55
-
56
-
57
-
58
-
59
-
60
-
61
-
62
-
63
-
64
-
65
-
66
-
67
-
68
-
69
-
70
-
71
-
72
-
73
-
74
-
75
-
76
-
77
-
78
-
79
-
80
-
81
-
82
-
83
-
84
-
85
-
86
-
87
-
88
-
89
-
90
-
91
-
92
-
93
-
94
-
95
-
96
-
97
-
98
-
99
-
100
-
101
-
102
-
103
-
104
-
105
-
106
-
107
-
108
-
109
-
110
-
111
-
112
-
113
-
114
-
115
-
116
-
117
-
118
-
119
-
120
-
121
-
122
-
123
-
124
-
125
-
126
-
127
-
128
-
129
-
130
-
131
-
132
-
133
-
134
-
135
-
136
-
137
-
138
-
139
-
140
-
141
-
142
-
143
-
144
-
145
-
146
-
147
-
148
-
149
-
150
-
151
-
152
-
153
-
154
-
155
-
156
-
157
-
158
-
159
-
160
-
161
-
162
-
163
-
164
-
165
-
166
-
167
-
168
-
169
-
170
-
171
-
172
-
173
-
174
-
175
-
176
-
177
-
178
-
179
-
180
-
181
-
182
-
183
-
184
-
 185
185 -
 186
186 -
 187
187 -
 188
188 -
 189
189 -
 190
190 -
 191
191 -
 192
192 -
 193
193 -
 194
194 -
 195
195 -
196
-
197
-
198
-
199
-
200
-
201
-
202
-
203
-
204
-
205
-
206
-
207
-
208
-
209
-
210
-
211
-
212
-
213
-
214
-
215
-
216
-
217
-
218
-
219
-
220
-
221
-
222
-
223
-
224
-
225
-
226
-
227
-
228
-
229
-
230
-
231
-
232
-
233
-
234
-
235
-
236
-
237
-
238
-
239
-
240
-
241
-
242
-
243
-
244
-
245
-
246
-
247
-
248
-
249
-
250
-
251
-
252
-
253
-
254
-
255
-
256
-
257
-
258
-
259
-
260
-
261
-
262
-
263
-
264
-
265
-
266
-
267
-
268
-
269
-
270
-
271
-
272
-
273
-
274
-
275
-
276
-
277
-
278
-
279
-
280
 |
 |
