HP EX475 HP EX470, EX475 MediaSmart Server - User's Guide - Page 33
Important, To enable the guest account, Assistant, User Accounts, User Accounts Setup
 |
UPC - 883585222643
View all HP EX475 manuals
Add to My Manuals
Save this manual to your list of manuals |
Page 33 highlights
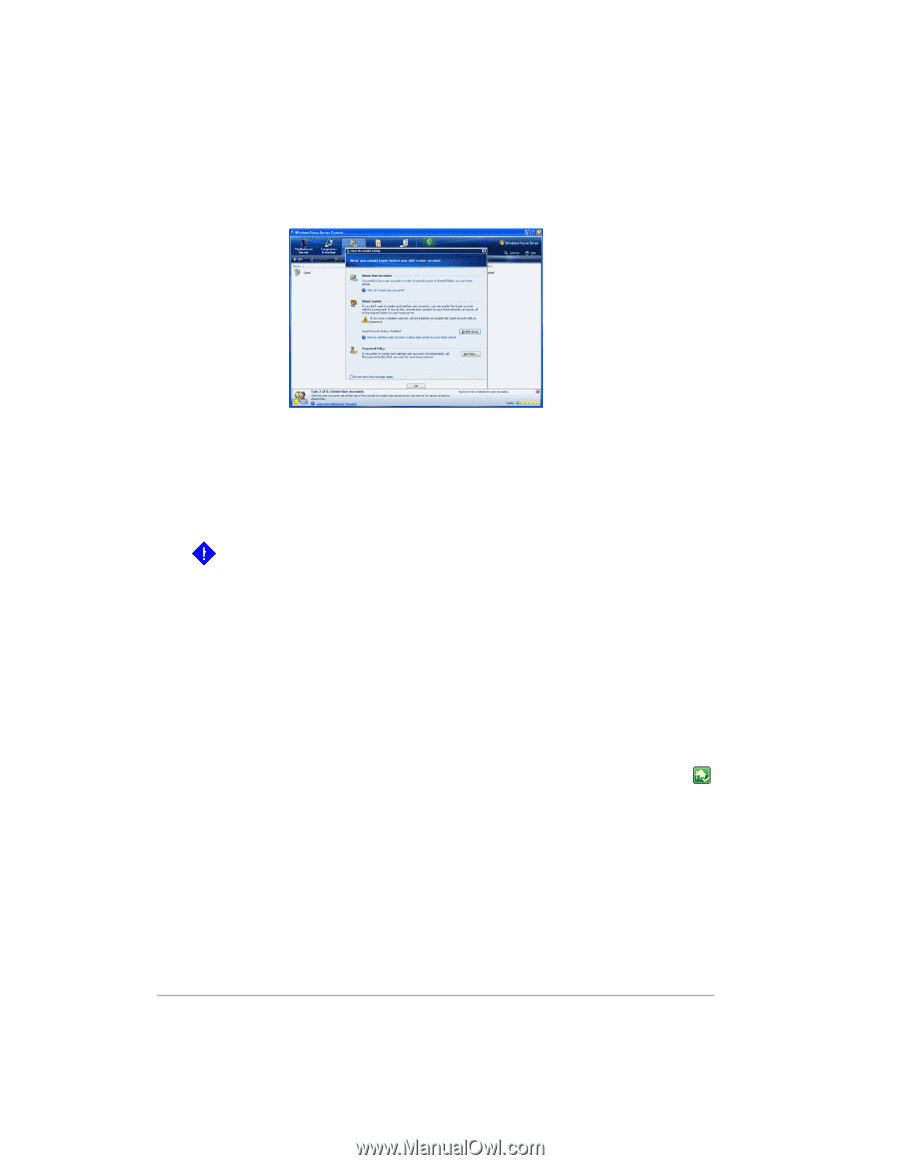
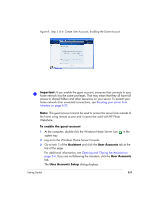
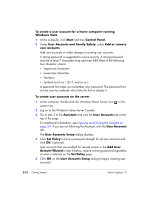
Figure 8: Step 2 of 6: Create User Accounts, Enabling the Guest Account Important: If you enable the guest account, everyone that connects to your home network has the same privileges. That may mean that they all have full access to shared folders and other resources on your server. To protect your home network from unwanted connections, see Securing your server from intruders on page 6-22. Note: The guest account cannot be used to access the server from outside of the home using remote access and it cannot be used with HP Photo Webshare. To enable the guest account 1 At the computer, double-click the Windows Home Server icon system tray. in the 2 Log on to the Windows Home Server Console. 3 Go to task 2 of the Assistant and click the User Accounts tab at the top of the page. For additional information, see Opening and Closing the Assistant on page 2-4. If you are not following the Assistant, click the User Accounts tab. The User Accounts Setup dialog displays. Getting Started 2-9
-
 1
1 -
2
-
3
-
4
-
5
-
6
-
7
-
8
-
9
-
10
-
11
-
12
-
13
-
14
-
15
-
16
-
17
-
18
-
19
-
20
-
21
-
22
-
23
-
24
-
25
-
26
-
27
-
 28
28 -
 29
29 -
 30
30 -
 31
31 -
 32
32 -
 33
33 -
 34
34 -
 35
35 -
 36
36 -
 37
37 -
 38
38 -
39
-
40
-
41
-
42
-
43
-
44
-
45
-
46
-
47
-
48
-
49
-
50
-
51
-
52
-
53
-
54
-
55
-
56
-
57
-
58
-
59
-
60
-
61
-
62
-
63
-
64
-
65
-
66
-
67
-
68
-
69
-
70
-
71
-
72
-
73
-
74
-
75
-
76
-
77
-
78
-
79
-
80
-
81
-
82
-
83
-
84
-
85
-
86
-
87
-
88
-
89
-
90
-
91
-
92
-
93
-
94
-
95
-
96
-
97
-
98
-
99
-
100
-
101
-
102
-
103
-
104
-
105
-
106
-
107
-
108
-
109
-
110
-
111
-
112
-
113
-
114
-
115
-
116
-
117
-
118
-
119
-
120
-
121
-
122
-
123
-
124
-
125
-
126
-
127
-
128
-
129
-
130
-
131
-
132
-
133
-
134
-
135
-
136
-
137
-
138
-
139
-
140
-
141
-
142
-
143
-
144
-
145
-
146
-
147
-
148
-
149
-
150
-
151
-
152
-
153
-
154
-
155
-
156
-
157
-
158
-
159
-
160
-
161
-
162
-
163
-
164
-
165
-
166
-
167
-
168
-
169
-
170
-
171
-
172
-
173
-
174
-
175
-
176
-
177
-
178
-
179
-
180
-
181
-
182
-
183
-
184
-
185
-
186
-
187
-
188
-
189
-
190
-
191
-
192
 |
 |