HP EX475 HP EX470, EX475 MediaSmart Server - User's Guide - Page 42
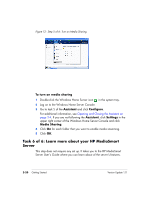
To access Photo Webshare settings
 |
UPC - 883585222643
View all HP EX475 manuals
Add to My Manuals
Save this manual to your list of manuals |
Page 42 highlights
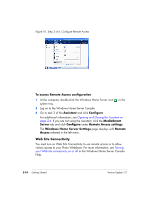
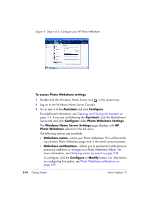
Figure 11: Step 4 of 6: Configure your HP Photo Webshare To access Photo Webshare settings 1 Double-click the Windows Home Server icon in the system tray. 2 Log on to the Windows Home Server Console. 3 Go to task 4 of the Assistant and click Configure. For additional information, see Opening and Closing the Assistant on page 2-4. If you are not following the Assistant, click the MediaSmart Server tab and click Configure under Photo Webshare Settings. The Windows Home Server Settings page displays with HP Photo Webshare selected in the left menu. The following options are available: ƒ Webshare name-name your Photo Webshare. This will be at the top of every Photo Webshare page and in the email announcements. ƒ Webshare notifications-allows you to send email notifications to announce additions or changes to a Photo Webshare Album. For more information, see Notifying visitors by email on page 5-18. To configure, click the Configure or Modify button. For information on configuring this option, see Photo Webshare notifications on page 2-19. 2-18 Getting Started Version Update 1.1.1
-
 1
1 -
2
-
3
-
4
-
5
-
6
-
7
-
8
-
9
-
10
-
11
-
12
-
13
-
14
-
15
-
16
-
17
-
18
-
19
-
20
-
21
-
22
-
23
-
24
-
25
-
26
-
27
-
28
-
29
-
30
-
31
-
32
-
33
-
34
-
35
-
36
-
 37
37 -
 38
38 -
 39
39 -
 40
40 -
 41
41 -
 42
42 -
 43
43 -
 44
44 -
 45
45 -
 46
46 -
 47
47 -
48
-
49
-
50
-
51
-
52
-
53
-
54
-
55
-
56
-
57
-
58
-
59
-
60
-
61
-
62
-
63
-
64
-
65
-
66
-
67
-
68
-
69
-
70
-
71
-
72
-
73
-
74
-
75
-
76
-
77
-
78
-
79
-
80
-
81
-
82
-
83
-
84
-
85
-
86
-
87
-
88
-
89
-
90
-
91
-
92
-
93
-
94
-
95
-
96
-
97
-
98
-
99
-
100
-
101
-
102
-
103
-
104
-
105
-
106
-
107
-
108
-
109
-
110
-
111
-
112
-
113
-
114
-
115
-
116
-
117
-
118
-
119
-
120
-
121
-
122
-
123
-
124
-
125
-
126
-
127
-
128
-
129
-
130
-
131
-
132
-
133
-
134
-
135
-
136
-
137
-
138
-
139
-
140
-
141
-
142
-
143
-
144
-
145
-
146
-
147
-
148
-
149
-
150
-
151
-
152
-
153
-
154
-
155
-
156
-
157
-
158
-
159
-
160
-
161
-
162
-
163
-
164
-
165
-
166
-
167
-
168
-
169
-
170
-
171
-
172
-
173
-
174
-
175
-
176
-
177
-
178
-
179
-
180
-
181
-
182
-
183
-
184
-
185
-
186
-
187
-
188
-
189
-
190
-
191
-
192
 |
 |
