HP EX475 HP EX470, EX475 MediaSmart Server - User's Guide - Page 64
Visitors, Create Visitor, Email Address, User Name, Note: Passwords, Add Photos: These visitors can
 |
UPC - 883585222643
View all HP EX475 manuals
Add to My Manuals
Save this manual to your list of manuals |
Page 64 highlights
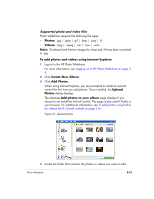
1 Log on to the HP Photo Webshare. For more information, see Logging on to HP Photo Webshare on page 54. 2 Webshare Managers click Visitors in the upper right corner of the HP Photo Webshare. 3 Click Create Visitor or click Edit next to an existing visitor. If adding a visitor, the first field is the email address. The email address becomes the user name when the visitor is saved. If editing a visitor, the first field shows the user name. 4 Type the Email Address for the new visitor. If you are editing an existing visitor, the email address is the User Name and it cannot be changed. Use only the following characters when typing the Email Address: ƒ Uppercase letters-A, B, C, and so on. ƒ Lowercase letters-a, b, c, and so on. ƒ Numbers-0, 1, 2, 3, 4, 5, 6, 7, 8, 9 ƒ Symbols-use only: dash - underscore _ period . space [ ] Note: After creating a visitor, the user name cannot be edited. If you need to change the User Name, you must delete the visitor and create a new one. Be sure to add the visitor back to the appropriate groups, as needed. 5 Type or change the remaining information for the visitor. For detailed descriptions of each of the fields on this page, see To view visitors on page 5-8. Note: Passwords for Windows Home Server User Accounts and Webshare Managers cannot be managed from within Webshare. They are managed in the Windows Home Server Console. For more information, see Task 2 of 6: Create User Accounts on page 2-7. 6 Select visitor permissions. ƒ Add Photos: These visitors can add photos Check to give visitors the ability to add photos to an album. Visitors with the add photos permission must logon to the Photo Webshare with a user name and password. 5-10 Photo Webshare Version Update 1.1.1
-
 1
1 -
2
-
3
-
4
-
5
-
6
-
7
-
8
-
9
-
10
-
11
-
12
-
13
-
14
-
15
-
16
-
17
-
18
-
19
-
20
-
21
-
22
-
23
-
24
-
25
-
26
-
27
-
28
-
29
-
30
-
31
-
32
-
33
-
34
-
35
-
36
-
37
-
38
-
39
-
40
-
41
-
42
-
43
-
44
-
45
-
46
-
47
-
48
-
49
-
50
-
51
-
52
-
53
-
54
-
55
-
56
-
57
-
58
-
 59
59 -
 60
60 -
 61
61 -
 62
62 -
 63
63 -
 64
64 -
 65
65 -
 66
66 -
 67
67 -
 68
68 -
 69
69 -
70
-
71
-
72
-
73
-
74
-
75
-
76
-
77
-
78
-
79
-
80
-
81
-
82
-
83
-
84
-
85
-
86
-
87
-
88
-
89
-
90
-
91
-
92
-
93
-
94
-
95
-
96
-
97
-
98
-
99
-
100
-
101
-
102
-
103
-
104
-
105
-
106
-
107
-
108
-
109
-
110
-
111
-
112
-
113
-
114
-
115
-
116
-
117
-
118
-
119
-
120
-
121
-
122
-
123
-
124
-
125
-
126
-
127
-
128
-
129
-
130
-
131
-
132
-
133
-
134
-
135
-
136
-
137
-
138
-
139
-
140
-
141
-
142
-
143
-
144
-
145
-
146
-
147
-
148
-
149
-
150
-
151
-
152
-
153
-
154
-
155
-
156
-
157
-
158
-
159
-
160
-
161
-
162
-
163
-
164
-
165
-
166
-
167
-
168
-
169
-
170
-
171
-
172
-
173
-
174
-
175
-
176
-
177
-
178
-
179
-
180
-
181
-
182
-
183
-
184
-
185
-
186
-
187
-
188
-
189
-
190
-
191
-
192
 |
 |