HP Integrity Superdome 2 HP Integrity Superdome 2 Onboard Administrator User G - Page 136
Local Users screen, Add Local User, Examples
 |
View all HP Integrity Superdome 2 manuals
Add to My Manuals
Save this manual to your list of manuals |
Page 136 highlights
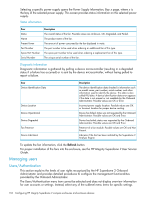
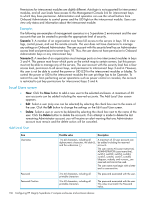
Permissions for interconnect modules are slightly different. Autologin is not supported for interconnect modules, and all user levels have access to the Management Console link for interconnect bays to which they have permission. Administrators and operators can use the virtual buttons from Onboard Administrator to control power and the UID light on the interconnect module. Users can view only status and information about the interconnect module. Examples The following are examples of management scenarios in a Superdome 2 environment and the user accounts that can be created to provide the appropriate level of security. Scenario 1: A member of an organization must have full access to the servers in bays 1-8 to view logs, control power, and use the remote console. The user does not have clearance to manage any settings on Onboard Administrator. The user account with this security level has an Administrator access level and permission to server bays 1-8. Thus, the user does not have permission to Onboard Administrator bays or any interconnect bay. Scenario 2: A member of an organization must manage ports on two interconnect modules in bays 3 and 4. This person must know which ports on the switch map to certain servers, but this person must not be able to manage any of the servers. The user account with this security level has a User access level, permission to all server bays, and permission to interconnect bays 3 and 4. However, this user is not be able to control the power or UID LED for the interconnect modules or blades. To control the power or UID to the interconnect modules the user privilege has to be Operator. To restrict this user from performing server operations such as power control or consoles, the account is restricted to just bay permissions for interconnect bays 3 and 4. Local Users screen • New: Click the New button to add a new user to the selected enclosure. A maximum of 30 user accounts can be added including the reserved accounts. The Add Local User screen appears. • Edit: Select a user (only one can be selected) by selecting the check box next to the name of the user. Click the Edit button to change the settings on the Edit Local User screen. • Delete: Select a user or users to be deleted by selecting the check box next to the name of the user. Click the Delete button to delete the accounts. If an attempt is made to delete the last remaining Administrator account, you will receive an alert warning that one Administrator account must remain and the delete action will be canceled. Add Local User Item Username Password Password Confirm Possible value Description 1 to 40 characters, including all A maximum of 30 user accounts can alphanumeric characters, the dash (-), be added including the reserved and the underscore (_) accounts. The user names ALL (case-insensitive), ADMINISTRATOR (case-insensitive), switch1, switch2, switch3, switch4, switch5, switch6, switch7, switch8, ldapuser, nobody, and vcmuser_ are reserved and cannot be used. The user name must begin with a letter and is case-sensitive. 3 to 40 characters, including all printable characters 3 to 40 characters, including all printable characters The password associated with the user. The password associated with the user. This value must match the Password value. 136 Configuring HP Integrity Superdome 2 compute enclosures and enclosure devices
-
 1
1 -
2
-
3
-
4
-
5
-
6
-
7
-
8
-
9
-
10
-
11
-
12
-
13
-
14
-
15
-
16
-
17
-
18
-
19
-
20
-
21
-
22
-
23
-
24
-
25
-
26
-
27
-
28
-
29
-
30
-
31
-
32
-
33
-
34
-
35
-
36
-
37
-
38
-
39
-
40
-
41
-
42
-
43
-
44
-
45
-
46
-
47
-
48
-
49
-
50
-
51
-
52
-
53
-
54
-
55
-
56
-
57
-
58
-
59
-
60
-
61
-
62
-
63
-
64
-
65
-
66
-
67
-
68
-
69
-
70
-
71
-
72
-
73
-
74
-
75
-
76
-
77
-
78
-
79
-
80
-
81
-
82
-
83
-
84
-
85
-
86
-
87
-
88
-
89
-
90
-
91
-
92
-
93
-
94
-
95
-
96
-
97
-
98
-
99
-
100
-
101
-
102
-
103
-
104
-
105
-
106
-
107
-
108
-
109
-
110
-
111
-
112
-
113
-
114
-
115
-
116
-
117
-
118
-
119
-
120
-
121
-
122
-
123
-
124
-
125
-
126
-
127
-
128
-
129
-
130
-
 131
131 -
 132
132 -
 133
133 -
 134
134 -
 135
135 -
 136
136 -
 137
137 -
 138
138 -
 139
139 -
 140
140 -
 141
141 -
142
-
143
-
144
-
145
-
146
-
147
-
148
-
149
-
150
-
151
-
152
-
153
-
154
-
155
-
156
-
157
-
158
-
159
-
160
-
161
-
162
-
163
-
164
-
165
-
166
-
167
-
168
-
169
-
170
-
171
-
172
-
173
-
174
-
175
-
176
-
177
-
178
-
179
-
180
-
181
-
182
-
183
-
184
-
185
-
186
-
187
-
188
-
189
-
190
-
191
 |
 |