HP Integrity Superdome 2 HP Integrity Superdome 2 Onboard Administrator User G - Page 21
Clear, Rack Name, DVD Drive, Detach/Attach, Change, Attach:Enclosure DVD, Accept All
 |
View all HP Integrity Superdome 2 manuals
Add to My Manuals
Save this manual to your list of manuals |
Page 21 highlights
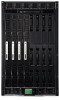
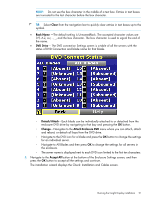
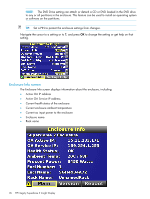
NOTE: Do not use the box character in the middle of a text box. Entries in text boxes are truncated to the last character before the box character. TIP: Select Clear from the navigation bar to quickly clear entries in text boxes up to the symbol. • Rack Name -The default setting is UnnamedRack. The accepted character values are 0-9, A-Z, a-z, -, _, and the box character. The box character is used to signal the end of the name. • DVD Drive- The DVD connection Settings screen is a table of all the servers with the status of DVD Connection and blade name for that blade. ◦ Detach/Attach-Each blade can be individually attached to or detached from the enclosure DVD drive by navigating to that bay and pressing the OK button. ◦ Change-Navigates to the Attach:Enclosure DVD menu where you can attach, attach and reboot, or detach all bays from the DVD drive. ◦ Navigate to the DVD icon for a blade and press the OK button to change the settings for an individual server. ◦ Navigate to All Blades and then press OK to change the settings for all servers in the enclosure. ◦ The server name is displayed next to each DVD icon limited to the first ten characters. 5. Navigate to the Accept All button at the bottom of the Enclosure Settings screen, and then press the OK button to accept all the settings and continue. The installation wizard displays the Check: Installation and Cables screen. Running the Insight Display installation 21
-
 1
1 -
2
-
3
-
4
-
5
-
6
-
7
-
8
-
9
-
10
-
11
-
12
-
13
-
14
-
15
-
 16
16 -
 17
17 -
 18
18 -
 19
19 -
 20
20 -
 21
21 -
 22
22 -
 23
23 -
 24
24 -
 25
25 -
 26
26 -
27
-
28
-
29
-
30
-
31
-
32
-
33
-
34
-
35
-
36
-
37
-
38
-
39
-
40
-
41
-
42
-
43
-
44
-
45
-
46
-
47
-
48
-
49
-
50
-
51
-
52
-
53
-
54
-
55
-
56
-
57
-
58
-
59
-
60
-
61
-
62
-
63
-
64
-
65
-
66
-
67
-
68
-
69
-
70
-
71
-
72
-
73
-
74
-
75
-
76
-
77
-
78
-
79
-
80
-
81
-
82
-
83
-
84
-
85
-
86
-
87
-
88
-
89
-
90
-
91
-
92
-
93
-
94
-
95
-
96
-
97
-
98
-
99
-
100
-
101
-
102
-
103
-
104
-
105
-
106
-
107
-
108
-
109
-
110
-
111
-
112
-
113
-
114
-
115
-
116
-
117
-
118
-
119
-
120
-
121
-
122
-
123
-
124
-
125
-
126
-
127
-
128
-
129
-
130
-
131
-
132
-
133
-
134
-
135
-
136
-
137
-
138
-
139
-
140
-
141
-
142
-
143
-
144
-
145
-
146
-
147
-
148
-
149
-
150
-
151
-
152
-
153
-
154
-
155
-
156
-
157
-
158
-
159
-
160
-
161
-
162
-
163
-
164
-
165
-
166
-
167
-
168
-
169
-
170
-
171
-
172
-
173
-
174
-
175
-
176
-
177
-
178
-
179
-
180
-
181
-
182
-
183
-
184
-
185
-
186
-
187
-
188
-
189
-
190
-
191
 |
 |