HP Integrity Superdome 2 HP Integrity Superdome 2 Onboard Administrator User G - Page 38
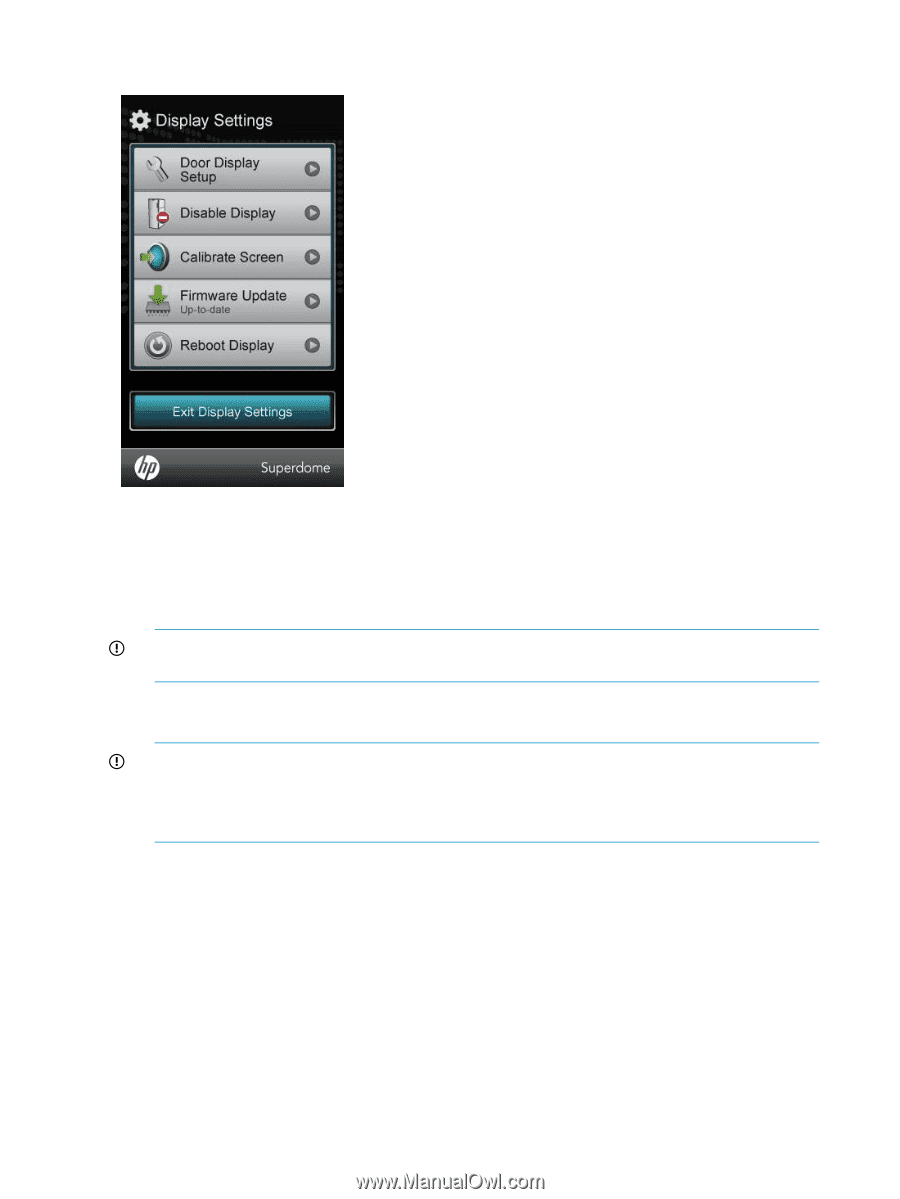
Display Settings menu, Door Display Setup, Disable Display, Calibrate Screen, Firmware Update
 |
View all HP Integrity Superdome 2 manuals
Add to My Manuals
Save this manual to your list of manuals |
Page 38 highlights
Display Settings menu The Display Settings menu has the following options: • Door Display Setup- Runs the initial setup of the Door Display. • Disable Display- If this option is selected, the Door Display erases all settings. The Door Display screen then immediately displays a screen saver. The screen saver displays for one hour and then the Door Display shuts off. IMPORTANT: If you select this option, you must re-enter all setting information, such as user names and passwords before you can use the Door Display. • Calibrate Screen- If this option is selected, the Door Display enters calibration mode for the touch screen. IMPORTANT: HP recommends using a stylus or the back of a pencil to calibrate the screen. Using a finger is not precise enough to properly calibrate the screen. Do not use metal objects to calibrate the screen. Using a metal object might damage the LCD touch screen. • Firmware Update- Use this option to update the Door Display firmware. The current status of the Door Display firmware is displayed on the menu button. The firmware status is one of the following: ◦ Setup required first- The initial Door Display setup has not been completed and the Door Display is unable to access firmware status. ◦ Up-to-date- The current Door Display firmware matches the current revision available on the OA. No firmware update is required. If necessary, the Door Display firmware can be reloaded using the Firmware Update menu. ◦ Update Available- A newer firmware revision is available for the Door Display. ◦ No Update Available- The OA does not have firmware available for the Door Display. This occurs if the OA web server is disabled. 38 HP Superdome 2 Door Status Display
-
 1
1 -
2
-
3
-
4
-
5
-
6
-
7
-
8
-
9
-
10
-
11
-
12
-
13
-
14
-
15
-
16
-
17
-
18
-
19
-
20
-
21
-
22
-
23
-
24
-
25
-
26
-
27
-
28
-
29
-
30
-
31
-
32
-
 33
33 -
 34
34 -
 35
35 -
 36
36 -
 37
37 -
 38
38 -
 39
39 -
 40
40 -
 41
41 -
 42
42 -
 43
43 -
44
-
45
-
46
-
47
-
48
-
49
-
50
-
51
-
52
-
53
-
54
-
55
-
56
-
57
-
58
-
59
-
60
-
61
-
62
-
63
-
64
-
65
-
66
-
67
-
68
-
69
-
70
-
71
-
72
-
73
-
74
-
75
-
76
-
77
-
78
-
79
-
80
-
81
-
82
-
83
-
84
-
85
-
86
-
87
-
88
-
89
-
90
-
91
-
92
-
93
-
94
-
95
-
96
-
97
-
98
-
99
-
100
-
101
-
102
-
103
-
104
-
105
-
106
-
107
-
108
-
109
-
110
-
111
-
112
-
113
-
114
-
115
-
116
-
117
-
118
-
119
-
120
-
121
-
122
-
123
-
124
-
125
-
126
-
127
-
128
-
129
-
130
-
131
-
132
-
133
-
134
-
135
-
136
-
137
-
138
-
139
-
140
-
141
-
142
-
143
-
144
-
145
-
146
-
147
-
148
-
149
-
150
-
151
-
152
-
153
-
154
-
155
-
156
-
157
-
158
-
159
-
160
-
161
-
162
-
163
-
164
-
165
-
166
-
167
-
168
-
169
-
170
-
171
-
172
-
173
-
174
-
175
-
176
-
177
-
178
-
179
-
180
-
181
-
182
-
183
-
184
-
185
-
186
-
187
-
188
-
189
-
190
-
191
 |
 |