HP LH4r HP NetRAID-4M Installation Guide - Page 116
If you updated the firmware on controllers 0
 |
View all HP LH4r manuals
Add to My Manuals
Save this manual to your list of manuals |
Page 116 highlights
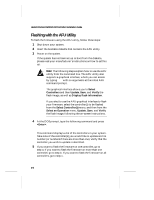
Hewlett-Packard NetRAID-4M Controller Installation Guide 8 After the AFU reads the new BIOS from both installation disks, it shuts down the controller and updates the firmware. A verification of the operation follows. The results of each operation are displayed on the screen as it happens. 9 After the firmware installation completes, the AFU exits. After the AFU exits, remove the firmware diskette and insert the bootable diskette that contains the AFU utility. 10 Type the following command, replacing CONTROLLER_NUMBER(S) with either the controller number or a comma-separated list of controller numbers: \> afu version /c CONTROLLER_NUMBER(S) If you updated the firmware on controllers 0, 2, and 3, for example, you would type the following: \> afu version /c 0, 2, 3 11 The AFU displays the version information for the selected controllers. Verify that the version displayed is correct. 12 Remove the diskette from the diskette drive and reboot the system. ❒ D-4
-
 1
1 -
2
-
3
-
4
-
5
-
6
-
7
-
8
-
9
-
10
-
11
-
12
-
13
-
14
-
15
-
16
-
17
-
18
-
19
-
20
-
21
-
22
-
23
-
24
-
25
-
26
-
27
-
28
-
29
-
30
-
31
-
32
-
33
-
34
-
35
-
36
-
37
-
38
-
39
-
40
-
41
-
42
-
43
-
44
-
45
-
46
-
47
-
48
-
49
-
50
-
51
-
52
-
53
-
54
-
55
-
56
-
57
-
58
-
59
-
60
-
61
-
62
-
63
-
64
-
65
-
66
-
67
-
68
-
69
-
70
-
71
-
72
-
73
-
74
-
75
-
76
-
77
-
78
-
79
-
80
-
81
-
82
-
83
-
84
-
85
-
86
-
87
-
88
-
89
-
90
-
91
-
92
-
93
-
94
-
95
-
96
-
97
-
98
-
99
-
100
-
101
-
102
-
103
-
104
-
105
-
106
-
107
-
108
-
109
-
110
-
 111
111 -
 112
112 -
 113
113 -
 114
114 -
 115
115 -
 116
116 -
 117
117 -
 118
118 -
 119
119 -
 120
120 -
 121
121 -
122
-
123
-
124
 |
 |
