HP Neoware e90 NeoLinux Thin Clients User Manual - Page 62
TCP/IP instead of TCP/IP + HTTP server location. If your, Configuring ICA connections
 |
View all HP Neoware e90 manuals
Add to My Manuals
Save this manual to your list of manuals |
Page 62 highlights
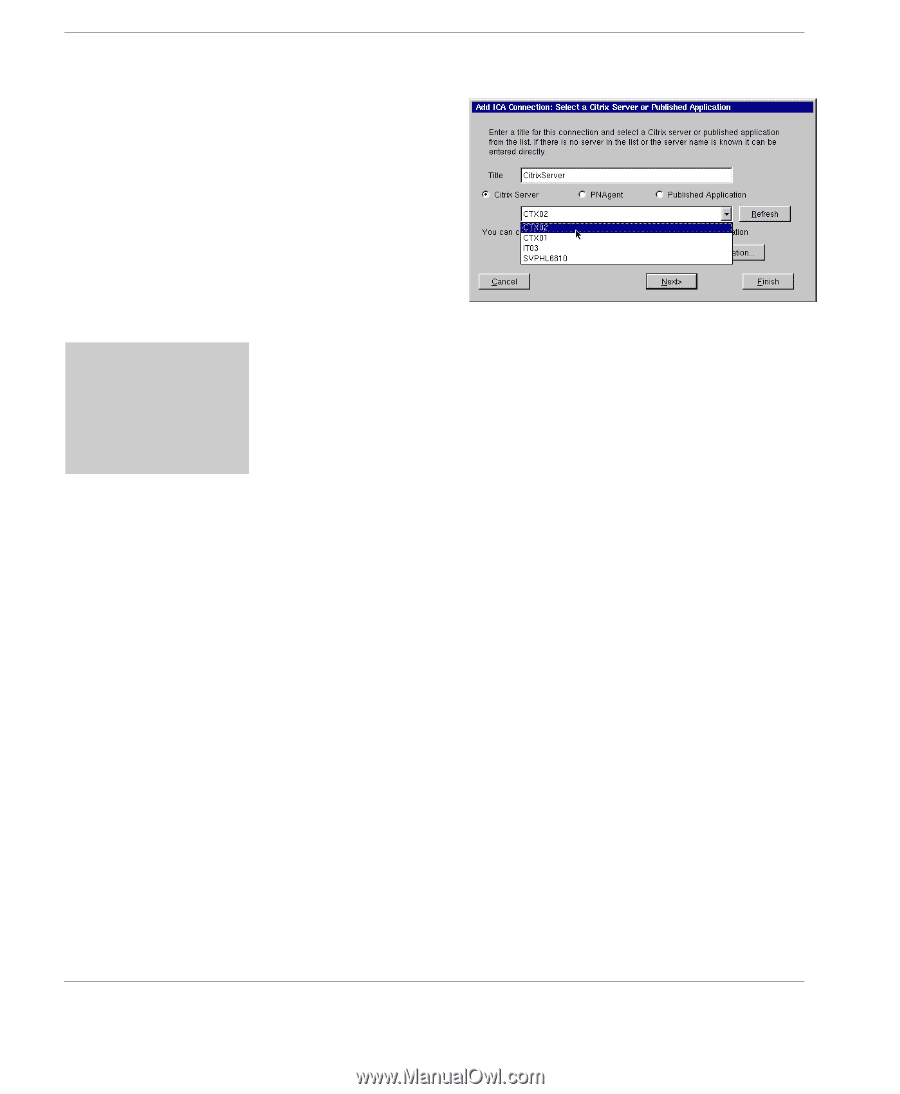
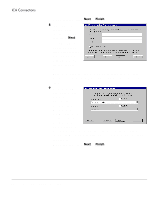
ICA Connections TIP You can short-cut the ICA connection setup process by clicking Finish on any dialog screen. 3 For Citrix Server and Published Application connections, select the server or application to which you want to connect from the drop-down menu. 4 If you need to set another primary Citrix server (for example, one located on a different subnet from the thin client), click the Server Location button. For more information concerning the dialog that opens, see the explanation of the Server tab in the Global ICA Settings section of the ezConnect chapter, page 56. When finished, click Next or Finish. Note: When no server or application is listed in the drop-down menu, or you know the name of the server or application, you can directly enter the name or the IP address in the field. If neither Citrix Server nor Published Application radio button produces a listing, and you are using MetaFrame with browsing enabled, click on Server Location and set the Network Protocol to "TCP/IP" instead of "TCP/IP + HTTP server location." If your servers can respond to only TCP/IP browser requests, you should consider using the Global ICA Defaults dialog to make TCP/IP the default network protocol. (For more information, see "Global ICA settings" on page 55.) When ICA browsing is required across a router, you will need to set server location addresses using the Server Location dialog. 62 Configuring ICA connections
-
 1
1 -
2
-
3
-
4
-
5
-
6
-
7
-
8
-
9
-
10
-
11
-
12
-
13
-
14
-
15
-
16
-
17
-
18
-
19
-
20
-
21
-
22
-
23
-
24
-
25
-
26
-
27
-
28
-
29
-
30
-
31
-
32
-
33
-
34
-
35
-
36
-
37
-
38
-
39
-
40
-
41
-
42
-
43
-
44
-
45
-
46
-
47
-
48
-
49
-
50
-
51
-
52
-
53
-
54
-
55
-
56
-
 57
57 -
 58
58 -
 59
59 -
 60
60 -
 61
61 -
 62
62 -
 63
63 -
 64
64 -
 65
65 -
 66
66 -
 67
67 -
68
-
69
-
70
-
71
-
72
-
73
-
74
-
75
-
76
-
77
-
78
-
79
-
80
-
81
-
82
-
83
-
84
-
85
-
86
-
87
-
88
-
89
-
90
-
91
-
92
-
93
-
94
-
95
-
96
-
97
-
98
-
99
-
100
-
101
-
102
-
103
-
104
-
105
-
106
-
107
-
108
-
109
-
110
-
111
-
112
-
113
-
114
-
115
-
116
-
117
-
118
-
119
-
120
-
121
-
122
-
123
-
124
-
125
-
126
-
127
-
128
-
129
-
130
-
131
-
132
-
133
-
134
-
135
-
136
-
137
-
138
 |
 |