HP PageWide XL 5000 User Guide - Page 109
Job queue in the Embedded Web Server, Cancel a job, even if it is already printing.
 |
View all HP PageWide XL 5000 manuals
Add to My Manuals
Save this manual to your list of manuals |
Page 109 highlights
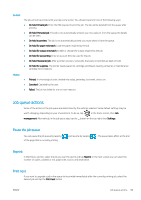
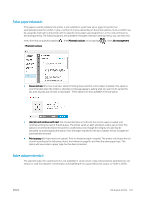
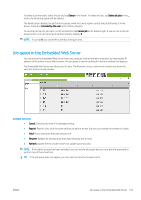
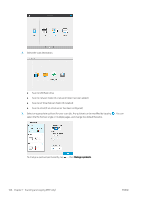
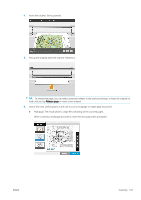
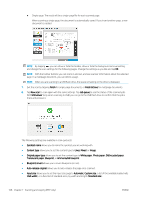
To delete a job manually, select the job and tap Delete in the footer. To delete all jobs, tap Delete all jobs in the ... menu; the whole job queue will be deleted. The delete option deletes the job from the queue, while the cancel option cancels the job but leaves it in the queue, marked as Canceled by the user in the history category. To cancel a job, tap the job name on the list and then tap Cancel job at the bottom right. If you are not in the job queue screen, you can cancel a job while printing by tapping X. NOTE: If you tap X, you cancel the currently printing job only. Job queue in the Embedded Web Server You can access the Embedded Web Server from any computer with an Internet connection, by entering the IP address of the printer in your Web browser; the job queue is shown by default in the first window that appears. The Embedded Web Server can show up to 32 jobs. The filename, status, and time of creation are shown for each job; there is no job preview. Available functions ● Cancel: Cancel a job, even if it is already printing. ● Reprint: Reprint a job, with the same settings as before, except that you can change the number of copies. ● Hold: Put on hold a job that was sent to print. ● Resume: Release for printing a job that was previously put on hold. ● Refresh: Update the list of jobs (it does not update automatically). NOTE: If the admin account has been activated, you can see the job queue but you must give the password to perform any of these functions. TIP: If the job queue does not appear, you may need to clear the browser cache. ENWW Job queue in the Embedded Web Server 103
-
 1
1 -
2
-
3
-
4
-
5
-
6
-
7
-
8
-
9
-
10
-
11
-
12
-
13
-
14
-
15
-
16
-
17
-
18
-
19
-
20
-
21
-
22
-
23
-
24
-
25
-
26
-
27
-
28
-
29
-
30
-
31
-
32
-
33
-
34
-
35
-
36
-
37
-
38
-
39
-
40
-
41
-
42
-
43
-
44
-
45
-
46
-
47
-
48
-
49
-
50
-
51
-
52
-
53
-
54
-
55
-
56
-
57
-
58
-
59
-
60
-
61
-
62
-
63
-
64
-
65
-
66
-
67
-
68
-
69
-
70
-
71
-
72
-
73
-
74
-
75
-
76
-
77
-
78
-
79
-
80
-
81
-
82
-
83
-
84
-
85
-
86
-
87
-
88
-
89
-
90
-
91
-
92
-
93
-
94
-
95
-
96
-
97
-
98
-
99
-
100
-
101
-
102
-
103
-
 104
104 -
 105
105 -
 106
106 -
 107
107 -
 108
108 -
 109
109 -
 110
110 -
 111
111 -
 112
112 -
 113
113 -
 114
114 -
115
-
116
-
117
-
118
-
119
-
120
-
121
-
122
-
123
-
124
-
125
-
126
-
127
-
128
-
129
-
130
-
131
-
132
-
133
-
134
-
135
-
136
-
137
-
138
-
139
-
140
-
141
-
142
-
143
-
144
-
145
-
146
-
147
-
148
-
149
-
150
-
151
-
152
-
153
-
154
-
155
-
156
-
157
-
158
-
159
-
160
-
161
-
162
-
163
-
164
-
165
-
166
-
167
-
168
-
169
-
170
-
171
-
172
-
173
-
174
-
175
-
176
-
177
-
178
-
179
-
180
-
181
-
182
-
183
-
184
-
185
-
186
-
187
-
188
-
189
 |
 |