HP PageWide XL 5000 User Guide - Page 83
gloves and hold the cartridge by the handle., When removing a maintenance cartridge
 |
View all HP PageWide XL 5000 manuals
Add to My Manuals
Save this manual to your list of manuals |
Page 83 highlights
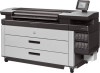
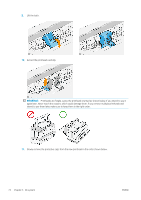
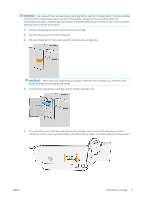
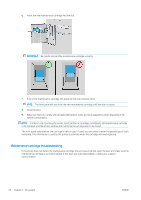
IMPORTANT: Be ready with the new maintenance cartridge before starting the replacement. Once the cartridge is moved to the replacement position, you have 40 seconds to change it. If you exceed that limit, the maintenance cartridge is automatically moved back so that the printheads do not become dry. If the front panel shows an error, close the service door. 1. Remove the packaging from the new maintenance cartridge. 2. Start the replacement from the front panel. 3. When prompted by the front panel, open the maintenance cartridge door. IMPORTANT: When removing a maintenance cartridge, remember that it contains ink. Therefore, wear gloves and hold the cartridge by the handle. 4. To remove the maintenance cartridge, grip the handle and slide it out. 5. If you intend to insert a partially used replacement cartridge, make a note of the percentage of cloth remaining, which is shown approximately on the side of the cartridge. You will be asked for this figure later. ENWW Maintenance cartridge 77
-
 1
1 -
2
-
3
-
4
-
5
-
6
-
7
-
8
-
9
-
10
-
11
-
12
-
13
-
14
-
15
-
16
-
17
-
18
-
19
-
20
-
21
-
22
-
23
-
24
-
25
-
26
-
27
-
28
-
29
-
30
-
31
-
32
-
33
-
34
-
35
-
36
-
37
-
38
-
39
-
40
-
41
-
42
-
43
-
44
-
45
-
46
-
47
-
48
-
49
-
50
-
51
-
52
-
53
-
54
-
55
-
56
-
57
-
58
-
59
-
60
-
61
-
62
-
63
-
64
-
65
-
66
-
67
-
68
-
69
-
70
-
71
-
72
-
73
-
74
-
75
-
76
-
77
-
 78
78 -
 79
79 -
 80
80 -
 81
81 -
 82
82 -
 83
83 -
 84
84 -
 85
85 -
 86
86 -
 87
87 -
 88
88 -
89
-
90
-
91
-
92
-
93
-
94
-
95
-
96
-
97
-
98
-
99
-
100
-
101
-
102
-
103
-
104
-
105
-
106
-
107
-
108
-
109
-
110
-
111
-
112
-
113
-
114
-
115
-
116
-
117
-
118
-
119
-
120
-
121
-
122
-
123
-
124
-
125
-
126
-
127
-
128
-
129
-
130
-
131
-
132
-
133
-
134
-
135
-
136
-
137
-
138
-
139
-
140
-
141
-
142
-
143
-
144
-
145
-
146
-
147
-
148
-
149
-
150
-
151
-
152
-
153
-
154
-
155
-
156
-
157
-
158
-
159
-
160
-
161
-
162
-
163
-
164
-
165
-
166
-
167
-
168
-
169
-
170
-
171
-
172
-
173
-
174
-
175
-
176
-
177
-
178
-
179
-
180
-
181
-
182
-
183
-
184
-
185
-
186
-
187
-
188
-
189
 |
 |