HP PageWide XL 5000 User Guide - Page 32
Con the email address book (MFP only), Email lookup, Information needed before starting
 |
View all HP PageWide XL 5000 manuals
Add to My Manuals
Save this manual to your list of manuals |
Page 32 highlights
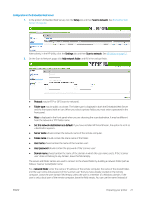
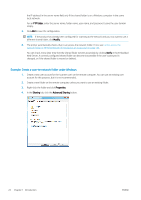
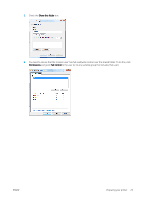
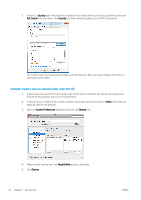
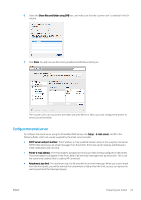
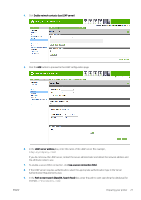
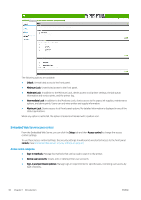
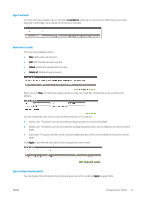
● Use SSL certificates: Check this box to use SSL certificates if the server requires an encrypted connection. Click the link to configure advanced certificate settings. ● Authentication. If you choose authentication, you are also asked for your username and password. Once you have configured the email server, you are strongly recommended to check the configuration. Configure the email address book (MFP only) The printer uses LDAP v3, the latest version of the Lightweight Directory Access Protocol (LDAP), which provides access to a network address book for scan-to-email purposes. To use LDAP, you need a printer firmware release dated January 2016 or later. The following instructions explain how to use LDAP to connect the printer to a network email address book, and how to configure a default SMTP to send email messages from the printer. Email lookup When the printer uses LDAP for scan-to-email, it searches a database of email addresses. When you enter the email address and click the Search button, LDAP searches a list of email addresses for matching characters. You can refine the search results by typing additional characters and performing a new search. Printers that support LDAP also support the use of a standard outgoing email profile, so they do not require a connection to an LDAP server in order to send email. Information needed before starting Ensure that you have the following information before starting the configuration: ● Server authentication requirements ● Path to start search (BaseDN, Search Root) (for example, o=mycompany.com) ● Attributes for matching the name entered (such as cn or samAccountName), retrieving the email address (such as mail), and how the name will be displayed on the control panel (such as displayName) Address book setup In the Embedded Web Server, click Setup > Address book to access the network address book. From here you can configure the printer to obtain email addresses from an LDAP server, so that they are available when users perform a search from the Scan to Email screen. 1. Open the Embedded Web Server. 2. Click the Setup tab. 3. In the left navigation pane, click Address book. 26 Chapter 1 Introduction ENWW
-
 1
1 -
2
-
3
-
4
-
5
-
6
-
7
-
8
-
9
-
10
-
11
-
12
-
13
-
14
-
15
-
16
-
17
-
18
-
19
-
20
-
21
-
22
-
23
-
24
-
25
-
26
-
 27
27 -
 28
28 -
 29
29 -
 30
30 -
 31
31 -
 32
32 -
 33
33 -
 34
34 -
 35
35 -
 36
36 -
 37
37 -
38
-
39
-
40
-
41
-
42
-
43
-
44
-
45
-
46
-
47
-
48
-
49
-
50
-
51
-
52
-
53
-
54
-
55
-
56
-
57
-
58
-
59
-
60
-
61
-
62
-
63
-
64
-
65
-
66
-
67
-
68
-
69
-
70
-
71
-
72
-
73
-
74
-
75
-
76
-
77
-
78
-
79
-
80
-
81
-
82
-
83
-
84
-
85
-
86
-
87
-
88
-
89
-
90
-
91
-
92
-
93
-
94
-
95
-
96
-
97
-
98
-
99
-
100
-
101
-
102
-
103
-
104
-
105
-
106
-
107
-
108
-
109
-
110
-
111
-
112
-
113
-
114
-
115
-
116
-
117
-
118
-
119
-
120
-
121
-
122
-
123
-
124
-
125
-
126
-
127
-
128
-
129
-
130
-
131
-
132
-
133
-
134
-
135
-
136
-
137
-
138
-
139
-
140
-
141
-
142
-
143
-
144
-
145
-
146
-
147
-
148
-
149
-
150
-
151
-
152
-
153
-
154
-
155
-
156
-
157
-
158
-
159
-
160
-
161
-
162
-
163
-
164
-
165
-
166
-
167
-
168
-
169
-
170
-
171
-
172
-
173
-
174
-
175
-
176
-
177
-
178
-
179
-
180
-
181
-
182
-
183
-
184
-
185
-
186
-
187
-
188
-
189
 |
 |
