HP PageWide XL 5000 User Guide - Page 34
Turn usage information on and off, Turn email notifications on and off, Control access to the printer
 |
View all HP PageWide XL 5000 manuals
Add to My Manuals
Save this manual to your list of manuals |
Page 34 highlights
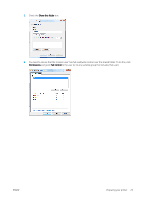
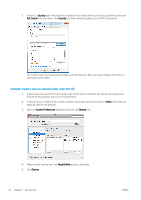
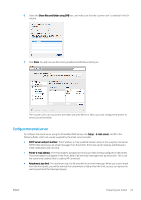
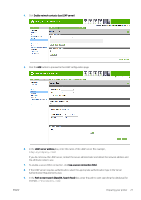
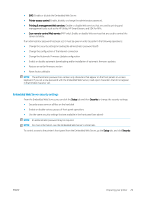
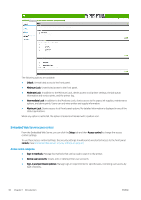
10. In the Recipients's display name box, enter the name of the attribute that contains the person's name (for example, displayName). 11. In the Recipient's email address box, enter the name of the attribute that contains the person's email address (for example, mail or rfc822Mailbox). 12. Use the LDAP filter condition box to set up an optional filter to filter out e-mail addresses. 13. To check that the LDAP retrieval is set up correctly, enter at least three characters of a network contact name in the Test box, and then click the Test button. If the test is successful, a list of possible matches is displayed. 14. Click the Apply button to save the settings. Setup is complete. Turn usage information on and off The printer can send usage information periodically by email. You can request this in the following ways: ● In the HP DesignJet Utility for Windows: from the Admin tab, click Printer settings > Accounting. ● In the HP Utility for Mac OS X: click Printer Settings > Accounting. ● In the Embedded Web Server: click Setup > Printer settings > Accounting. In each case, you must set the following options: ● Send accounting files: Enabled (the default is Disabled) ● Send accounting files to: a valid email address ● Send accounting files every: choose a number of days (1-60) or a number of prints (1-500) You must also ensure that the email server has been configured: see Configure the email server on page 25. Turn email notifications on and off In order to receive email notifications from the printer, you must have configured the email server (see Configure the email server on page 25). The notification service is always turned on, but all specific notifications are turned off by default. You can turn them on or off individually by selecting Notifications from the Setup tab of the Embedded Web Server. Control access to the printer Front-panel security settings From the front panel, you can tap , then Security, to control some of the features of the printer: ● USB drive: Enable or disable the use of a USB flash drive. ● Firmware update from USB: Enable or disable firmware updates from a USB flash drive. ● User sessions: Enable or disable automatic log-out after 1, 3, or 5 minutes. 28 Chapter 1 Introduction ENWW
-
 1
1 -
2
-
3
-
4
-
5
-
6
-
7
-
8
-
9
-
10
-
11
-
12
-
13
-
14
-
15
-
16
-
17
-
18
-
19
-
20
-
21
-
22
-
23
-
24
-
25
-
26
-
27
-
28
-
 29
29 -
 30
30 -
 31
31 -
 32
32 -
 33
33 -
 34
34 -
 35
35 -
 36
36 -
 37
37 -
 38
38 -
 39
39 -
40
-
41
-
42
-
43
-
44
-
45
-
46
-
47
-
48
-
49
-
50
-
51
-
52
-
53
-
54
-
55
-
56
-
57
-
58
-
59
-
60
-
61
-
62
-
63
-
64
-
65
-
66
-
67
-
68
-
69
-
70
-
71
-
72
-
73
-
74
-
75
-
76
-
77
-
78
-
79
-
80
-
81
-
82
-
83
-
84
-
85
-
86
-
87
-
88
-
89
-
90
-
91
-
92
-
93
-
94
-
95
-
96
-
97
-
98
-
99
-
100
-
101
-
102
-
103
-
104
-
105
-
106
-
107
-
108
-
109
-
110
-
111
-
112
-
113
-
114
-
115
-
116
-
117
-
118
-
119
-
120
-
121
-
122
-
123
-
124
-
125
-
126
-
127
-
128
-
129
-
130
-
131
-
132
-
133
-
134
-
135
-
136
-
137
-
138
-
139
-
140
-
141
-
142
-
143
-
144
-
145
-
146
-
147
-
148
-
149
-
150
-
151
-
152
-
153
-
154
-
155
-
156
-
157
-
158
-
159
-
160
-
161
-
162
-
163
-
164
-
165
-
166
-
167
-
168
-
169
-
170
-
171
-
172
-
173
-
174
-
175
-
176
-
177
-
178
-
179
-
180
-
181
-
182
-
183
-
184
-
185
-
186
-
187
-
188
-
189
 |
 |