HP PageWide XL 5000 User Guide - Page 123
Line discontinuities
 |
View all HP PageWide XL 5000 manuals
Add to My Manuals
Save this manual to your list of manuals |
Page 123 highlights
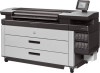
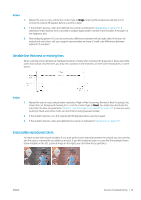
Actions 1. Re-scan the original, setting the content type to Image, and contrast and background cleaning to zero. 2. If the problem persists, re-scan the original at a lower scanner resolution (Standard quality if scanning, Fast or Normal if copying). It may also help to flatten the original manually as much as possible before scanning it again. NOTE: The problem of wrinkles cannot always be solved, due to the technological limitations of CIS technology. HP offers HD Scanners with CCD technology for higher quality requirements. If the wrinkles remain after the corrective actions explained above, then no further action can be taken to improve the image quality, except to buy a more expensive CCD scanner. Line discontinuities When scanning or copying large originals, you may sometimes find issues such as that shown in the following image, where a straight line (it does not necessarily have to be horizontal) appears with discontinuities or small steps. Note the black arrow indicating the scanning direction in this example. Actions 1. Repeat the scan, preferably using a higher resolution, and this time make sure that the product is correctly positioned (it is flat on the floor and it does not move), and that the printer is not printing while you scan. Turning the original 90 or 180 degrees and scanning it again may also solve the problem. 2. If the problem persists, check that the original to be scanned is not skewed, and that it does not become skewed during the scan. If so, see Incorrect paper advance, skew during scanning, or horizontal wrinkles on page 121. You might also want to deactivate the automatic de-skew algorithm as indicated in Copied or scanned image is very skewed on page 124. 3. If there is no skew but the problem persists, clean and calibrate the scanner as indicated in Maintenance on page 150. Take care not to move the printer during the calibration (the printer should not be printing during scanner calibration), and check that the maintenance sheet is correctly positioned before starting the calibration. Also check that the maintenance sheet is not damaged before calibrating the scanner (an old or damaged maintenance sheet may cause this problem); if it is damaged, call your support representative and ask for a new maintenance sheet. 4. If the problem persists, proceed to analyze the following areas of the diagnostic plot: a. 4 (from module A to E). b. 10, at the intersection between modules. c. 13 in modules A and E, and 14 in modules B, C, and D. If you see any of these defects in the studied areas, call your support representative and report a "line discontinuities" error after calibration. ENWW Scanner troubleshooting 117
-
 1
1 -
2
-
3
-
4
-
5
-
6
-
7
-
8
-
9
-
10
-
11
-
12
-
13
-
14
-
15
-
16
-
17
-
18
-
19
-
20
-
21
-
22
-
23
-
24
-
25
-
26
-
27
-
28
-
29
-
30
-
31
-
32
-
33
-
34
-
35
-
36
-
37
-
38
-
39
-
40
-
41
-
42
-
43
-
44
-
45
-
46
-
47
-
48
-
49
-
50
-
51
-
52
-
53
-
54
-
55
-
56
-
57
-
58
-
59
-
60
-
61
-
62
-
63
-
64
-
65
-
66
-
67
-
68
-
69
-
70
-
71
-
72
-
73
-
74
-
75
-
76
-
77
-
78
-
79
-
80
-
81
-
82
-
83
-
84
-
85
-
86
-
87
-
88
-
89
-
90
-
91
-
92
-
93
-
94
-
95
-
96
-
97
-
98
-
99
-
100
-
101
-
102
-
103
-
104
-
105
-
106
-
107
-
108
-
109
-
110
-
111
-
112
-
113
-
114
-
115
-
116
-
117
-
 118
118 -
 119
119 -
 120
120 -
 121
121 -
 122
122 -
 123
123 -
 124
124 -
 125
125 -
 126
126 -
 127
127 -
 128
128 -
129
-
130
-
131
-
132
-
133
-
134
-
135
-
136
-
137
-
138
-
139
-
140
-
141
-
142
-
143
-
144
-
145
-
146
-
147
-
148
-
149
-
150
-
151
-
152
-
153
-
154
-
155
-
156
-
157
-
158
-
159
-
160
-
161
-
162
-
163
-
164
-
165
-
166
-
167
-
168
-
169
-
170
-
171
-
172
-
173
-
174
-
175
-
176
-
177
-
178
-
179
-
180
-
181
-
182
-
183
-
184
-
185
-
186
-
187
-
188
-
189
 |
 |