HP PageWide XL 5000 User Guide - Page 153
Calibrate print bar, Advanced options
 |
View all HP PageWide XL 5000 manuals
Add to My Manuals
Save this manual to your list of manuals |
Page 153 highlights
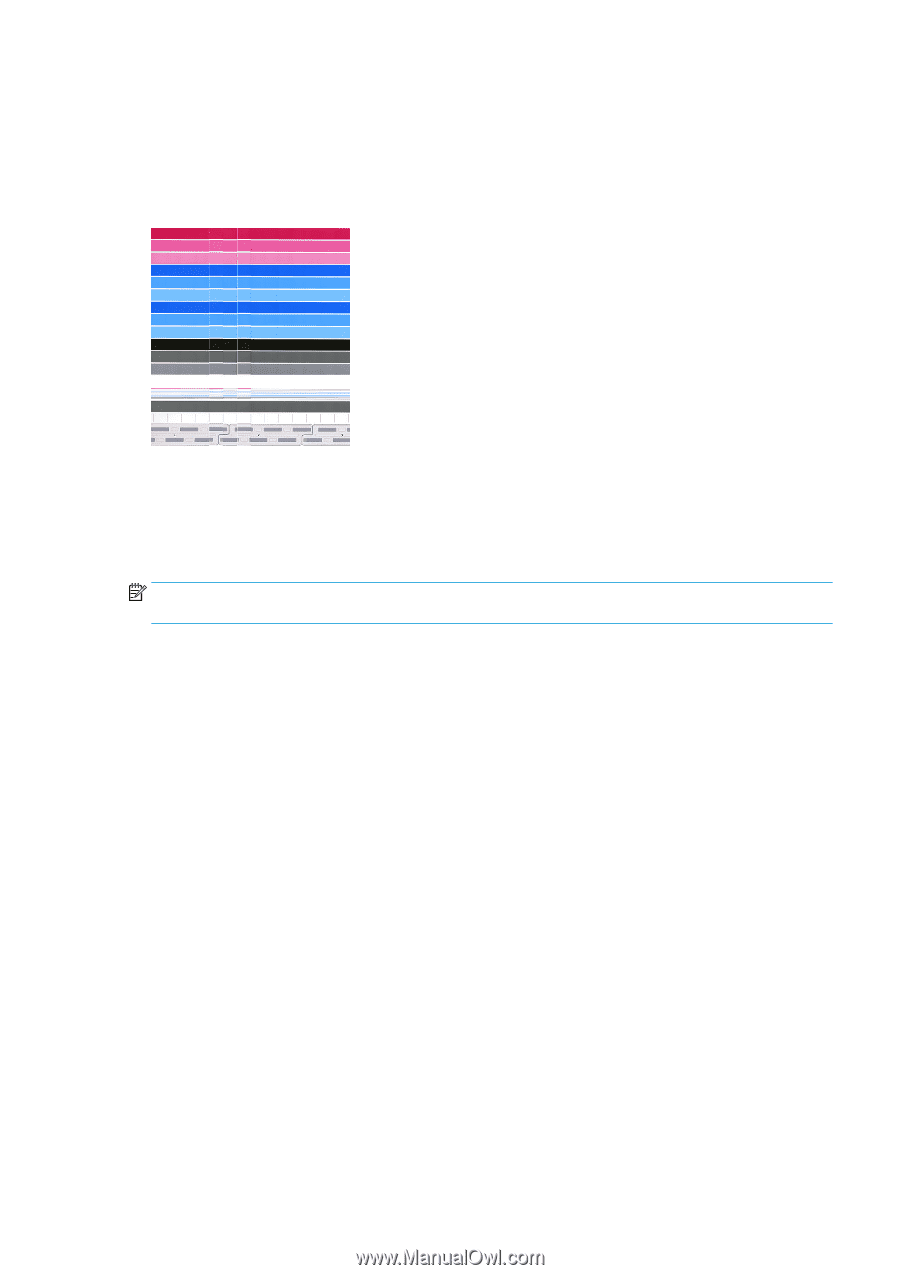
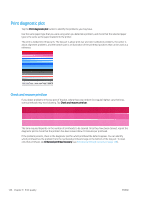
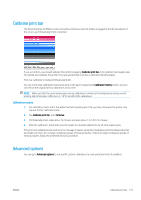
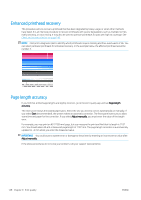
Calibrate print bar The horizontal lines of different colors should be continuous and not broken or jagged at the die boundaries; if this occurs, a printhead alignment is required. If you see defects, you should calibrate the printer by tapping Calibrate print bar in the optimize print quality app. You should also calibrate the printer if you are warned that a roll has a calibration pending status. Print-bar calibration includes printhead alignment. You can check what calibrations have been done in the past by tapping the Calibration history button; and you can restore the original factory calibrations at any time. NOTE: Make sure that the room temperature during calibration is similar to the temperature during normal printing. Big temperature differences (> 10°C) can affect the calibrations. Calibration procedure 1. For calibration, load a roll of the widest and best-quality paper that you have; otherwise the printer may request further calibrations later. 2. Tap Calibrate print bar, then Continue. 3. Printhead alignment takes about 16 minutes and uses about 1.3 m (51 in) of paper. 4. After the calibration, the printer uses the results to calculate calibrations for all other paper types. If the print-bar calibration fails with an error message or leaves some dies misaligned, print the Diagnostics Plot and make sure there are no large contiguous groups of missing nozzles. If there are large contiguous groups of missing nozzles, follow the printhead recovery procedure. Advanced options You can go to Advanced options to run specific custom calibrations to solve particular kinds of problems. ENWW Calibrate print bar 147
-
 1
1 -
2
-
3
-
4
-
5
-
6
-
7
-
8
-
9
-
10
-
11
-
12
-
13
-
14
-
15
-
16
-
17
-
18
-
19
-
20
-
21
-
22
-
23
-
24
-
25
-
26
-
27
-
28
-
29
-
30
-
31
-
32
-
33
-
34
-
35
-
36
-
37
-
38
-
39
-
40
-
41
-
42
-
43
-
44
-
45
-
46
-
47
-
48
-
49
-
50
-
51
-
52
-
53
-
54
-
55
-
56
-
57
-
58
-
59
-
60
-
61
-
62
-
63
-
64
-
65
-
66
-
67
-
68
-
69
-
70
-
71
-
72
-
73
-
74
-
75
-
76
-
77
-
78
-
79
-
80
-
81
-
82
-
83
-
84
-
85
-
86
-
87
-
88
-
89
-
90
-
91
-
92
-
93
-
94
-
95
-
96
-
97
-
98
-
99
-
100
-
101
-
102
-
103
-
104
-
105
-
106
-
107
-
108
-
109
-
110
-
111
-
112
-
113
-
114
-
115
-
116
-
117
-
118
-
119
-
120
-
121
-
122
-
123
-
124
-
125
-
126
-
127
-
128
-
129
-
130
-
131
-
132
-
133
-
134
-
135
-
136
-
137
-
138
-
139
-
140
-
141
-
142
-
143
-
144
-
145
-
146
-
147
-
 148
148 -
 149
149 -
 150
150 -
 151
151 -
 152
152 -
 153
153 -
 154
154 -
 155
155 -
 156
156 -
 157
157 -
 158
158 -
159
-
160
-
161
-
162
-
163
-
164
-
165
-
166
-
167
-
168
-
169
-
170
-
171
-
172
-
173
-
174
-
175
-
176
-
177
-
178
-
179
-
180
-
181
-
182
-
183
-
184
-
185
-
186
-
187
-
188
-
189
 |
 |