Motorola Moto X 1st Generation User Guide - Page 134
Accounts Settings, Set Up a New Account, Synchronize or Delete Existing Accounts
 |
View all Motorola Moto X 1st Generation manuals
Add to My Manuals
Save this manual to your list of manuals |
Page 134 highlights
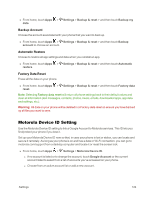
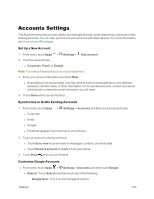
Accounts Settings The Accounts menu lets you add, delete, and manage all email, social networking, picture and video sharing accounts. You can also synchronize your accounts with other devices. For more information, see Accounts and Messaging. Set Up a New Account 1. From home, touch Apps > Settings > Add account. 2. Touch an account type: l Corporate, Email, or Google. Note: Your set up Facebook account, is also listed here. 3. Enter your account information and touch Next. l Depending on the account type, you may need to enter an email address or user address, password, domain name, or other information. For Corporate accounts, contact your server administrator to determine what information you will need. 4. Touch Done when you are finished. Synchronize or Delete Existing Accounts 1. From home, touch Apps > Settings > Accounts and then touch an account type. l Corporate. l Email. l Google. l Facebook (appears if you set it up on your phone). 2. Touch an account in the list and touch . l Touch Sync now to synchronize its messages, contacts, and other data. l Touch Remove account to delete it from your phone. 3. Touch Back when you are finished. Customize Google Accounts n From home, touch Apps > Settings > Accounts and then touch Google. l Search: Touch Search and then touch any of the following: o Google Now: Turn it on and manage its options. Settings 125
-
 1
1 -
2
-
3
-
4
-
5
-
6
-
7
-
8
-
9
-
10
-
11
-
12
-
13
-
14
-
15
-
16
-
17
-
18
-
19
-
20
-
21
-
22
-
23
-
24
-
25
-
26
-
27
-
28
-
29
-
30
-
31
-
32
-
33
-
34
-
35
-
36
-
37
-
38
-
39
-
40
-
41
-
42
-
43
-
44
-
45
-
46
-
47
-
48
-
49
-
50
-
51
-
52
-
53
-
54
-
55
-
56
-
57
-
58
-
59
-
60
-
61
-
62
-
63
-
64
-
65
-
66
-
67
-
68
-
69
-
70
-
71
-
72
-
73
-
74
-
75
-
76
-
77
-
78
-
79
-
80
-
81
-
82
-
83
-
84
-
85
-
86
-
87
-
88
-
89
-
90
-
91
-
92
-
93
-
94
-
95
-
96
-
97
-
98
-
99
-
100
-
101
-
102
-
103
-
104
-
105
-
106
-
107
-
108
-
109
-
110
-
111
-
112
-
113
-
114
-
115
-
116
-
117
-
118
-
119
-
120
-
121
-
122
-
123
-
124
-
125
-
126
-
127
-
128
-
 129
129 -
 130
130 -
 131
131 -
 132
132 -
 133
133 -
 134
134 -
 135
135 -
 136
136 -
 137
137 -
 138
138 -
 139
139 -
140
-
141
-
142
-
143
-
144
-
145
-
146
-
147
-
148
-
149
-
150
-
151
-
152
-
153
-
154
-
155
-
156
-
157
-
158
-
159
-
160
-
161
-
162
-
163
-
164
-
165
-
166
 |
 |