Panasonic HPX500 Operating Instructions - Page 104
Thumbnail Screen, Selecting Thumbnails, Manipulating Clips with Thumbnails
 |
UPC - 791871302965
View all Panasonic HPX500 manuals
Add to My Manuals
Save this manual to your list of manuals |
Page 104 highlights
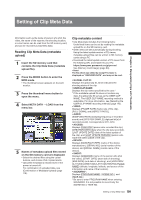
Chapter 6 Manipulating Clips with Thumbnails Thumbnail Screen Press the MODE button to engage the MCR mode and open the thumbnail screen on the LCD monitor. When switching is done from the regular screen display to the thumbnail screen display, all the clips will be displayed on the thumbnail screen. Pressing the thumbnail menu button in the thumbnail screen moves the pointer to the setting menu providing access to allow thumbnail menu functions. 2 1 3 7 5 4 6 8 1 Slot number • The number of the slot with the P2 card containing the selected clip is indicated here. (The number appears in yellow.) • If a clip extends over the P2 cards in two or more slots, numbers will appear in yellow. • The slot number is surrounded by a pink border when a DIR location error or life end-up occurs. 2 Thumbnails This is where the initial images of the clips are displayed. 3 Thumbnail display status The types of clips displayed as thumbnails appear in this area. 4 Clip numbers • The clips are displayed in the order in which they were shot. • Clips in the wrong recording format or clips which cannot be played back for other reasons are shown in red. • To play clips indicated by the red numbers, set the format for the REC FORMAT/MCR FORMAT option on the RECORDING SETUP setting menu to the format 6 below. • Clips on the playlist which have been edited and copied using the AJ-SPD850 memory card recorder or other such unit and which have more than one format (DVCPRO/DV or DVCPRO50) are shown in red, and these clips cannot be played back even when the REC FORMAT item has been set. 5 Menu display • This is where the menu items are displayed. • When EXIT is selected and the SET button is pressed, the menu display is cleared, and the original screen is restored. 6 Recording mode/format display This is where the recording mode and format of the recorded images are displayed. 7 Indicators M (Shot mark): This indicates that a clip has a shot mark. W (Wide): This indicates that a clip has been recorded in the 16:9 aspect ratio (wide screen). (480i/576i recording) ! (Incomplete clip): This indicator appears when the recording of a clip extends over two P2 cards and one of the cards is not found in the slot. X (Defective clip): • This indicator appears for a clip whose recording was defective because the power was cut off during the recording process, for instance. • Clips indicated by the yellow defective clip indicator can be repaired. • Clips indicated by the red defective clip indicator cannot be repaired so delete them. If a clip cannot be deleted, first back up its data, and then format the P2 card. Clips in the wrong format are indicated by ( ? ) instead. V (Voice memo): This indicates that a clip has a voice memo. (You cannot perform recording/playback with this camera.) T (Text memo): This indicates that a clip has a text memo. E (Edit copy): This indicates that this is an edit copy clip. (You cannot perform editing with this camera.) P (Proxy): This indicates that a proxy has been added and recorded. (You cannot perform recording with this camera.) For detailed explanations on V , T , E , and P , refer to the Operating Instructions supplied with the devices used to record or edit the voice memo, text memo, edit copy clip, and proxy respectively. 8 Duration display This displays the duration of the selected clip. Selecting Thumbnails Multiple thumbnails can be randomly selected in the thumbnail screen. 1 Use the cursor buttons to move the pointer (yellow frame) to the desired clip and press the SET button. • The frame around the selected thumbnail changes to a blueframe. Press the SET button again to deselect the clip. 104 Thumbnail Operations
-
 1
1 -
2
-
3
-
4
-
5
-
6
-
7
-
8
-
9
-
10
-
11
-
12
-
13
-
14
-
15
-
16
-
17
-
18
-
19
-
20
-
21
-
22
-
23
-
24
-
25
-
26
-
27
-
28
-
29
-
30
-
31
-
32
-
33
-
34
-
35
-
36
-
37
-
38
-
39
-
40
-
41
-
42
-
43
-
44
-
45
-
46
-
47
-
48
-
49
-
50
-
51
-
52
-
53
-
54
-
55
-
56
-
57
-
58
-
59
-
60
-
61
-
62
-
63
-
64
-
65
-
66
-
67
-
68
-
69
-
70
-
71
-
72
-
73
-
74
-
75
-
76
-
77
-
78
-
79
-
80
-
81
-
82
-
83
-
84
-
85
-
86
-
87
-
88
-
89
-
90
-
91
-
92
-
93
-
94
-
95
-
96
-
97
-
98
-
 99
99 -
 100
100 -
 101
101 -
 102
102 -
 103
103 -
 104
104 -
 105
105 -
 106
106 -
 107
107 -
 108
108 -
 109
109 -
110
-
111
-
112
-
113
-
114
-
115
-
116
-
117
-
118
-
119
-
120
-
121
-
122
-
123
-
124
-
125
-
126
-
127
-
128
-
129
-
130
-
131
-
132
-
133
-
134
-
135
-
136
-
137
-
138
-
139
-
140
-
141
-
142
-
143
-
144
-
145
-
146
-
147
-
148
-
149
-
150
-
151
-
152
 |
 |
