Panasonic HPX500 Operating Instructions - Page 109
Setting of Clip Meta Data
 |
UPC - 791871302965
View all Panasonic HPX500 manuals
Add to My Manuals
Save this manual to your list of manuals |
Page 109 highlights
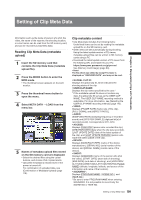
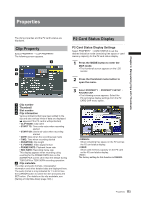
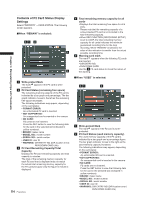
Setting of Clip Meta Data Chapter 6 Manipulating Clips with Thumbnails Information such as the name of person who shot the video, the name of the reporter, the shooting location, or a text memo can be read from the SD memory card, and can be recorded as Clip Meta Data. Reading Clip Meta Data (metadata upload) 1 Insert the SD memory card that contains the Clip Meta Data (metadata upload file). 2 Press the MODE button to enter the MCR mode. • The thumbnail screen appears on the LCD monitor. 3 Press the thumbnail menu button to open the menu. 4 Select META DATA → LOAD from the menu bar. 5 Names of metadata upload files stored on the SD memory card are displayed. • Select the desired files using the cursor buttons, and choose YES. Upload starts. • Uploaded metadata is retained even if the power is turned off. For confirmation of uploaded data, see [Confirmation of Metadata Upload] (page 115). Clip metadata content • Clip Meta Data includes the following items: Underlined items can be set by reading the metadata upload file on the SD memory card. • Other items are set automatically during shooting. Using the latest update version of P2 viewer, metadata upload files can be written to SD memory cards using a PC. • Download the latest update version of P2 viewer from the following URL and install it to your PC: https://eww.pavc.panasonic.co.jp/pro-av/ See [Memory Card Usage] (page 83). The file which was edited by except P2 viewer is displayed as "UNKNOWN DATA", and may not be read. • GLOBAL CLIP ID: Displays the global clip ID, which indicates the shooting status of the clip. • USER CLIP NAME: Displays the clip name specified by the user.* * If the metadata upload file does not contain any data, the global clip ID serves as the USER CLIP NAME. The USER CLIP NAME recording method is selectable. For more information, see [Selecting the USER CLIP NAME recording method] (page 110). • VIDEO: Displays [FRAME RATE] (frame rate of the clip), [PULL DOWN], and [ASPECT RATIO]. • AUDIO: [SAMPLING RATE] (sampling frequency of recorded sound) and [BITS PER SAMPLE] (digitized bit[s] of recorded sound). Corresponds to CH1- CH4. • ACCESS: Displays [CREATOR] (person who recorded the clip), [CREATION DATE] (date when the clip was recorded), [LAST UPDATE DATE] (date of the latest update of the clip), and [LAST UPDATE PERSON] (person who made the latest update of the clip). • DEVICE: Displays [MANUFACTURER] (name of the device manufacturer), [SERIAL NO.] (serial number of the device) and [MODEL NAME] (model name of the device). • SHOOT: Displays [SHOOTER] (name of the person who shot the video), [START DATE] (start date of shooting), [END DATE] (end date of shooting), and [LOCATION/ ALTITUDE/LONGITUDE/LATITUDE/SOURCE/PLACE NAME] (altitude, longitude, latitude, and source of the information and name of the location). • SCENARIO*: Displays [PROGRAM NAME], [SCENE NO.], and [TAKE NO.]. * Be sure to enter PROGRAM NAME when entering SCENARIO. It is not possible to record only the SCENE NO or TAKE NO. 109 Setting of Clip Meta Data
-
 1
1 -
2
-
3
-
4
-
5
-
6
-
7
-
8
-
9
-
10
-
11
-
12
-
13
-
14
-
15
-
16
-
17
-
18
-
19
-
20
-
21
-
22
-
23
-
24
-
25
-
26
-
27
-
28
-
29
-
30
-
31
-
32
-
33
-
34
-
35
-
36
-
37
-
38
-
39
-
40
-
41
-
42
-
43
-
44
-
45
-
46
-
47
-
48
-
49
-
50
-
51
-
52
-
53
-
54
-
55
-
56
-
57
-
58
-
59
-
60
-
61
-
62
-
63
-
64
-
65
-
66
-
67
-
68
-
69
-
70
-
71
-
72
-
73
-
74
-
75
-
76
-
77
-
78
-
79
-
80
-
81
-
82
-
83
-
84
-
85
-
86
-
87
-
88
-
89
-
90
-
91
-
92
-
93
-
94
-
95
-
96
-
97
-
98
-
99
-
100
-
101
-
102
-
103
-
 104
104 -
 105
105 -
 106
106 -
 107
107 -
 108
108 -
 109
109 -
 110
110 -
 111
111 -
 112
112 -
 113
113 -
 114
114 -
115
-
116
-
117
-
118
-
119
-
120
-
121
-
122
-
123
-
124
-
125
-
126
-
127
-
128
-
129
-
130
-
131
-
132
-
133
-
134
-
135
-
136
-
137
-
138
-
139
-
140
-
141
-
142
-
143
-
144
-
145
-
146
-
147
-
148
-
149
-
150
-
151
-
152
 |
 |
