Panasonic HPX500 Operating Instructions - Page 94
If the lens is provided with an extender, perform steps 2 to 5 again.
 |
UPC - 791871302965
View all Panasonic HPX500 manuals
Add to My Manuals
Save this manual to your list of manuals |
Page 94 highlights
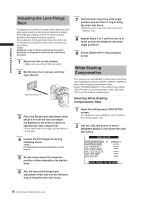
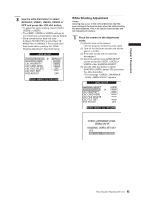
Chapter 5 Preparation 2 Set the image. (1) Shoot a solid white sheet of paper. (2) Set the lens iris to manual and adjust the iris so that a zebra pattern fills the entire viewfinder screen. • When the piece of paper is unevenly lit, the zebra pattern will not cover the entire screen. Adjust as required. • Make sure that the white paper is not exposed to multiple light sources (example, fluorescent lighting or halogen lamps) of different color temperatures. 6 If the lens is provided with an extender, turn on the extender function and perform steps 2 to 5 again. • The white shading adjustment need not be readjusted when the extender is later turned off. CHECK LUMINANCE LEVEL ZEBRA ON VF SHADING: USER1 SET OK? YES NO PUSH DIAL • Adjust the white shading in sunlight, under halogen lamp light or other light source that does not flicker. Fluorescent light and mercury lamps tend to flicker and should not be used for this adjustment. • Adjust the light source if the lens iris is out of the range between F4 and F11. • Make sure the electronic shutter is set to off. 3 Adjust white and black balance. (1) Set the WHITE BAL switch to A or B and use the AUTO W/B BAL switch to make an automatic white balance adjustment. (2) Use the AUTO W/B BAL switch to make an automatic black balance adjustment. (3) Again, use the AUTO W/B BAL switch to make an automatic white balance adjustment. 4 Repeat the operation in step 2-(2). 5 Adjust white shading. (1) Use the JOG dial button to select YES and press the JOG dial button. (2) The message "SHADING ACTIVE" appears on the screen during adjustment. (3) When the adjustment ends after a few seconds, the message "SHADING OK" appears. • When an error message such as "SHADING NG LEVEL OVER" or "SHADING NG LOW LIGHT" appears, adjust the iris. • The adjusted value is automatically stored in memory (USER1, USER2, USER3). 94 Mounting and Adjusting the Lens
-
 1
1 -
2
-
3
-
4
-
5
-
6
-
7
-
8
-
9
-
10
-
11
-
12
-
13
-
14
-
15
-
16
-
17
-
18
-
19
-
20
-
21
-
22
-
23
-
24
-
25
-
26
-
27
-
28
-
29
-
30
-
31
-
32
-
33
-
34
-
35
-
36
-
37
-
38
-
39
-
40
-
41
-
42
-
43
-
44
-
45
-
46
-
47
-
48
-
49
-
50
-
51
-
52
-
53
-
54
-
55
-
56
-
57
-
58
-
59
-
60
-
61
-
62
-
63
-
64
-
65
-
66
-
67
-
68
-
69
-
70
-
71
-
72
-
73
-
74
-
75
-
76
-
77
-
78
-
79
-
80
-
81
-
82
-
83
-
84
-
85
-
86
-
87
-
88
-
 89
89 -
 90
90 -
 91
91 -
 92
92 -
 93
93 -
 94
94 -
 95
95 -
 96
96 -
 97
97 -
 98
98 -
 99
99 -
100
-
101
-
102
-
103
-
104
-
105
-
106
-
107
-
108
-
109
-
110
-
111
-
112
-
113
-
114
-
115
-
116
-
117
-
118
-
119
-
120
-
121
-
122
-
123
-
124
-
125
-
126
-
127
-
128
-
129
-
130
-
131
-
132
-
133
-
134
-
135
-
136
-
137
-
138
-
139
-
140
-
141
-
142
-
143
-
144
-
145
-
146
-
147
-
148
-
149
-
150
-
151
-
152
 |
 |
