Panasonic HPX500 Operating Instructions - Page 62
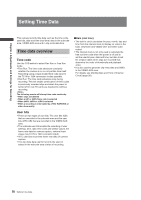
Setting the Time Code, Time code function during battery, replacement
 |
UPC - 791871302965
View all Panasonic HPX500 manuals
Add to My Manuals
Save this manual to your list of manuals |
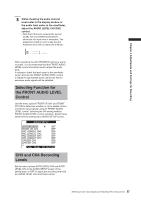
Page 62 highlights
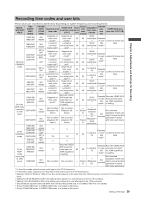
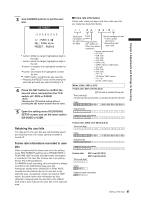
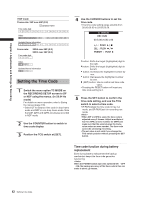
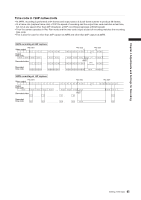
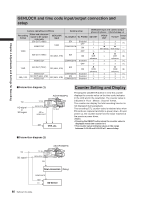
Chapter 4 Adjustments and Settings for Recording 720P mode Frame rate: 24P over 60P (2:3) Updated frame Time code digit 00 01 02 03 04 05 06 ... 23 24 25 26 27 28 29 Video AABBBCCDDDAABB ... CDDDAABBBCCDDD Updated frame information 10 10 01 01 00 10 10 ... 01 00 10 10 01 01 00 Frame rate: 30PA over 60P (2:2) 25PA over 50P (2:2) Time code digit 00 01 02 ... Video AABBCC ... Updated frame information 10 10 10 ... Setting the Time Code 1 Switch the menu option TC MODE on the RECORDING SETUP screen to DF or NDF using the menus. (In 59.94 Hz mode) For details on menu operation, refer to [Using the menus] (page 116). • Select DF to advance time code in drop frame mode and NDF in non-drop frame mode. Note that 24P, 24PA and 24PN are always recorded in NDF mode. 2 Use the COUNTER button to switch to time code display 3 Position the TCG switch at [SET]. 4 Use the CURSOR buttons to set the time code. • The time code setting range extends from 00:00:00:00 to 23:59:59:29. TC PRESET REC RUN 00 h 00 m 00 s 00 +/- : PUSH / SEL : PUSH / PRESET : PUSH button: Shifts the target (highlighted) digit to the right. button: Shifts the target (highlighted) digit to the left. button: Increases the highlighted number by one. button: Decreases the highlighted number by one. (SET) button: Use to confirm set time code value. • Pressing the RESET button will reset any time code setting to 0. 5 Press the SET button to confirm the time code setting, and use the TCG switch to select a time code. • [F-RUN] steps the time code in free run mode, and [R-RUN] set it in recording run mode. • When 24P or 24PA is used, the time code is adjusted every 5 frames. Adjust a multiple of four for 24PN, an even number for 30PN and make sure that the seconds plus the frame value makes an even number. The time code cannot be set during recording. • The set value is not valid if you change the TCG switch position without pressing the SET button. Time code function during battery replacement Even during battery replacement the backup mechanism keeps the time code generator functioning. When the POWER switch has been switched ON → OFF → ON, the backup accuracy of the time code in free run mode is about ±2 frames. 62 Setting Time Data
-
 1
1 -
2
-
3
-
4
-
5
-
6
-
7
-
8
-
9
-
10
-
11
-
12
-
13
-
14
-
15
-
16
-
17
-
18
-
19
-
20
-
21
-
22
-
23
-
24
-
25
-
26
-
27
-
28
-
29
-
30
-
31
-
32
-
33
-
34
-
35
-
36
-
37
-
38
-
39
-
40
-
41
-
42
-
43
-
44
-
45
-
46
-
47
-
48
-
49
-
50
-
51
-
52
-
53
-
54
-
55
-
56
-
 57
57 -
 58
58 -
 59
59 -
 60
60 -
 61
61 -
 62
62 -
 63
63 -
 64
64 -
 65
65 -
 66
66 -
 67
67 -
68
-
69
-
70
-
71
-
72
-
73
-
74
-
75
-
76
-
77
-
78
-
79
-
80
-
81
-
82
-
83
-
84
-
85
-
86
-
87
-
88
-
89
-
90
-
91
-
92
-
93
-
94
-
95
-
96
-
97
-
98
-
99
-
100
-
101
-
102
-
103
-
104
-
105
-
106
-
107
-
108
-
109
-
110
-
111
-
112
-
113
-
114
-
115
-
116
-
117
-
118
-
119
-
120
-
121
-
122
-
123
-
124
-
125
-
126
-
127
-
128
-
129
-
130
-
131
-
132
-
133
-
134
-
135
-
136
-
137
-
138
-
139
-
140
-
141
-
142
-
143
-
144
-
145
-
146
-
147
-
148
-
149
-
150
-
151
-
152
 |
 |
