Panasonic HPX500 Operating Instructions - Page 116
Menu Operations, Viewfinder and LCD Menus, Using the menus
 |
UPC - 791871302965
View all Panasonic HPX500 manuals
Add to My Manuals
Save this manual to your list of manuals |
Page 116 highlights
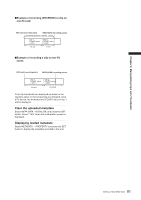
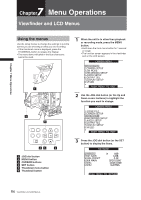
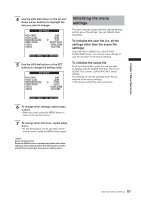
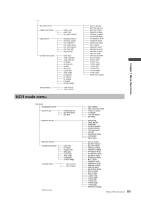
Chapter 7 Menu Operations 7 Chapter Menu Operations Viewfinder and LCD Menus Using the menus Use the setup menus to change the settings to suit the scenes you are shooting or what you are recording. • If the thumbnail menu is displayed, press the THUMBNAIL button to release the display. • The menu items indicated in the blue characters cannot be used. 1 2 6 1 When the unit is in other than playback or recording mode, press the MENU button. • Hold down the front menu button for 1 second or longer. • The function screen appears in the viewfinder and on the LCD screen. CAMERA MENU 1.SCENE FILE 2.CAMERA SETUP 3.SW MODE 4.RECORDING SETUP 5.AUDIO SETUP 6.OUTPUT SEL 7.DISPLAY SETUP 8.VF!LED PUSH MENU TO EXIT 2 Use the JOG dial button (or the Up and Down cursor buttons) to highlight the function you want to change. CAMERA MENU 1.SCENE FILE 2.CAMERA SETUP 3.SW MODE 4.RECORDING SETUP 5.AUDIO SETUP 6.OUTPUT SEL 7.DISPLAY SETUP 8.VF!LED PUSH MENU TO EXIT 35 4 1 JOG dial button 2 MENU button 3 CURSOR buttons 4 SET button 5 Thumbnail menu button 6 Thumbnail button 3 Press the JOG dial button (or the SET button) to display the items. SW MODE MID GAIN HIGH GAIN W.BAL.PRESET USER MAIN USER1 USER2 6dB 12dB 3.2K SPOTLIGHT GAIN:18dB SLOTSEL PUSH MENU TO RETURN 116 Viewfinder and LCD Menus
-
 1
1 -
2
-
3
-
4
-
5
-
6
-
7
-
8
-
9
-
10
-
11
-
12
-
13
-
14
-
15
-
16
-
17
-
18
-
19
-
20
-
21
-
22
-
23
-
24
-
25
-
26
-
27
-
28
-
29
-
30
-
31
-
32
-
33
-
34
-
35
-
36
-
37
-
38
-
39
-
40
-
41
-
42
-
43
-
44
-
45
-
46
-
47
-
48
-
49
-
50
-
51
-
52
-
53
-
54
-
55
-
56
-
57
-
58
-
59
-
60
-
61
-
62
-
63
-
64
-
65
-
66
-
67
-
68
-
69
-
70
-
71
-
72
-
73
-
74
-
75
-
76
-
77
-
78
-
79
-
80
-
81
-
82
-
83
-
84
-
85
-
86
-
87
-
88
-
89
-
90
-
91
-
92
-
93
-
94
-
95
-
96
-
97
-
98
-
99
-
100
-
101
-
102
-
103
-
104
-
105
-
106
-
107
-
108
-
109
-
110
-
 111
111 -
 112
112 -
 113
113 -
 114
114 -
 115
115 -
 116
116 -
 117
117 -
 118
118 -
 119
119 -
 120
120 -
 121
121 -
122
-
123
-
124
-
125
-
126
-
127
-
128
-
129
-
130
-
131
-
132
-
133
-
134
-
135
-
136
-
137
-
138
-
139
-
140
-
141
-
142
-
143
-
144
-
145
-
146
-
147
-
148
-
149
-
150
-
151
-
152
 |
 |
