Panasonic HPX500 Operating Instructions - Page 137
Maintenance and Inspections, Inspections Before Shooting, Preparing for Inspections
 |
UPC - 791871302965
View all Panasonic HPX500 manuals
Add to My Manuals
Save this manual to your list of manuals |
Page 137 highlights
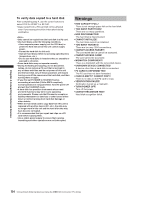
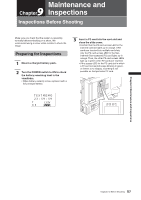
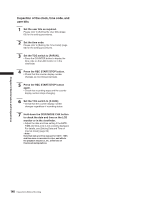
Maintenance and 9 Chapter Inspections Inspections Before Shooting Make sure you check that the system is operating normally before embarking on a shoot. We recommend using a colour video monitor to check the image. Preparing for Inspections 1 Mount a charged battery pack. 2 Turn the POWER switch to ON to check the battery remaining level in the viewfinder. • When battery capacity is low, replace it with a fully charged battery. 3 Insert a P2 card into the card slot and close the slide cover. • Confirm that the P2 card access LED for the inserted card slot lights up in orange. If P2 cards are inserted into multiple card slots, only the P2 card access LED for the firstinserted (first-accessed) P2 card lights up in orange. Then, the other P2 card access LEDs light up in green when P2 cards are inserted. • If the access LED for the P2 card slot in which a P2 card is inserted keeps blinking in green, or if there is no display, recording is not possible on that particular P2 card. T E X T M E M O 23 : 59 : 59 T 13.5V 9 9 4 3 21 Chapter 9 Maintenance and Inspections 137 Inspections Before Shooting
-
 1
1 -
2
-
3
-
4
-
5
-
6
-
7
-
8
-
9
-
10
-
11
-
12
-
13
-
14
-
15
-
16
-
17
-
18
-
19
-
20
-
21
-
22
-
23
-
24
-
25
-
26
-
27
-
28
-
29
-
30
-
31
-
32
-
33
-
34
-
35
-
36
-
37
-
38
-
39
-
40
-
41
-
42
-
43
-
44
-
45
-
46
-
47
-
48
-
49
-
50
-
51
-
52
-
53
-
54
-
55
-
56
-
57
-
58
-
59
-
60
-
61
-
62
-
63
-
64
-
65
-
66
-
67
-
68
-
69
-
70
-
71
-
72
-
73
-
74
-
75
-
76
-
77
-
78
-
79
-
80
-
81
-
82
-
83
-
84
-
85
-
86
-
87
-
88
-
89
-
90
-
91
-
92
-
93
-
94
-
95
-
96
-
97
-
98
-
99
-
100
-
101
-
102
-
103
-
104
-
105
-
106
-
107
-
108
-
109
-
110
-
111
-
112
-
113
-
114
-
115
-
116
-
117
-
118
-
119
-
120
-
121
-
122
-
123
-
124
-
125
-
126
-
127
-
128
-
129
-
130
-
131
-
 132
132 -
 133
133 -
 134
134 -
 135
135 -
 136
136 -
 137
137 -
 138
138 -
 139
139 -
 140
140 -
 141
141 -
 142
142 -
143
-
144
-
145
-
146
-
147
-
148
-
149
-
150
-
151
-
152
 |
 |
