Panasonic HPX500 Operating Instructions - Page 133
Procedures for connecting a hard disk, To check data copied to hard disk
 |
UPC - 791871302965
View all Panasonic HPX500 manuals
Add to My Manuals
Save this manual to your list of manuals |
Page 133 highlights
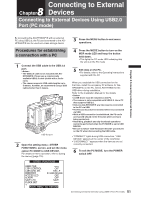
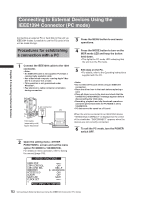
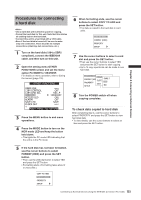
Chapter 8 Connecting to External Devices Procedures for connecting a hard disk • Use a hard disk with sufficient space for copying. • Format the hard disk for this unit. Note that this deletes all existing data on the hard disk. • Connect this unit to a hard disk with a 1394 cable. • Even if the hard disk is turned off, be sure to make only one connection. There must be no multiple connections (chaining, hub connections, etc.). 1 Turn on the hard disk (1394.a SBP2 compliant), connect the IEEE1394 cable, and then turn on this unit. 2 Open the setting menu OTHER FUNCTIONS screen and set the menu option PC MODE to 1394HOST. For details on menu operation, refer to [Using the menus] (page 116). OTHER FUNCTIONS USER FILE 1394 CONTROL 1394 CMD SEL PC MODE ACCESS LED ALARM SAVE LED CLOCK SET OFF REC_P 1394HOST OFF OFF SAVE PUSH MENU TO RETURN 3 Press the MENU button to end menu operations. 4 Press the MODE button to turn on the MCR mode LED and keep the button held down. • This lights the PC mode LED indicating that the unit is in the PC mode. 6 When formatting ends, use the cursor buttons to select COPY TO HDD and press the SET button. • The data is copied to the hard disk in card units. COPY TO HDD FORMAT (HDD) PROPERTY SETUP 7 Use the cursor buttons to select a card slot and press the SET button. • Then use the cursor buttons to select YES and press the SET button to start copying. • Up to 15 copy operations can be made to one hard disk. COPY TO HDD SLOT1 FORMAT (HDD)SLOT2 SURE ? PROPERTY SETUP YES EXIT NO 8 Turn the POWER switch off when copying completes. To check data copied to hard disk After completing step 4, use the cursor buttons to select PROPERTY and press the SET button to view hard disk data. • To view details, use the cursor buttons to select an item and press the SET button. 5 If the hard disk has not been formatted, use the cursor buttons to select FORMAT (HDD) and press the SET button. • Then use the JOG dial button to select YES and press the SET button. • Formatting starts. (Formatting takes about 2 or 3 seconds.) COPY TO HDD FORMAT (HDD) PROPERTY SETUP 133 Connecting to External Devices Using the IEEE1394 Connector (PC mode)
-
 1
1 -
2
-
3
-
4
-
5
-
6
-
7
-
8
-
9
-
10
-
11
-
12
-
13
-
14
-
15
-
16
-
17
-
18
-
19
-
20
-
21
-
22
-
23
-
24
-
25
-
26
-
27
-
28
-
29
-
30
-
31
-
32
-
33
-
34
-
35
-
36
-
37
-
38
-
39
-
40
-
41
-
42
-
43
-
44
-
45
-
46
-
47
-
48
-
49
-
50
-
51
-
52
-
53
-
54
-
55
-
56
-
57
-
58
-
59
-
60
-
61
-
62
-
63
-
64
-
65
-
66
-
67
-
68
-
69
-
70
-
71
-
72
-
73
-
74
-
75
-
76
-
77
-
78
-
79
-
80
-
81
-
82
-
83
-
84
-
85
-
86
-
87
-
88
-
89
-
90
-
91
-
92
-
93
-
94
-
95
-
96
-
97
-
98
-
99
-
100
-
101
-
102
-
103
-
104
-
105
-
106
-
107
-
108
-
109
-
110
-
111
-
112
-
113
-
114
-
115
-
116
-
117
-
118
-
119
-
120
-
121
-
122
-
123
-
124
-
125
-
126
-
127
-
 128
128 -
 129
129 -
 130
130 -
 131
131 -
 132
132 -
 133
133 -
 134
134 -
 135
135 -
 136
136 -
 137
137 -
 138
138 -
139
-
140
-
141
-
142
-
143
-
144
-
145
-
146
-
147
-
148
-
149
-
150
-
151
-
152
 |
 |
