Panasonic HPX500 Operating Instructions - Page 67
Viewfinder Screen Status Displays, Lamps in the Viewfinder Screen, Viewfinder Status Indication Layout
 |
UPC - 791871302965
View all Panasonic HPX500 manuals
Add to My Manuals
Save this manual to your list of manuals |
Page 67 highlights
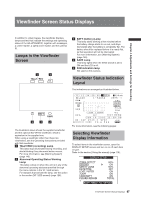
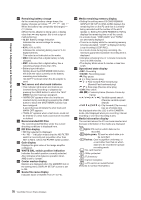
Viewfinder Screen Status Displays Chapter 4 Adjustments and Settings for Recording In addition to video images, the viewfinder displays lamps and text that indicate the settings and operating status of the AG-HPX500P/E, together with messages, a center marker, a safety zone marker and the camera ID. Lamps in the Viewfinder Screen 1 5 3 BATT (battery) Lamp This lamp starts blinking a few minutes before the battery charge starts to run out, and stays illuminated after the battery is completely flat. The battery should be replaced before it is nearly flat, so that operation will not be interrupted. For more information, see [Warning System] (page 142). 4 SAVE Lamp This lamp lights when the SAVE switch is set to ON and the LCD is off. 5 50M indication lamp Not used on this camera. Viewfinder Status Indication Layout The indications are arranged as illustrated below. 2 3 4 The illustration above shows the supplied viewfinder and the optional AG-VF11G viewfinder, which is equivalent to the supplied one. When using a viewfinder other than these two viewfinders, see the Operating Instructions provided with that viewfinder. 1 TALLY/REC (recording) Lamp This lamp stays illuminated during recording, and starts blinking if any abnormal action occurs. For more information, see [Warning System] (page 142). 2 Abnormal Operating Status Warning Lamp This lamp comes on when this unit is in any of the abnormal operating statuses specified through the menu options in the VF ! LED screen. For statuses that activate the lamp, see the option in the section [VF ! LED screen] (page 126). T C 1 2 : 3 4 : 5 6 : 0 0 1 2 3 4 2 9 9 9 min P2 L A C K I PAUSE USER - 1 1394 C A C HD1080i AWB NG 60 S Q U ABB NG P 3 .2 K 1 8 dB LOW LIGHT ND 1 8 3 % ND 2 TEXT MEMO JUN 1 9 2 0 0 2 23 : 59 : 59 6 0 : 2 4 P 1/ 1 2 3 . 4 S P O T CH F 5. 6 Z 9 9 13.5V For more information, see the following pages: Selecting Viewfinder Display Information To select items in the viewfinder screen, open the DISPLAY SETUP screen and turn on or off each item or type. Refer to the section [Using the menus] (page 116). DISPLAY SETUP ZEBRA DETECT MARKER SAFETY ZONE DATE/TIME LEVEL MATER ZOOM CARD/BATT P2CARD REMAIN 80% ON 90% OFF ON ON ON TOTAL PUSH MENU TO RETURN 67 Viewfinder Screen Status Displays
-
 1
1 -
2
-
3
-
4
-
5
-
6
-
7
-
8
-
9
-
10
-
11
-
12
-
13
-
14
-
15
-
16
-
17
-
18
-
19
-
20
-
21
-
22
-
23
-
24
-
25
-
26
-
27
-
28
-
29
-
30
-
31
-
32
-
33
-
34
-
35
-
36
-
37
-
38
-
39
-
40
-
41
-
42
-
43
-
44
-
45
-
46
-
47
-
48
-
49
-
50
-
51
-
52
-
53
-
54
-
55
-
56
-
57
-
58
-
59
-
60
-
61
-
 62
62 -
 63
63 -
 64
64 -
 65
65 -
 66
66 -
 67
67 -
 68
68 -
 69
69 -
 70
70 -
 71
71 -
 72
72 -
73
-
74
-
75
-
76
-
77
-
78
-
79
-
80
-
81
-
82
-
83
-
84
-
85
-
86
-
87
-
88
-
89
-
90
-
91
-
92
-
93
-
94
-
95
-
96
-
97
-
98
-
99
-
100
-
101
-
102
-
103
-
104
-
105
-
106
-
107
-
108
-
109
-
110
-
111
-
112
-
113
-
114
-
115
-
116
-
117
-
118
-
119
-
120
-
121
-
122
-
123
-
124
-
125
-
126
-
127
-
128
-
129
-
130
-
131
-
132
-
133
-
134
-
135
-
136
-
137
-
138
-
139
-
140
-
141
-
142
-
143
-
144
-
145
-
146
-
147
-
148
-
149
-
150
-
151
-
152
 |
 |
