Panasonic HPX500 Operating Instructions - Page 41
One-shot recording (ONE-SHOT REC), Press the REC START/STOP button.
 |
UPC - 791871302965
View all Panasonic HPX500 manuals
Add to My Manuals
Save this manual to your list of manuals |
Page 41 highlights
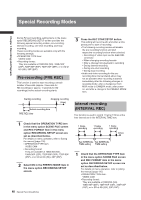
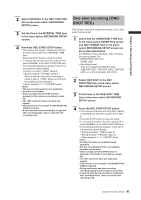
Chapter 3 Recording and Playback 2 Select INTERVAL in the REC FUNCTION item in the menu option RECORDING SETUP screen. 3 Set the time in the INTERVAL TIME item in the menu option RECORDING SETUP screen. 4 Press the REC START/STOP button. • The camera will repeat 1-frame recording for the time interval set in the INTERVAL TIME item. • Press the STOP button to stop recording. • To cancel this function, turn the camera off or select NORMAL in the REC FUNCTION item. • The following indications appear to the left of the operation status display. • During recording: "I-REC" stays lit. • During a pause: "I-PAUSE" stays lit. When a setting of less than 2 seconds is made in step 3, "I-REC" blinks according to time setting during recording. • When stopped:"I-" in "I-PAUSE" blinks. • The pre-recording function is not available. • Sound is not recorded. • Data recorded (until the STOP button is pressed) in this mode is recorded as a single file. • The 1394 connector does not output any signals. • This function is not available if a DIR ENTRY NG CARD is inserted. • A card inserted during recording is recognized after recording stops. Insert a card after the recording ends. One-shot recording (ONESHOT REC) This function records a single shot at each unit of time which has been set. 1 Check that the OPERATION TYPE item in the menu option SCENE FILE screen and REC FORMAT item in the menu option RECORDING SETUP screen are set as described below. For details on menu operation, refer to [Using the menus] (page 116). • OPERATION TYPE item: VIDEO CAM • Recording format: They are available at 1080i/60i (50i), 1080i/30P (25P), 720P/60P (50P), 720P/30P (25P), or in SD at 60i (50i), 30P (25P). 2 Select ONE SHOT in the REC FUNCTION item in the menu option RECORDING SETUP screen. 3 Set the time in the ONE SHOT TIME item in the menu option RECORDING SETUP screen. 4 Press the REC START/STOP button. • The camera will pause recording after making a recording that lasts the duration set in step 3. • Press the STOP button to stop recording. • To cancel this function, turn the camera off or select NORMAL in the REC FUNCTION item. • The following indications appear to the left of the operation status display. • During recording: "I-REC" stays lit. • During a pause: "I-PAUSE" stays lit. • When stopped:"I-" in "I-PAUSE" blinks. • No other functions are available during operation. • The pre-recording function is not available. • Sound is not recorded. • Data recorded (until the STOP button is pressed) in this mode is recorded as a single file. • The 1394 connector does not output any signals. • This function is not available if a DIR ENTRY NG CARD is inserted. • During continuous one-shot recording, recording operation speed may be decreased. • A card inserted during recording is recognized after recording stops. Insert a card after the recording ends. 41 Special Recording Modes
-
 1
1 -
2
-
3
-
4
-
5
-
6
-
7
-
8
-
9
-
10
-
11
-
12
-
13
-
14
-
15
-
16
-
17
-
18
-
19
-
20
-
21
-
22
-
23
-
24
-
25
-
26
-
27
-
28
-
29
-
30
-
31
-
32
-
33
-
34
-
35
-
 36
36 -
 37
37 -
 38
38 -
 39
39 -
 40
40 -
 41
41 -
 42
42 -
 43
43 -
 44
44 -
 45
45 -
 46
46 -
47
-
48
-
49
-
50
-
51
-
52
-
53
-
54
-
55
-
56
-
57
-
58
-
59
-
60
-
61
-
62
-
63
-
64
-
65
-
66
-
67
-
68
-
69
-
70
-
71
-
72
-
73
-
74
-
75
-
76
-
77
-
78
-
79
-
80
-
81
-
82
-
83
-
84
-
85
-
86
-
87
-
88
-
89
-
90
-
91
-
92
-
93
-
94
-
95
-
96
-
97
-
98
-
99
-
100
-
101
-
102
-
103
-
104
-
105
-
106
-
107
-
108
-
109
-
110
-
111
-
112
-
113
-
114
-
115
-
116
-
117
-
118
-
119
-
120
-
121
-
122
-
123
-
124
-
125
-
126
-
127
-
128
-
129
-
130
-
131
-
132
-
133
-
134
-
135
-
136
-
137
-
138
-
139
-
140
-
141
-
142
-
143
-
144
-
145
-
146
-
147
-
148
-
149
-
150
-
151
-
152
 |
 |
