Panasonic HPX500 Operating Instructions - Page 92
Adjusting the Lens Flange Back, White Shading Compensation, Selecting White Shading, Compensation Data - lenses
 |
UPC - 791871302965
View all Panasonic HPX500 manuals
Add to My Manuals
Save this manual to your list of manuals |
Page 92 highlights
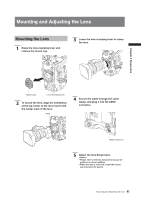
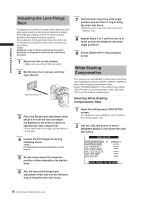
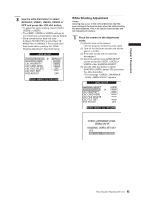
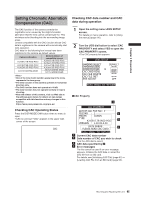
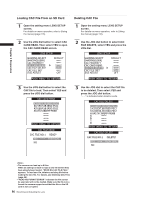
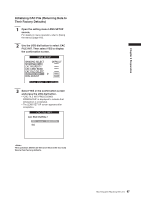
Chapter 5 Preparation Adjusting the Lens Flange Back If images are not clearly focused at both telephoto and wide-angle positions during zoom operations, adjust the flange back (distance from the lens mounting surface to the image formation surface). Once adjusted, the flange back does not need to be re-adjusted as long as the same lens is mounted on the camera. Please also refer to the lens instruction manual for directions on adjustment and locations of individual lens parts. 1 Mount the lens on the camera. • Make sure you connect the lens cable. 2 Set the lens iris to manual, and fully open the iris. Approximately 3 m 7 Set the zoom ring to the wide-angle position and turn the F.f ring to bring the chart into focus. • While focusing, take care not to move the distance ring. 8 Repeat Steps 5 to 7 until the lens is in focus at both the telephoto and wideangle positions. 9 Firmly tighten the F.f ring clamping screw. White Shading Compensation The camera can use DEFAULT (fixed value) and three user adjustable functions (USER1, USER2, USER3) to store white shading compensation data. Select SHADING SELECT in the setting menu LENS SETUP screen to set compensation data. Selecting OFF turns off shading compensation. Selecting White Shading Compensation Data 3 Place the flange back adjustment chart about 3 m from the lens and adjust the lighting on the chart to obtain an appropriate video output level. • If the video level is too high, use the filters or the shutter. 4 Loosen the F.f (Flange focus) ring clamping screw. F.b (Flange back) may be indicated on some lenses. 5 Set the zoom ring to the telephoto position, either manually or by electric drive. 1 Open the setting menu LENS SETUP screen. For details on menu operation, refer to [Using the menus] (page 116). 2 Use the JOG dial button to select SHADING SELECT, then press the JOG dial button. LENS SETUP SHADING SELECT SHADING(USER) CAC PROPERTY CAC CARD READ CAC FILE DELETE CAC FILE INIT IRIS ADJUST DEFAULT OFF PUSH MENU TO RETURN 6 Aim the lens at the flange back adjustment chart and turn the distance ring to bring the chart into focus. 92 Mounting and Adjusting the Lens
-
 1
1 -
2
-
3
-
4
-
5
-
6
-
7
-
8
-
9
-
10
-
11
-
12
-
13
-
14
-
15
-
16
-
17
-
18
-
19
-
20
-
21
-
22
-
23
-
24
-
25
-
26
-
27
-
28
-
29
-
30
-
31
-
32
-
33
-
34
-
35
-
36
-
37
-
38
-
39
-
40
-
41
-
42
-
43
-
44
-
45
-
46
-
47
-
48
-
49
-
50
-
51
-
52
-
53
-
54
-
55
-
56
-
57
-
58
-
59
-
60
-
61
-
62
-
63
-
64
-
65
-
66
-
67
-
68
-
69
-
70
-
71
-
72
-
73
-
74
-
75
-
76
-
77
-
78
-
79
-
80
-
81
-
82
-
83
-
84
-
85
-
86
-
 87
87 -
 88
88 -
 89
89 -
 90
90 -
 91
91 -
 92
92 -
 93
93 -
 94
94 -
 95
95 -
 96
96 -
 97
97 -
98
-
99
-
100
-
101
-
102
-
103
-
104
-
105
-
106
-
107
-
108
-
109
-
110
-
111
-
112
-
113
-
114
-
115
-
116
-
117
-
118
-
119
-
120
-
121
-
122
-
123
-
124
-
125
-
126
-
127
-
128
-
129
-
130
-
131
-
132
-
133
-
134
-
135
-
136
-
137
-
138
-
139
-
140
-
141
-
142
-
143
-
144
-
145
-
146
-
147
-
148
-
149
-
150
-
151
-
152
 |
 |
