Panasonic HPX500 Operating Instructions - Page 108
Deleting Clips, Restoring Clips
 |
UPC - 791871302965
View all Panasonic HPX500 manuals
Add to My Manuals
Save this manual to your list of manuals |
Page 108 highlights
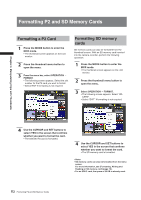
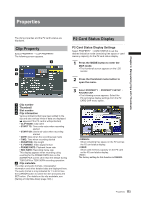
Chapter 6 Manipulating Clips with Thumbnails When adding a shot mark to (or deleting the shot mark from) a clip recorded across multiple P2 cards, do this with all these P2 cards inserted into P2 card slots. Deleting Clips 1 Press the MODE button to enter the MCR mode. • The thumbnail screen appears on the LCD monitor. 2 Use the cursor buttons to move the pointer over the clip you want to delete, and press the SET button. • Press the SET button to select the clip. 3 Press the thumbnail menu button to select OPERATION → DELETE from the menu bar. Restoring Clips Restores clips that are defective as a result of sudden poweringdown during recording, or removal of the P2 card being accessed. • Only those clips with yellow corrupt clip markers can be restored. Delete the clips with red corrupt clip markers. If the clip cannot be deleted, format the P2 card. • During restoration of the clips, however, the defectiveclip indicator may change from yellow to red, resulting in inability to restore the clips. 1 Press the MODE button to enter the MCR mode. • The thumbnail screen appears on the LCD monitor. 2 Use the cursor buttons to move the pointer over the clip you want to restore (defective clips are indicated by corrupt clip marks), and press the SET button. • Press the SET button to select the clip. 3 Press the thumbnail menu button to select OPERATION → REPAIR CLIP from the menu bar. To restore a bad clip generated during loop recording, select REPAIR CLIP (LOOP). Clip repair may take some time. 4 A screen to confirm the delete operation appears. Use the cursor buttons and the SET button to select YES. • The clip is deleted. • All selected clips (in blue-green frames) are deleted by this operation. 4 The confirmation window appears. Use the cursor buttons and the SET button to select YES. After selecting multiple clips and during deletion with "CANCEL" indication displayed, pressing the SET button stops the deletion operation in the middle. 108 Clip Operations
-
 1
1 -
2
-
3
-
4
-
5
-
6
-
7
-
8
-
9
-
10
-
11
-
12
-
13
-
14
-
15
-
16
-
17
-
18
-
19
-
20
-
21
-
22
-
23
-
24
-
25
-
26
-
27
-
28
-
29
-
30
-
31
-
32
-
33
-
34
-
35
-
36
-
37
-
38
-
39
-
40
-
41
-
42
-
43
-
44
-
45
-
46
-
47
-
48
-
49
-
50
-
51
-
52
-
53
-
54
-
55
-
56
-
57
-
58
-
59
-
60
-
61
-
62
-
63
-
64
-
65
-
66
-
67
-
68
-
69
-
70
-
71
-
72
-
73
-
74
-
75
-
76
-
77
-
78
-
79
-
80
-
81
-
82
-
83
-
84
-
85
-
86
-
87
-
88
-
89
-
90
-
91
-
92
-
93
-
94
-
95
-
96
-
97
-
98
-
99
-
100
-
101
-
102
-
 103
103 -
 104
104 -
 105
105 -
 106
106 -
 107
107 -
 108
108 -
 109
109 -
 110
110 -
 111
111 -
 112
112 -
 113
113 -
114
-
115
-
116
-
117
-
118
-
119
-
120
-
121
-
122
-
123
-
124
-
125
-
126
-
127
-
128
-
129
-
130
-
131
-
132
-
133
-
134
-
135
-
136
-
137
-
138
-
139
-
140
-
141
-
142
-
143
-
144
-
145
-
146
-
147
-
148
-
149
-
150
-
151
-
152
 |
 |
