Panasonic HPX500 Operating Instructions - Page 20
Parts and their Functions, OUTPUT/AUTO KNEE selector switch, WHITE BAL white balance memory
 |
UPC - 791871302965
View all Panasonic HPX500 manuals
Add to My Manuals
Save this manual to your list of manuals |
Page 20 highlights
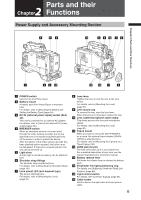
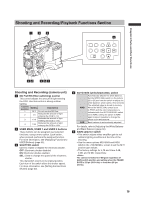
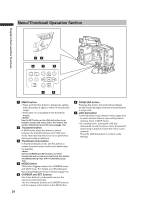
Chapter 2 Parts and their Functions 6 OUTPUT/AUTO KNEE selector switch This switch selects the video signals sent from the camera unit to the memory card recorder unit, viewfinder and video monitor. Video being recorded through the camera CAM. is output with the AUTO KNEE circuit AUTO activated. The compression level (KNEE KNEE ON point) of the video signal is automatically changed according to the received signal. CAM. AUTO KNEE OFF Video being recorded through the camera is output with the AUTO KNEE circuit turned off. The KNEE point is locked to the level set in the menu. BARS Color bar signals are output with the AUTO KNEE circuit turned off. ■AUTO KNEE function Usually, when you adjust levels to shoot people or scenery against a strongly lit background, the background will be totally whited-out, with buildings and other objects blurred. In this case, the AUTO KNEE function reproduces the background clearly. This function is effective when: • The subject is a person positioned in the shade under a clear sky. • The subject is a person inside a car or building, and you also want to capture the background visible through a window. • The subject is a high-contrast scene. 7 WHITE BAL (white balance memory selector) switch Used to select the white balance adjustment method. PRST: Use this when you have no time to adjust the white balance. • The value for the white balance is factory-set to 3200 K. • While the setting menu or the color temperature is displayed, turn the AUTO W/B BAL switch to AWB to set the color temperature to 3200K or 5600K. A • B: Pressing the AUTO W/B BAL Switch toward [AWB] automatically adjusts the white balance, saving the adjusted value in Memory A or B. For more information, see [Adjusting the White Balance] (page 50). 8 DISP/MODE CHK button • Press this button to turn off the LCD monitor and viewfinder display. (The time code indication stays on.) • A second press of the button turns the display back on and holding it down displays shooting conditions and functions assigned to USER switches. • It also serves to turn off the alarm sound. 9 MODE button • This button toggles between the CAMERA mode and MCR mode at each press. • Holding down this button for 2 seconds or longer in the MCR mode will engage the PC mode. Since this button does not work in the PC mode, power off the camera to exit the PC mode and switch to another mode. The camera will start up in the CAMERA mode when powered up next time. • Use the mode LED to check current mode. 20
-
 1
1 -
2
-
3
-
4
-
5
-
6
-
7
-
8
-
9
-
10
-
11
-
12
-
13
-
14
-
 15
15 -
 16
16 -
 17
17 -
 18
18 -
 19
19 -
 20
20 -
 21
21 -
 22
22 -
 23
23 -
 24
24 -
 25
25 -
26
-
27
-
28
-
29
-
30
-
31
-
32
-
33
-
34
-
35
-
36
-
37
-
38
-
39
-
40
-
41
-
42
-
43
-
44
-
45
-
46
-
47
-
48
-
49
-
50
-
51
-
52
-
53
-
54
-
55
-
56
-
57
-
58
-
59
-
60
-
61
-
62
-
63
-
64
-
65
-
66
-
67
-
68
-
69
-
70
-
71
-
72
-
73
-
74
-
75
-
76
-
77
-
78
-
79
-
80
-
81
-
82
-
83
-
84
-
85
-
86
-
87
-
88
-
89
-
90
-
91
-
92
-
93
-
94
-
95
-
96
-
97
-
98
-
99
-
100
-
101
-
102
-
103
-
104
-
105
-
106
-
107
-
108
-
109
-
110
-
111
-
112
-
113
-
114
-
115
-
116
-
117
-
118
-
119
-
120
-
121
-
122
-
123
-
124
-
125
-
126
-
127
-
128
-
129
-
130
-
131
-
132
-
133
-
134
-
135
-
136
-
137
-
138
-
139
-
140
-
141
-
142
-
143
-
144
-
145
-
146
-
147
-
148
-
149
-
150
-
151
-
152
 |
 |
