Panasonic HPX500 Operating Instructions - Page 24
Menu/Thumbnail Operation VAR button
 |
UPC - 791871302965
View all Panasonic HPX500 manuals
Add to My Manuals
Save this manual to your list of manuals |
Page 24 highlights
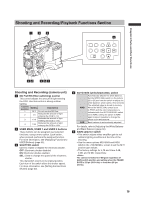
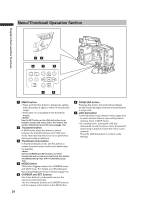
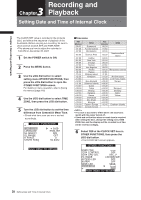
Menu/Thumbnail Operation Section Chapter 2 Parts and their Functions 71 6 2 4 3 5 1 MENU button • Press and hold this button to display the setting menu and press it again to return to the previous image. • This button is not available in the thumbnail display. Use the SET button or the JOG dial button to go between menus and select items. For details, see section [Viewfinder and LCD menus] (page 116). 2 Thumbnail button In MCR mode, press this button to switch between the thumbnail screen and 1394 input mode. Note that this switchover is not performed during recording or playback. 3 Thumbnail menu button In thumbnail display mode, use this button to access thumbnail menu functions to delete clips, for example. Use the CURSOR and SET buttons to select thumbnails and access menu functions. For details, see [Manipulating Clips with Thumbnails] (page 103 ) . 4 MODE button This button toggles between the CAMERA mode and MCR mode. For details, see [Shooting and Recording/Playback Function Section] (page 19). 5 CURSOR and SET buttons Use these buttons to manipulate menus, the menu bar and thumbnails. The four triangular buttons are CURSOR buttons and the square center button is the SET button. 24 6 PAGE/VAR button Pressing this button during thumbnail display scrolls thumbnail pages forwards and backwards in page units. 7 JOG dial button • Use this button to go between menu pages and to select and set items in open setting menus (camera menu or MCR menu). • In a setting menu, turning the JOG dial downwards moves the menu cursor downwards and turning it upwards moves the menu cursor upwards. Press the JOG dial button to confirm made settings.
-
 1
1 -
2
-
3
-
4
-
5
-
6
-
7
-
8
-
9
-
10
-
11
-
12
-
13
-
14
-
15
-
16
-
17
-
18
-
 19
19 -
 20
20 -
 21
21 -
 22
22 -
 23
23 -
 24
24 -
 25
25 -
 26
26 -
 27
27 -
 28
28 -
 29
29 -
30
-
31
-
32
-
33
-
34
-
35
-
36
-
37
-
38
-
39
-
40
-
41
-
42
-
43
-
44
-
45
-
46
-
47
-
48
-
49
-
50
-
51
-
52
-
53
-
54
-
55
-
56
-
57
-
58
-
59
-
60
-
61
-
62
-
63
-
64
-
65
-
66
-
67
-
68
-
69
-
70
-
71
-
72
-
73
-
74
-
75
-
76
-
77
-
78
-
79
-
80
-
81
-
82
-
83
-
84
-
85
-
86
-
87
-
88
-
89
-
90
-
91
-
92
-
93
-
94
-
95
-
96
-
97
-
98
-
99
-
100
-
101
-
102
-
103
-
104
-
105
-
106
-
107
-
108
-
109
-
110
-
111
-
112
-
113
-
114
-
115
-
116
-
117
-
118
-
119
-
120
-
121
-
122
-
123
-
124
-
125
-
126
-
127
-
128
-
129
-
130
-
131
-
132
-
133
-
134
-
135
-
136
-
137
-
138
-
139
-
140
-
141
-
142
-
143
-
144
-
145
-
146
-
147
-
148
-
149
-
150
-
151
-
152
 |
 |
