Panasonic HPX500 Operating Instructions - Page 35
Shooting, Setting the switches before shooting, and recording, White/Black Balance Adjustment - ag b h
 |
UPC - 791871302965
View all Panasonic HPX500 manuals
Add to My Manuals
Save this manual to your list of manuals |
Page 35 highlights
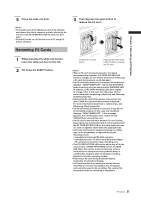
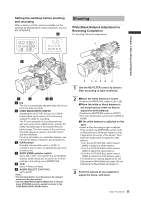
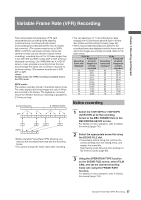
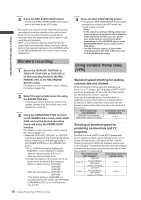
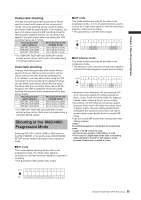
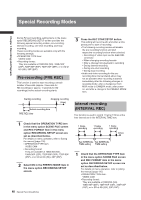
Chapter 3 Recording and Playback Setting the switches before shooting and recording When a battery and P2 cards are installed, set the switches as detailed below, before starting to use your AG-HPX500P/E. 6 Shooting White/Black Balance Adjustment to Recording Completion For shooting, follow the steps below. 1 5 1 2 34 1 Iris The iris is automatically adjusted when the lens is set to the auto iris mode. 2 USER MAIN/USER1/USER2 Assigning the SLOT SEL function to a USER button allows you to select a P2 card among multiple P2 cards for recording. The P2 card selected for recording switches with each press of the USER button, and the P2 CARD ACCESS LED of the selected P2 card lights orange. The slot number of the card to be recorded appears in green in the LCD monitor and the viewfinder. For more information on viewfinder displays, see [Viewfinder Status Indication Layout] (page 67). 3 GAIN switch Normally, this should be set to L (0 dB). If conditions are too dark, an appropriate gain level should be set. 4 AUTO KNEE selector switch Set to ON or OFF. Turning OFF the AUTO KNEE selector switch allows you to select one of three settings in the setting menu SCENE FILE. 5 TCG Set to F-RUN or R-RUN. 6 AUDIO SELECT CH 1/CH 2 Set to AUTO. • The slot selected for recording cannot be changed when recording has started. • Use the USER MAIN/USER1/USER2 item in setting menu SW MODE screen to assign functions to the USER MAIN/USER1/USER2 button. 3 56 4 2 2 1 Use the ND FILTER control to select a filter according to light conditions. 2 ■When the white balance is saved: • Position the WHITE BAL switch to [A] or [B]. ■When the white or black balance is not saved and you have no time to adjust the white balance: • Position the WHITE BAL switch to [PRST]. • The color temperature can be set to 3200K or 5600K. ■If the white balance is adjusted on the spot: • Select a filter according to light conditions. Then, position the WHITE BAL switch to [A] or [B] and shoot a white test subject so that it appears at the center of the screen. Then, follow the steps below to adjust the white balance. 1.Turn the AUTO W/B BAL switch toward [AWB] to adjust the white balance. 2.Turn the AUTO W/B BAL switch toward [ABB] to adjust the black balance. 3.Turn the AUTO W/B BAL switch toward [AWB] to adjust the white balance again. For directions on making adjustments, see [Adjusting the White Balance] (page 50) and [Adjusting the Black Balance] (page 51). 3 Point the camera at your subject to adjust the focus, and zoom. 35 Basic Procedures
-
 1
1 -
2
-
3
-
4
-
5
-
6
-
7
-
8
-
9
-
10
-
11
-
12
-
13
-
14
-
15
-
16
-
17
-
18
-
19
-
20
-
21
-
22
-
23
-
24
-
25
-
26
-
27
-
28
-
29
-
 30
30 -
 31
31 -
 32
32 -
 33
33 -
 34
34 -
 35
35 -
 36
36 -
 37
37 -
 38
38 -
 39
39 -
 40
40 -
41
-
42
-
43
-
44
-
45
-
46
-
47
-
48
-
49
-
50
-
51
-
52
-
53
-
54
-
55
-
56
-
57
-
58
-
59
-
60
-
61
-
62
-
63
-
64
-
65
-
66
-
67
-
68
-
69
-
70
-
71
-
72
-
73
-
74
-
75
-
76
-
77
-
78
-
79
-
80
-
81
-
82
-
83
-
84
-
85
-
86
-
87
-
88
-
89
-
90
-
91
-
92
-
93
-
94
-
95
-
96
-
97
-
98
-
99
-
100
-
101
-
102
-
103
-
104
-
105
-
106
-
107
-
108
-
109
-
110
-
111
-
112
-
113
-
114
-
115
-
116
-
117
-
118
-
119
-
120
-
121
-
122
-
123
-
124
-
125
-
126
-
127
-
128
-
129
-
130
-
131
-
132
-
133
-
134
-
135
-
136
-
137
-
138
-
139
-
140
-
141
-
142
-
143
-
144
-
145
-
146
-
147
-
148
-
149
-
150
-
151
-
152
 |
 |
