Panasonic HPX500 Operating Instructions - Page 82
Saving scene files and other settings on SD memory cards, To load a file
 |
UPC - 791871302965
View all Panasonic HPX500 manuals
Add to My Manuals
Save this manual to your list of manuals |
Page 82 highlights
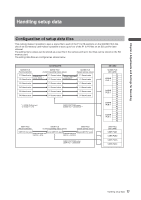
Chapter 4 Adjustments and Settings for Recording Saving scene files and other settings on SD memory cards You can save up to four scene file settings or other settings as files on an SD memory card, and you can also load them from the card. • In the case of the scene files, the current settings are automatically saved in the unit, and the saved data is written on an SD memory card. When data has been read from an SD memory card, the current settings are rewritten at the same time as the data saved inside the unit. • The data in all the scene files, F1 to F6, is rewritten. The following procedure shows how to save scene files. 1 Set the unit's POWER switch to ON. 2 Select SCENE FILE on the setting menu CARD FUNCTIONS screen, select YES, and press the JOG dial button. For details on menu operation, refer to [Using the menus] (page 116). CARD FUNCTIONS SCENE FILE USER FILE YES SD CARD FORMAT 4 Select WRITE using the JOG dial button, and press the JOG dial button. SCENE FILE (SD CARD) FILE SELECT READ WRITE FILE 1 FILE 2 FILE 3 FILE 4 TITLE RELOAD 1 - - - YES NO FILE NO FILE NO FILE NO FILE - - - - PUSH MENU TO RETURN 5 Press the cursor button, turn the JOG dial button to move to YES and again press the JOG dial button. • In the following example, TITLE 1 is the filename. • When writing is completed, WRITE OK appears. SCENE FILE (SD CARD) WRITE FILE 1 YES PUSH DIAL NO TITLE EDIT TITLE 1 PUSH MENU TO RETURN PUSH MENU TO RETURN 3 Select the file number (1 to 4) using the JOG dial button. • Press the JOG dial button again to confirm the setting. SCENE FILE (SD CARD) FILE SELECT READ WRITE FILE 1 FILE 2 FILE 3 FILE 4 TITLE RELOAD 1 NO FILE NO FILE NO FILE NO FILE - - - - PUSH MENU TO RETURN To load a file Perform steps 1 to 3, select READ in step 4, and press the JOG dial button. When reading is completed, READ OK appears. Select USER FILE in the CARD FUNCTION screen and process it in the same way as scene files. 82 Handling setup data
-
 1
1 -
2
-
3
-
4
-
5
-
6
-
7
-
8
-
9
-
10
-
11
-
12
-
13
-
14
-
15
-
16
-
17
-
18
-
19
-
20
-
21
-
22
-
23
-
24
-
25
-
26
-
27
-
28
-
29
-
30
-
31
-
32
-
33
-
34
-
35
-
36
-
37
-
38
-
39
-
40
-
41
-
42
-
43
-
44
-
45
-
46
-
47
-
48
-
49
-
50
-
51
-
52
-
53
-
54
-
55
-
56
-
57
-
58
-
59
-
60
-
61
-
62
-
63
-
64
-
65
-
66
-
67
-
68
-
69
-
70
-
71
-
72
-
73
-
74
-
75
-
76
-
 77
77 -
 78
78 -
 79
79 -
 80
80 -
 81
81 -
 82
82 -
 83
83 -
 84
84 -
 85
85 -
 86
86 -
 87
87 -
88
-
89
-
90
-
91
-
92
-
93
-
94
-
95
-
96
-
97
-
98
-
99
-
100
-
101
-
102
-
103
-
104
-
105
-
106
-
107
-
108
-
109
-
110
-
111
-
112
-
113
-
114
-
115
-
116
-
117
-
118
-
119
-
120
-
121
-
122
-
123
-
124
-
125
-
126
-
127
-
128
-
129
-
130
-
131
-
132
-
133
-
134
-
135
-
136
-
137
-
138
-
139
-
140
-
141
-
142
-
143
-
144
-
145
-
146
-
147
-
148
-
149
-
150
-
151
-
152
 |
 |
