Panasonic HPX500 Operating Instructions - Page 140
Inspection of the clock, time code, and, user bits, Hold down the DISP/MODE CHK button
 |
UPC - 791871302965
View all Panasonic HPX500 manuals
Add to My Manuals
Save this manual to your list of manuals |
Page 140 highlights
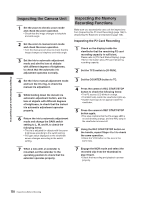
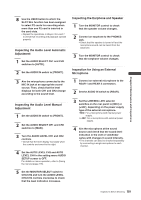
Chapter 9 Maintenance and Inspections Inspection of the clock, time code, and user bits 1 Set the user bits as required. Please refer to [Setting the User Bits] (page 60) for the setting procedures. 2 Set the time code. Please refer to [Setting the Time Code] (page 62) for the setting procedures. 3 Set the TCG switch to [R-RUN]. • Press the COUNTER button to display the time code on the LCD monitor or in the viewfinder. 4 Press the REC START/STOP button. • Check that the counter display number changes as recording progresses. 5 Press the REC START/STOP button again. • Check that recording stops and the counter display number stops changing. 6 Set the TCG switch to [F-RUN]. • Check that the counter display number changes regardless of recording status. 7 Hold down the DISP/MODE CHK button to check the date and time on the LCD monitor or in the viewfinder. • Adjust the date and time setting if the DATE, TIME and time zone is not correctly displayed. For details, see [Setting Date and Time of Internal Clock] (page 28). Note that date and time data set for DATE, TIME, and time zone is recorded in clips, and affects the playback sequence, etc. at the time of thumbnail manipulations. 140 Inspections Before Shooting
-
 1
1 -
2
-
3
-
4
-
5
-
6
-
7
-
8
-
9
-
10
-
11
-
12
-
13
-
14
-
15
-
16
-
17
-
18
-
19
-
20
-
21
-
22
-
23
-
24
-
25
-
26
-
27
-
28
-
29
-
30
-
31
-
32
-
33
-
34
-
35
-
36
-
37
-
38
-
39
-
40
-
41
-
42
-
43
-
44
-
45
-
46
-
47
-
48
-
49
-
50
-
51
-
52
-
53
-
54
-
55
-
56
-
57
-
58
-
59
-
60
-
61
-
62
-
63
-
64
-
65
-
66
-
67
-
68
-
69
-
70
-
71
-
72
-
73
-
74
-
75
-
76
-
77
-
78
-
79
-
80
-
81
-
82
-
83
-
84
-
85
-
86
-
87
-
88
-
89
-
90
-
91
-
92
-
93
-
94
-
95
-
96
-
97
-
98
-
99
-
100
-
101
-
102
-
103
-
104
-
105
-
106
-
107
-
108
-
109
-
110
-
111
-
112
-
113
-
114
-
115
-
116
-
117
-
118
-
119
-
120
-
121
-
122
-
123
-
124
-
125
-
126
-
127
-
128
-
129
-
130
-
131
-
132
-
133
-
134
-
 135
135 -
 136
136 -
 137
137 -
 138
138 -
 139
139 -
 140
140 -
 141
141 -
 142
142 -
 143
143 -
 144
144 -
 145
145 -
146
-
147
-
148
-
149
-
150
-
151
-
152
 |
 |
