Panasonic HPX500 Operating Instructions - Page 139
Inspecting the Audio Level Automatic, Inspecting the Earphone and Speaker
 |
UPC - 791871302965
View all Panasonic HPX500 manuals
Add to My Manuals
Save this manual to your list of manuals |
Page 139 highlights
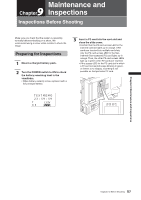
Chapter 9 Maintenance and Inspections 8 Use the USER button to which the SLOT SEL function has been assigned to select P2 cards for recording when more than one P2 card is inserted in the card slots. • Repeat the operations in Steps 4 to 5 and 7 to check that recording and playback operate properly. Inspecting the Audio Level Automatic Adjustment 1 Set the AUDIO SELECT CH1 and CH2 switches to [AUTO]. 2 Set the AUDIO IN switch to [FRONT]. 3 Aim the microphone connected to the MIC IN jack at an appropriate sound source. Then, check that the level displays for both CH1 and CH2 change according to the sound level. Inspecting the Audio Level Manual Adjustment 1 Set the AUDIO IN switch to [FRONT]. 2 Set the AUDIO SELECT CH1 and CH2 switches to [MAN]. 3 Turn the AUDIO LEVEL CH1 and CH2 controls. • Check that the level display increases when the controls are turned to the right. 4 Set the AUTO LEVEL CH3 and AUTO LEVEL CH4 in the setting menu AUDIO SETUP screen to OFF. For details on menu operation, refer to [Using the menus] (page 116). Inspecting the Earphone and Speaker 1 Turn the MONITOR control to check that the speaker volume changes. 2 Connect an earphone to the PHONES jack. • Check that the speaker is turned off and the microphone sound can be heard from the earphone. 3 Turn the MONITOR control to check that the earphone volume changes. Inspection for Using an External Microphone 1 Connect an external microphone to the REAR 1 and REAR 2 connectors. 2 Set the AUDIO IN switch to [REAR]. 3 Set the LINE/MIC/+48V selector switches on the rear panel to [MIC] or [+48V], depending on the power supply type of the external microphone. • MIC: For a microphone with internal power supply. • +48V: For a microphone with external power supply. 4 Aim the microphone at the sound source and check that the sound level indication in the LCD or viewfinder varies with changes in sound intensity. • The channels can also be checked separately by connecting a single microphone to each channel. 5 Set the MONITOR SELECT switch to CH3/CH4 and turn the AUDIO LEVEL CH3/CH4 controls clockwise to check that the level indication increases. 139 Inspections Before Shooting
-
 1
1 -
2
-
3
-
4
-
5
-
6
-
7
-
8
-
9
-
10
-
11
-
12
-
13
-
14
-
15
-
16
-
17
-
18
-
19
-
20
-
21
-
22
-
23
-
24
-
25
-
26
-
27
-
28
-
29
-
30
-
31
-
32
-
33
-
34
-
35
-
36
-
37
-
38
-
39
-
40
-
41
-
42
-
43
-
44
-
45
-
46
-
47
-
48
-
49
-
50
-
51
-
52
-
53
-
54
-
55
-
56
-
57
-
58
-
59
-
60
-
61
-
62
-
63
-
64
-
65
-
66
-
67
-
68
-
69
-
70
-
71
-
72
-
73
-
74
-
75
-
76
-
77
-
78
-
79
-
80
-
81
-
82
-
83
-
84
-
85
-
86
-
87
-
88
-
89
-
90
-
91
-
92
-
93
-
94
-
95
-
96
-
97
-
98
-
99
-
100
-
101
-
102
-
103
-
104
-
105
-
106
-
107
-
108
-
109
-
110
-
111
-
112
-
113
-
114
-
115
-
116
-
117
-
118
-
119
-
120
-
121
-
122
-
123
-
124
-
125
-
126
-
127
-
128
-
129
-
130
-
131
-
132
-
133
-
 134
134 -
 135
135 -
 136
136 -
 137
137 -
 138
138 -
 139
139 -
 140
140 -
 141
141 -
 142
142 -
 143
143 -
 144
144 -
145
-
146
-
147
-
148
-
149
-
150
-
151
-
152
 |
 |
