Samsung SGH-ZX20 User Manual (user Manual) (ver.f1) (English) - Page 79
Access Name
 |
View all Samsung SGH-ZX20 manuals
Add to My Manuals
Save this manual to your list of manuals |
Page 79 highlights
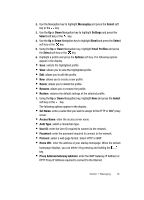
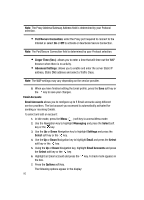
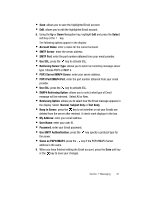
2. Use the Navigation key to highlight Messaging and press the Select soft key or the key. 3. Use the Up or Down Navigation key to highlight Settings and press the Select soft key or the key. 4. Use the Up or Down Navigation key to highlight Email and press the Select soft key or the key. 5. Using the Up or Down Navigation key, highlight Email Profiles and press the Select soft key or the key. 6. Highlight a profile and press the Options soft key. The following options appear in the display. • Save: selects the highlighted profile. • View: allows you to view the highlighted profile. • Edit: allows you to edit the profile. • New: allows you to create a new profile. • Delete: allows you to delete the profile. • Rename: allows you to rename the profile. • Restore: restores the default settings of the selected profile. 7. Using the Up or Down Navigation key, highlight New and press the Select soft key or the key. The following options appear in the display: • Set Name: enter a name that you wish to assign to the HTTP or WAP proxy server. • Access Name: enter the access server name. • Auth Type: select a connection type. • User ID: enter the User ID required to connect to the network. • Password: enter the password required to connect to the network. • Protocol: select a web page format. Select HTTP or WAP. • Home URL: enter the address of your startup homepage. When the default homepage displays, you can delete it by pressing and holding the key. • Proxy Address/Gateway Address: enter the WAP Gateway IP Address or HTTP Proxy IP Address required to connect to the Internet. Section 7: Messaging 79
-
 1
1 -
2
-
3
-
4
-
5
-
6
-
7
-
8
-
9
-
10
-
11
-
12
-
13
-
14
-
15
-
16
-
17
-
18
-
19
-
20
-
21
-
22
-
23
-
24
-
25
-
26
-
27
-
28
-
29
-
30
-
31
-
32
-
33
-
34
-
35
-
36
-
37
-
38
-
39
-
40
-
41
-
42
-
43
-
44
-
45
-
46
-
47
-
48
-
49
-
50
-
51
-
52
-
53
-
54
-
55
-
56
-
57
-
58
-
59
-
60
-
61
-
62
-
63
-
64
-
65
-
66
-
67
-
68
-
69
-
70
-
71
-
72
-
73
-
 74
74 -
 75
75 -
 76
76 -
 77
77 -
 78
78 -
 79
79 -
 80
80 -
 81
81 -
 82
82 -
 83
83 -
 84
84 -
85
-
86
-
87
-
88
-
89
-
90
-
91
-
92
-
93
-
94
-
95
-
96
-
97
-
98
-
99
-
100
-
101
-
102
-
103
-
104
-
105
-
106
-
107
-
108
-
109
-
110
-
111
-
112
-
113
-
114
-
115
-
116
-
117
-
118
-
119
-
120
-
121
-
122
-
123
-
124
-
125
-
126
-
127
-
128
-
129
-
130
-
131
-
132
-
133
-
134
-
135
-
136
-
137
-
138
-
139
-
140
-
141
-
142
-
143
-
144
-
145
-
146
-
147
-
148
-
149
-
150
-
151
-
152
-
153
-
154
-
155
-
156
-
157
-
158
-
159
-
160
-
161
-
162
-
163
-
164
-
165
-
166
-
167
-
168
-
169
-
170
-
171
-
172
-
173
-
174
-
175
-
176
-
177
-
178
-
179
 |
 |